Namcorules (talk | contribs) No edit summary |
Trig Jegman (talk | contribs) mNo edit summary |
||
| (33 intermediate revisions by 6 users not shown) | |||
| Line 1: | Line 1: | ||
{{Header Nav|game=Genpei | {{Header Nav|game=Genpei Touma Den}} | ||
{{floatingtoc|limit=2}} | |||
{{-}} | |||
==Map Guide== | |||
[[File:Genpei Overall Map.png|center]] | |||
Kagekiyo will travel through ancient Japan, when the provinces were named by the [[wp:Gokishichid%C5%8D|Gokishichidou]] rule. Guide of the map: | |||
*Stages with blue circle are Big Mode stages. | |||
*Stages with green circle are Over Mode stages. | |||
*Stages in yellow are bonus stages. | |||
*Stages in purple are gag stages filled with staff memo everywhere. | |||
*Other stages are standard Small Mode stages. | |||
*Red arrows indicate the shortest path to beat the game. | |||
This walkthrough will be divided into three parts: | |||
*Part A: From {{nihongo|Hell|地獄}} to {{nihongo|Yamashiro|山城}}. | |||
*Part B: From {{nihongo|Kyoto|京都}} to {{nihongo|Suruga|駿河}}. | |||
*Part C: From {{nihongo|Musashi|武蔵}} to {{nihongo|Kamakura|鎌倉}}. | |||
Kagekiyo will reach next stage by entering a torii in the end of stage. Sometimes a stage may have more than one toriis. | |||
{{-}} | |||
==Bonus Stage (Small Mode)== | |||
[[File:GT Bonus Stage.png|frame|left|Aim for the useful orbs!]] | |||
Some of the stages are bonus stages without enemies. You will see Amaterasu the Sun Goddess flying around at the top of the screen, raining powerup orbs. Collect as many as you can before the music fades out. Part of the ground will be covered with [[wp:Iris sibirica|iris flowers]], but collecting them has no effect. You will proceed to next stage afterwards. | |||
{{-}} | |||
==Gag Stage (Small Mode)== | |||
[[File:GT Gag Stage.png|frame|right|Staff: "Welcome to the gag stage."]] | |||
Some stages are filled with staff talks. You will reveal these talks at fixed location, but with random talking people. | |||
{{-}} | |||
==The Pit (黄泉, Over Mode)== | |||
[[File:GT Yomi Stage A.png|frame|left|Andabaa: "Sometimes money can solve hellish problems."]] | |||
[[File:GT Yomi Stage B.png|frame|right|Enma: "Choose your fate..."]] | |||
Anytime Kagekiyo falls off a Small Mode stage, he will have to clear this stage, filled with skull dogs, skull spiders, and Jigokusha generators, with 10-22 life left. In the middle of stage there is sometimes a blood pool, where Kagekiyo can escape to Kyoto with all Zeni lost, if he has at least 70. At the end of stage, Emma-Ou will show Kagekiyo with eight boxes. By opening a box with "生", Kagekiyo will return to the stage he has fallen, or Kyoto, take the earlier one. If he hits a box of "死", he is dead. There are only four chances to resurrect in this method, and the fifth time Kagekiyo will not be able to escape from death. | |||
{{-}} | |||
==Timeout== | |||
If Kagekiyo remains upon any Small Mode stage for too long, Yoritomo will rise up in the background and try to flatten him with a shaku which can cause significant damage. If he wastes too much time on any Big Mode or Over Mode stage however, birds will slowly appear on the screen and start flying around above him. | |||
{{-}} | |||
==General Tips== | |||
*You cannot jump from a falling platform. | |||
*Do not waste your sword points. Only attack hard enemies when necessary or with a scroll. | |||
*Always collect some money in order to buy swords and health recovery, or even an escape from the Pit. | |||
*Not-opened boxes and enemy generators can be used as jumping platforms. | |||
*In the bonus stage, aim for sword points first. | |||
{{Footer Nav|game=Genpei Touma Den|prevpage=Gameplay|nextpage=Part A}} | |||
{{Footer Nav|game=Genpei | |||
Latest revision as of 16:34, 29 May 2022
Map Guide[edit]
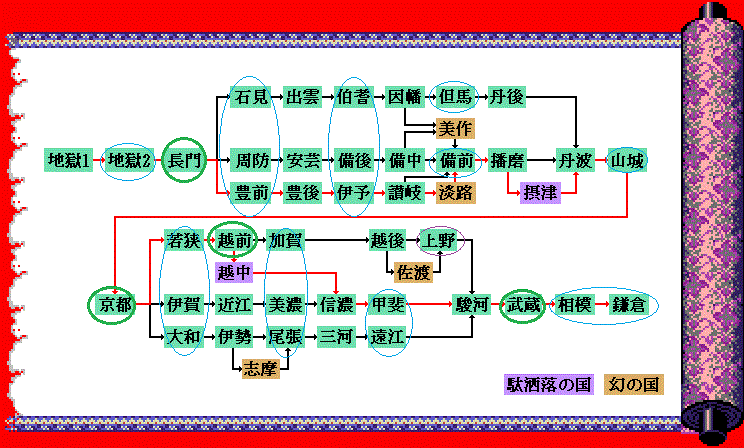
Kagekiyo will travel through ancient Japan, when the provinces were named by the Gokishichidou rule. Guide of the map:
- Stages with blue circle are Big Mode stages.
- Stages with green circle are Over Mode stages.
- Stages in yellow are bonus stages.
- Stages in purple are gag stages filled with staff memo everywhere.
- Other stages are standard Small Mode stages.
- Red arrows indicate the shortest path to beat the game.
This walkthrough will be divided into three parts:
- Part A: From Hell (地獄?) to Yamashiro (山城?).
- Part B: From Kyoto (京都?) to Suruga (駿河?).
- Part C: From Musashi (武蔵?) to Kamakura (鎌倉?).
Kagekiyo will reach next stage by entering a torii in the end of stage. Sometimes a stage may have more than one toriis.
Bonus Stage (Small Mode)[edit]
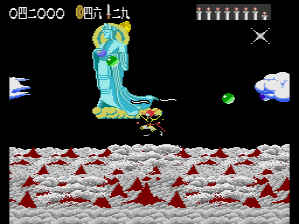
Some of the stages are bonus stages without enemies. You will see Amaterasu the Sun Goddess flying around at the top of the screen, raining powerup orbs. Collect as many as you can before the music fades out. Part of the ground will be covered with iris flowers, but collecting them has no effect. You will proceed to next stage afterwards.
Gag Stage (Small Mode)[edit]
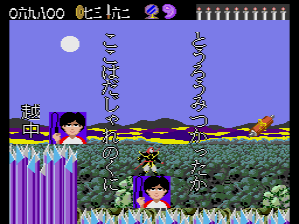
Some stages are filled with staff talks. You will reveal these talks at fixed location, but with random talking people.
The Pit (黄泉, Over Mode)[edit]
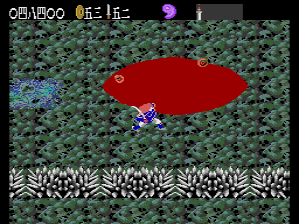
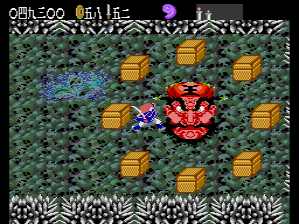
Anytime Kagekiyo falls off a Small Mode stage, he will have to clear this stage, filled with skull dogs, skull spiders, and Jigokusha generators, with 10-22 life left. In the middle of stage there is sometimes a blood pool, where Kagekiyo can escape to Kyoto with all Zeni lost, if he has at least 70. At the end of stage, Emma-Ou will show Kagekiyo with eight boxes. By opening a box with "生", Kagekiyo will return to the stage he has fallen, or Kyoto, take the earlier one. If he hits a box of "死", he is dead. There are only four chances to resurrect in this method, and the fifth time Kagekiyo will not be able to escape from death.
Timeout[edit]
If Kagekiyo remains upon any Small Mode stage for too long, Yoritomo will rise up in the background and try to flatten him with a shaku which can cause significant damage. If he wastes too much time on any Big Mode or Over Mode stage however, birds will slowly appear on the screen and start flying around above him.
General Tips[edit]
- You cannot jump from a falling platform.
- Do not waste your sword points. Only attack hard enemies when necessary or with a scroll.
- Always collect some money in order to buy swords and health recovery, or even an escape from the Pit.
- Not-opened boxes and enemy generators can be used as jumping platforms.
- In the bonus stage, aim for sword points first.