(cleanup) |
m (rm {{~}}) |
||
| (12 intermediate revisions by 6 users not shown) | |||
| Line 1: | Line 1: | ||
{{Header Nav|game=Mega Man}} | {{Header Nav|game=Mega Man}} | ||
[[File:Mega Man 1 Dr Wily1 logo.png|right]] | |||
With all six Robot Masters defeated, it's time to take the fight to Dr. Wily himself. It won't be as easy as walking up to his fortress and taking him on however. You'll have to scale the fortress over four separate stages. Later Mega Man's will go on to display an image of the fortress with a map over-layed in front, but for the very first Mega Man adventure, you'll have to do without that. In the first stage, you'll have to reach the entrance and take on the massive guard that Dr. Wily has created to deal with intruders. You will absolutely need the Magnet Beam to reach the guard, so return to Elec Man's stage if you haven't collected it already. | |||
Although the introduction says there is a clear points reward for beating this level, the reward is not acquired until the [[../Wily Fortress 4|final level]] is completed. | |||
{{-}} | |||
== Stage == | |||
[[File:Mega Man 1 Dr Wily1 map1.png|center]] | |||
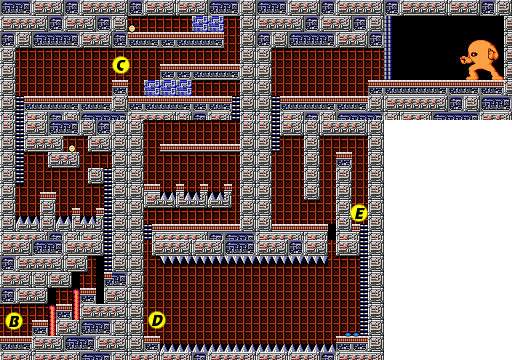
* '''A''': The road to Dr. Wily's fortress contains only three enemies… three ''very'' large and dangerous enemies. You'll have to take on three Big Eyes, one after another. The first two start off on ground level with you, while the third one starts slightly higher up on some steps. There are a couple of strategies you can employ here. One is to attempt to avoid taking damage by trying to run beneath them when they jump up high. The other is to try to destroy them before they get too far. The problem with that approach is that you may lose so much ground that when you run to the right, the Big Eye will just return. A third choice is a little like the first one, only you use the Ice Slasher to freeze the Big Eye in mid-air. Wait for them to jump high enough to run below them, and nail them with the ice weapon, then run past them, but remember that they can still hurt you if you touch them even while frozen. When you pass the third Big Eye, a set of blocks will be in the way. Pick them up and throw them away with the Super Arm, or just blast them out of the way with the Thunder Beam. | |||
[[File:Mega Man 1 Dr Wily1 map2.png|center]] | |||
* '''B''': While it's technically possible to jump from one step to the other, it's incredibly difficult. You need to be standing over the edge where the flame pillars rise in order to jump up without hitting the ceiling. You can make this section much easier for yourself by using the Ice Slasher to freeze the flame pillars in position and use them to reach the next step. You must remember, however, to freeze them when they are only one or two blocks high since three or four blocks high will prevent you from advancing. Try hitting them when they are on their way down. | |||
* '''C''': As you move through here, Kamadomas will leap about and be a nuisance. You will see a large health capsule above, but it takes a little work to get to. Rather than go to all that effort, you can collect that much health and more simply by running left and right and destroying the Kamadomas that reappear. When you've collected enough energy, pick up and throw the bottom blocks with the Super Arm, or blast them away with the Thunder Beam. | |||
* '''D''': Just like Ice Man's stage, you must cross a section with four Foot Holders hovering over a bed of spikes. And just as you might have in Ice Man's stage, you can use the Magnet Beam to make life much easier and bypass a good portion of the Foot Holders. Hold the fire button down to make a long platform, and begin creating the next one while you run along the first, but don't jump too high. Two small weapon capsules can help you refuel the beam when you reach the other side. | |||
* '''E''': In order to reach the ladder in the upper left corner, you absolutely must have the Magnet Beam. There is no other tool which will help you. If you came this far without it, you'll have to lose all of your lives and continue so that you can return to Elec Man's stage. To get through this room, create small platforms on alternating sides of the right shaft. Once you reach the top, hop over to the left, and create two or three more platform until you can jump up and reach the ladder. If you run out of Magnet Beam energy, you can climb up and down the ladder on the left to make the two small weapon capsules reappear. Collect them until you have enough energy to make it through the room. | |||
== Boss: Yellow Devil == | |||
[[File:Mega Man boss yellow devil.png|left|thumb|Yellow Devil]] [[File:Mega Man 1 battle yellow devil.png|right]] | |||
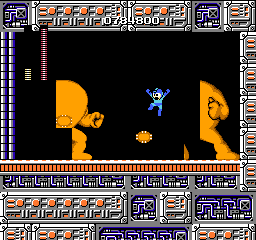
When you make it to the end of this stage, you'll enter an empty room and the door will seal. As soon as you get the chance, run to the right. Shortly after that, blobs of matter will come flying from the left side of the room and assemble on the right. When fully assembled, they will construct the massive enemy known as the Yellow Devil. A single eye will appear somewhere on his body, and it will shoot a bullet at you. Then the eye will close, and the Yellow Devil will begin to disassemble! Each piece that made up his body will start flying to the opposite side of the room and reassemble. He will open his eye, shoot at you, and repeat the process until one of you are dead. The only opportunity that you have to harm the Yellow Devil is when his eye is open. You'll likely only have one opportunity to shoot at him. Expert players can get two shots in if they are fast enough, although they'll likely take damage in the process. Some experimentation with different weapons will teach you that the Thunder Beam is the most damaging weapon against the Yellow Devil, taking only seven shots to destroy him. Not only is it the strongest weapon to use, it also has a wide area of effect, so you don't need to be very accurate when you fire. If you're out of Thunder Beam, the Rolling Cutter, Fire Storm, and even the regular Mega Buster will destroy him in fourteen shots. Of course, if you know about a special [[../Cheats|cheat trick]], you can destroy him with fewer shots. | |||
The most important thing to know in order to survive this fight is that the order in which the Yellow Devil's body pieces disassemble and reassemble never changes. Once you learn the pattern of the blocks, you can predict the moments you need to jump. You only need to jump over the two lowest level of pieces, all of the rest will fly over your head. The first three jumps are over single pieces (high, low, high), but the fourth time you have to jump, you should attempt to jump over the next two pieces (low, high) simultaneously by leaping forward. After that, two more leaps (high, low) are needed before the Yellow Devil is fully assembled and vulnerable to attack. | |||
{{Footer Nav|game=Mega Man|prevpage=Ice Man|nextpage=Wily Fortress 2}} | |||
{{Footer Nav|game=Mega Man|prevpage= | |||
Latest revision as of 05:49, 13 January 2022

With all six Robot Masters defeated, it's time to take the fight to Dr. Wily himself. It won't be as easy as walking up to his fortress and taking him on however. You'll have to scale the fortress over four separate stages. Later Mega Man's will go on to display an image of the fortress with a map over-layed in front, but for the very first Mega Man adventure, you'll have to do without that. In the first stage, you'll have to reach the entrance and take on the massive guard that Dr. Wily has created to deal with intruders. You will absolutely need the Magnet Beam to reach the guard, so return to Elec Man's stage if you haven't collected it already.
Although the introduction says there is a clear points reward for beating this level, the reward is not acquired until the final level is completed.
Stage[edit]

- A: The road to Dr. Wily's fortress contains only three enemies… three very large and dangerous enemies. You'll have to take on three Big Eyes, one after another. The first two start off on ground level with you, while the third one starts slightly higher up on some steps. There are a couple of strategies you can employ here. One is to attempt to avoid taking damage by trying to run beneath them when they jump up high. The other is to try to destroy them before they get too far. The problem with that approach is that you may lose so much ground that when you run to the right, the Big Eye will just return. A third choice is a little like the first one, only you use the Ice Slasher to freeze the Big Eye in mid-air. Wait for them to jump high enough to run below them, and nail them with the ice weapon, then run past them, but remember that they can still hurt you if you touch them even while frozen. When you pass the third Big Eye, a set of blocks will be in the way. Pick them up and throw them away with the Super Arm, or just blast them out of the way with the Thunder Beam.

- B: While it's technically possible to jump from one step to the other, it's incredibly difficult. You need to be standing over the edge where the flame pillars rise in order to jump up without hitting the ceiling. You can make this section much easier for yourself by using the Ice Slasher to freeze the flame pillars in position and use them to reach the next step. You must remember, however, to freeze them when they are only one or two blocks high since three or four blocks high will prevent you from advancing. Try hitting them when they are on their way down.
- C: As you move through here, Kamadomas will leap about and be a nuisance. You will see a large health capsule above, but it takes a little work to get to. Rather than go to all that effort, you can collect that much health and more simply by running left and right and destroying the Kamadomas that reappear. When you've collected enough energy, pick up and throw the bottom blocks with the Super Arm, or blast them away with the Thunder Beam.
- D: Just like Ice Man's stage, you must cross a section with four Foot Holders hovering over a bed of spikes. And just as you might have in Ice Man's stage, you can use the Magnet Beam to make life much easier and bypass a good portion of the Foot Holders. Hold the fire button down to make a long platform, and begin creating the next one while you run along the first, but don't jump too high. Two small weapon capsules can help you refuel the beam when you reach the other side.
- E: In order to reach the ladder in the upper left corner, you absolutely must have the Magnet Beam. There is no other tool which will help you. If you came this far without it, you'll have to lose all of your lives and continue so that you can return to Elec Man's stage. To get through this room, create small platforms on alternating sides of the right shaft. Once you reach the top, hop over to the left, and create two or three more platform until you can jump up and reach the ladder. If you run out of Magnet Beam energy, you can climb up and down the ladder on the left to make the two small weapon capsules reappear. Collect them until you have enough energy to make it through the room.
Boss: Yellow Devil[edit]


When you make it to the end of this stage, you'll enter an empty room and the door will seal. As soon as you get the chance, run to the right. Shortly after that, blobs of matter will come flying from the left side of the room and assemble on the right. When fully assembled, they will construct the massive enemy known as the Yellow Devil. A single eye will appear somewhere on his body, and it will shoot a bullet at you. Then the eye will close, and the Yellow Devil will begin to disassemble! Each piece that made up his body will start flying to the opposite side of the room and reassemble. He will open his eye, shoot at you, and repeat the process until one of you are dead. The only opportunity that you have to harm the Yellow Devil is when his eye is open. You'll likely only have one opportunity to shoot at him. Expert players can get two shots in if they are fast enough, although they'll likely take damage in the process. Some experimentation with different weapons will teach you that the Thunder Beam is the most damaging weapon against the Yellow Devil, taking only seven shots to destroy him. Not only is it the strongest weapon to use, it also has a wide area of effect, so you don't need to be very accurate when you fire. If you're out of Thunder Beam, the Rolling Cutter, Fire Storm, and even the regular Mega Buster will destroy him in fourteen shots. Of course, if you know about a special cheat trick, you can destroy him with fewer shots.
The most important thing to know in order to survive this fight is that the order in which the Yellow Devil's body pieces disassemble and reassemble never changes. Once you learn the pattern of the blocks, you can predict the moments you need to jump. You only need to jump over the two lowest level of pieces, all of the rest will fly over your head. The first three jumps are over single pieces (high, low, high), but the fourth time you have to jump, you should attempt to jump over the next two pieces (low, high) simultaneously by leaping forward. After that, two more leaps (high, low) are needed before the Yellow Devil is fully assembled and vulnerable to attack.