(2 intermediate revisions by one other user not shown)
Line 1:
Line 1:
{{Header Nav|game=Milon's Secret Castle}}
{{Header Nav|game=Milon's Secret Castle}}
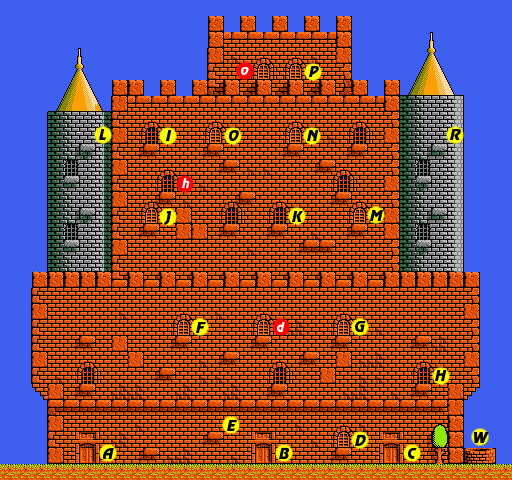
<center>[[Image:MSC_Map_Castle.png]]</center>
[[File:MSC_Map_Castle.png|center]]
The following is a set of steps that you can follow in order to complete the game. Although this is the recommended order of steps, it is not the only order possible.
The following is a set of steps that you can follow in order to complete the game. Although this is the recommended order of steps, it is not the only order possible.
== Floor 1 ==
== Floor 1 ==
You begin the game on the ground, to the left of door A.
You begin the game on the ground, to the left of door A.
* Enter [[Milon's Secret Castle/Floor 1|Room A]]:
* Enter [[Milon's Secret Castle/Floor 1#Room A|Room A]]:
** The coins in the upper left corner will be inaccessible.
** The coins in the upper left corner will be inaccessible.
** Obtain the honeycomb, and find the music box.
** Obtain the honeycomb, and find the music box.
* Enter [[Milon's Secret Castle/Floor 1|Room B]]:
* Enter [[Milon's Secret Castle/Floor 1#Room B|Room B]]:
** Purchase the Medicine for $5.
** Purchase the Medicine for $5.
* Enter [[Milon's Secret Castle/Floor 1|Room C]]:
* Enter [[Milon's Secret Castle/Floor 1#Room C|Room C]]:
** Purchase the shoes from the shop for $10.
** Purchase the shoes from the shop for $10.
** Obtain the honeycomb, and find the music box.
** Obtain the honeycomb, and find the music box.
* Enter [[Milon's Secret Castle/Floor 1|Room D]]:
* Enter [[Milon's Secret Castle/Floor 1#Room D|Room D]]:
** If you do not have the shoes, the boss Homa will not appear.
** If you do not have the shoes, the boss Homa will not appear.
** Defeat Homa and collect the first crystal.
** Defeat Homa and collect the first crystal.
== Floor 2 ==
== Floor 2 ==
After defeating Homa, you will pass through the gate, and exit out of door ''d'' on the second floor.
After defeating Homa, you will pass through the gate, and exit out of door ''d'' on the second floor.
* Enter [[Milon's Secret Castle/Floor 2|Room F]]:
* Enter [[Milon's Secret Castle/Floor 2#Room F|Room F]]:
** Purchase the lamp from the shop for $15.
** Purchase the lamp from the shop for $15.
** Obtain the honeycomb, and find the music box.
** Obtain the honeycomb, and find the music box.
* Enter [[Milon's Secret Castle/Floor 2|Room G]]:
* Enter [[Milon's Secret Castle/Floor 2#Room G|Room G]]:
** Purchase the vest from the shop for $25.
** Purchase the vest from the shop for $25.
** Obtain the honeycomb, and find the music box.
** Obtain the honeycomb, and find the music box.
* Enter the [[Milon's Secret Castle/Floor 2|well]]:
* Enter the [[Milon's Secret Castle/Floor 2#Well|well]]:
** You will be able to see where to go if you have the lamp.
** You will be able to see where to go if you have the lamp.
** Break the left wall to access the underground prison.
** Break the left wall to access the underground prison.
** Obtain the honeycomb in the underground prison.
** Obtain the honeycomb in the underground prison.
** Enter the [[Milon's Secret Castle/Floor 2|room of fire]]:
** Enter the [[Milon's Secret Castle/Floor 2#Room of Fire|room of fire]]:
*** If you have a vest, you will take less damage from the flames.
*** If you have a vest, you will take less damage from the flames.
*** Obtain the honeycomb.
*** Obtain the honeycomb.
Line 34:
Line 34:
*** Defeat Doma and collect the second crystal.
*** Defeat Doma and collect the second crystal.
*** Collect the hammer from the shop.
*** Collect the hammer from the shop.
* Enter [[Milon's Secret Castle/Floor 1|Room E]]:
* Enter [[Milon's Secret Castle/Floor 1#Room E|Room E]]:
** Break the wall with the hammer to enter this room.
** Break the wall with the hammer to enter this room.
** Collect the saw from the shop.
** Collect the saw from the shop.
* Enter [[Milon's Secret Castle/Floor 2|Room H]]:
* Enter [[Milon's Secret Castle/Floor 2#Room H|Room H]]:
** Use the saw on the window to enter this room.
** Use the saw on the window to enter this room.
** Defeat Barukama and collect the third crystal.
** Defeat Barukama and collect the third crystal.
Line 43:
Line 43:
== Floor 3 ==
== Floor 3 ==
After defeating Barukuma, you will pass through the gate, and exit out of door ''h'' on the third floor.
After defeating Barukuma, you will pass through the gate, and exit out of door ''h'' on the third floor.
* Enter [[Milon's Secret Castle/Floor 3|Room I]]:
* Enter [[Milon's Secret Castle/Floor 3#Room I|Room I]]:
** Use the saw on the window to enter this room.
** Use the saw on the window to enter this room.
** You will find yourself in the upper left corner of [[Milon's Secret Castle/Floor 1|Room A]].
** You will find yourself in the upper left corner of [[Milon's Secret Castle/Floor 1#Room A|Room A]].
** Collect the money and purchase the Super Shoes from the shop for $60.
** Collect the money and purchase the Super Shoes from the shop for $60.
* Enter [[Milon's Secret Castle/Floor 3|Room J]]:
* Enter [[Milon's Secret Castle/Floor 3#Room J|Room J]]:
** Use a spring to enter the shop and purchase the feather for $35.
** Use a spring to enter the shop and purchase the feather for $35.
** Obtain the honeycomb, and find the music box.
** Obtain the honeycomb, and find the music box.
* Enter [[Milon's Secret Castle/Floor 3|Room M]]:
* Enter [[Milon's Secret Castle/Floor 3#Room M|Room M]]:
** Purchase the blimp from the shop for $40.
** Purchase the blimp from the shop for $40.
** Many coins in this room will reappear every time you return.
** Many coins in this room will reappear every time you return.
** Find the music box.
** Find the music box.
* Enter [[Milon's Secret Castle/Floor 3|Room N]]:
* Enter [[Milon's Secret Castle/Floor 3#Room N|Room N]]:
** The feather is required to ride the elevator.
** The feather is required to ride the elevator.
** Purchase Excalibur from the shop for $50.
** Purchase Excalibur from the shop for $50.
** Obtain the honeycomb, and find the music box.
** Obtain the honeycomb, and find the music box.
* Enter [[Milon's Secret Castle/Floor 3|Room R]]:
* Enter [[Milon's Secret Castle/Floor 3#Room R|Room R]]:
** Break the wall at the top of the right tower with the hammer to enter this room.
** Break the wall at the top of the right tower with the hammer to enter this room.
** Obtain the honeycomb.
** Obtain the honeycomb.
** Defeat the Red Barukama and collect the fourth crystal.
** Defeat the Red Barukama and collect the fourth crystal.
** Collect the Canteen from the shop.
** Collect the Canteen from the shop.
* Enter [[Milon's Secret Castle/Floor 3|Room K]]:
* Enter [[Milon's Secret Castle/Floor 3#Room K|Room K]]:
** Use the saw on the window to enter this room.
** Use the saw on the window to enter this room.
** Purchase the paint from the shop for $40.
** Purchase the paint from the shop for $40.
* Enter [[Milon's Secret Castle/Floor 3|Room L]]:
* Enter [[Milon's Secret Castle/Floor 3#Room L|Room L]]:
** Break the wall at the top of the left tower with the hammer to enter this room.
** Break the wall at the top of the left tower with the hammer to enter this room.
** Proceed through the room until you fall through the trap floor.
** Proceed through the room until you fall through the trap floor.
Line 74:
Line 74:
*** You can see the invisible blocks if you purchased the paint and hit them with your bubbles.
*** You can see the invisible blocks if you purchased the paint and hit them with your bubbles.
*** Defeat the fake princess Crow, and obtain the Crown.
*** Defeat the fake princess Crow, and obtain the Crown.
* Enter [[Milon's Secret Castle/Floor 3|Room M]]:
* Enter [[Milon's Secret Castle/Floor 3#Room M|Room M]]:
** Jump on the fireplace in the lower right corner and the Fire will appear.
** Jump on the fireplace in the lower right corner and the Fire will appear.
** Push the one unbreakable block on the fireplace over to get inside and drop down.
** Push the one unbreakable block on the fireplace over to get inside and drop down.
Line 81:
Line 81:
*** You can see the invisible blocks if you purchased the paint and hit them with your bubbles.
*** You can see the invisible blocks if you purchased the paint and hit them with your bubbles.
*** Defeat the fake princess Crow, and obtain the Cane.
*** Defeat the fake princess Crow, and obtain the Cane.
* Enter [[Milon's Secret Castle/Floor 3|Room O]]:
* Enter [[Milon's Secret Castle/Floor 3#Room O|Room O]]:
** If you do not have the crown and the cane, the boss Kama will not appear.
** If you do not have the crown and the cane, the boss Kama will not appear.
** Defeat Kama and collect the seventh crystal.
** Defeat Kama and collect the seventh crystal.
== Floor 4 ==
== Floor 4 ==
After defeating Kama, you will pass through the gate, and exit out of door ''o'' on the fourth floor.
After defeating Kama, you will pass through the gate, and exit out of door ''o'' on the fourth floor.
* Enter [[Milon's Secret Castle/Floor 4|Room P]]:
* Enter [[Milon's Secret Castle/Floor 4#Room P|Room P]]:
** You cannot enter room P unless you possess all seven crystals.
** You cannot enter room P unless you possess all seven crystals.
** The real Maharito exists in only one of the four differently colored rooms.
** The real Maharito exists in only one of the four differently colored rooms.
Line 92:
Line 92:
** The game ends when you defeat the real Maharito.
** The game ends when you defeat the real Maharito.
The following is a set of steps that you can follow in order to complete the game. Although this is the recommended order of steps, it is not the only order possible.