Jump to navigation
Jump to search
(→Dungeon walkthrough: prerequisites) |
|||
| (One intermediate revision by one other user not shown) | |||
| Line 1: | Line 1: | ||
{{Header Nav|game=The Legend of Zelda}} | {{Header Nav|game=The Legend of Zelda}} | ||
<center>[[ | {{floatingtoc}} | ||
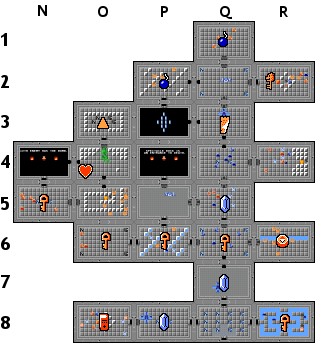
<center>[[File:LOZ_Dungeon_8.png]]</center> | |||
== Objectives == | == Objectives == | ||
* Obtain the Magic | * Obtain the {{im/loz|Item|Book of Magic}}. | ||
* Obtain the Magic Key. | * Obtain the {{im/loz|Item|Magic Key}}. | ||
* Defeat the four headed Gleeok. | * Defeat the four headed {{im/loz|Boss|Gleeok}}. | ||
* Obtain a Heart Container. | * Obtain a {{im/loz|Item|Heart Container}}. | ||
* Obtain the final Triforce | * Obtain the final {{im/loz|Item|Piece of Triforce}}. | ||
== Walkthrough == | == Walkthrough == | ||
=== | === Prerequisites === | ||
* {{im/loz|Item|Red Candle}} or {{im/loz|Item|Blue Candle}}. | |||
=== Dungeon | * {{im/loz|Item|Bomb}}. | ||
=== Dungeon walkthrough === | |||
#To enter this dungeon, you must burn down the lone tree that blocks the pathway in the woods at '''B-4''' in [[The Legend of Zelda/Overworld/Hyrule 2|section two]]. | |||
#From the entrance, head right and collect a key. | |||
#Return to the entrance and head left. Defeat the {{im/loz|Boss|Manhandla}} to open the door to the left. Enter that room and defeat all of the {{im/loz|Enemy|Darknuts}} and {{im/loz|Enemy|Gibdos}}. When the room is cleared, push the left block aside to enter the stairwell and find the {{im/loz|Item|Book of Magic}}. | |||
#Return to the entrance, head up, defeat the {{im/loz|Boss|Manhandla}}, and bomb the top wall in order to proceed through the dungeon. | |||
#In the next room, and the two rooms to its left, you can obtain keys. The room to the right contains the {{im/loz|Item|Compass}}. | |||
#Two rooms left of the compass room and one up, there is a blue {{im/loz|Boss|Gohma}} which requires three arrows in its eye to kill. If you defeat it, the closed door above will open and you can receive a hint from a man regarding Spectacle Rock. | |||
#Continue up through the dungeon until you encounter a room full of {{im/loz|Enemy|Blue Darknuts}}. When it is safe to do so, bomb the top wall. Go through the passage and you will have to fight another Manhandla who rewards you with the {{im/loz|Item|Map}}. | |||
#Above the map room is another blue Gohma. You can bomb the left wall, or enter the top door, but you should enter the right door and defeat the Darknuts and Pols Voices inside. Push the leftmost block to descend the stairs and find the {{im/loz|Item|Magic Key}}. | |||
#Return to the room full of blue Darknuts, and defeat them all so that you can enter the right room. Enter it and head down the stairs to enter an underground passage which leads to the west side of the dungeon. You can bomb the top wall here for a shortcut to the dungeon boss. | |||
#Otherwise, head left and fight the red Darknuts, then head up again for a cryptic message about bombs from a man. Finally, head right to encounter the boss. | |||
== Boss == | == Boss == | ||
*The boss of the dungeon is a four headed [[The Legend of Zelda/Bosses#Gleeok|Gleeok]]. Other than the number of heads, the strategy to defeat this Gleeok is no different. Keep stabbing the attached heads until every one is disconnected. | *The boss of the dungeon is a four headed [[The Legend of Zelda/Bosses#Gleeok|Gleeok]]. Other than the number of heads, the strategy to defeat this Gleeok is no different. Keep stabbing the attached heads until every one is disconnected. | ||
*Defeat it to earn a | *Defeat it to earn a {{im/loz|Item|Heart Container}}. Continue to the room above and obtain the final {{im/loz|Item|Piece of Triforce}}. | ||
== Resupply == | == Resupply == | ||
* A cheap | * A cheap {{im/loz|Item|Shield}} is two screens north. | ||
* Bombs are two screens east. | * {{im/loz|Item|Bombs}} are two screens east. | ||
{{Footer Nav|game=The Legend of Zelda|prevpage=Underworld/Quest 1/Dungeon 7|prevname=Dungeon 7|nextpage=Underworld/Quest 1/Dungeon 9|nextname=Dungeon 9}} | {{Footer Nav|game=The Legend of Zelda|prevpage=Underworld/Quest 1/Dungeon 7|prevname=Dungeon 7|nextpage=Underworld/Quest 1/Dungeon 9|nextname=Dungeon 9}} | ||
Latest revision as of 05:16, 30 December 2017

Objectives[edit]
- Obtain the Book of Magic
 .
. - Obtain the Magic Key
 .
. - Defeat the four headed Gleeok
 .
. - Obtain a Heart Container
 .
. - Obtain the final Piece of Triforce
 .
.
Walkthrough[edit]
Prerequisites[edit]
- Red Candle
 or Blue Candle
  .
. - Bomb
 .
.
Dungeon walkthrough[edit]
- To enter this dungeon, you must burn down the lone tree that blocks the pathway in the woods at B-4 in section two.
- From the entrance, head right and collect a key.
- Return to the entrance and head left. Defeat the Manhandla
 to open the door to the left. Enter that room and defeat all of the Darknuts
  and Gibdos
  . When the room is cleared, push the left block aside to enter the stairwell and find the Book of Magic .
 - Return to the entrance, head up, defeat the Manhandla , and bomb the top wall in order to proceed through the dungeon.
- In the next room, and the two rooms to its left, you can obtain keys. The room to the right contains the Compass
 .
. - Two rooms left of the compass room and one up, there is a blue Gohma
 which requires three arrows in its eye to kill. If you defeat it, the closed door above will open and you can receive a hint from a man regarding Spectacle Rock.
 - Continue up through the dungeon until you encounter a room full of Blue Darknuts
 . When it is safe to do so, bomb the top wall. Go through the passage and you will have to fight another Manhandla who rewards you with the Map
  .
. - Above the map room is another blue Gohma. You can bomb the left wall, or enter the top door, but you should enter the right door and defeat the Darknuts and Pols Voices inside. Push the leftmost block to descend the stairs and find the Magic Key .
- Return to the room full of blue Darknuts, and defeat them all so that you can enter the right room. Enter it and head down the stairs to enter an underground passage which leads to the west side of the dungeon. You can bomb the top wall here for a shortcut to the dungeon boss.
- Otherwise, head left and fight the red Darknuts, then head up again for a cryptic message about bombs from a man. Finally, head right to encounter the boss.
Boss[edit]
- The boss of the dungeon is a four headed Gleeok. Other than the number of heads, the strategy to defeat this Gleeok is no different. Keep stabbing the attached heads until every one is disconnected.
- Defeat it to earn a Heart Container . Continue to the room above and obtain the final Piece of Triforce .