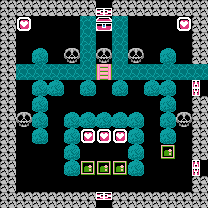
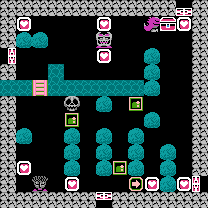
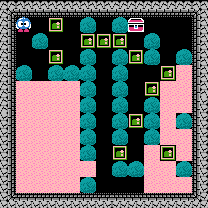
Approach the three Emerald Frames along the bottom, push the left and right frames in, and push the center frame aside. Collect the three Heart Frames and gain 4 egg shots.
Walk up to the right Skull, and shoot it to turn it into an egg. Push it up to the water and cross over to the opposite side to collect the Heart Frame. When the first egg is gone, shoot the Skull near by, push it down, and cross back over.
Walk up to the right Skull, and shoot it to turn it into an egg. Push it up to the water and cross over to the opposite side. Wait until the egg is gone before you collect the final Heart Frame.
When the egg is gone, collect the last Heart Frame and allow the nearby Skull to walk up to you along the top row. Shoot the Skull, and push the egg towards the water by the key. Use the egg to cross over and collect the key.
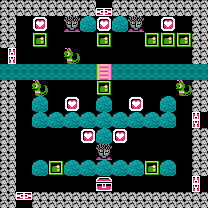
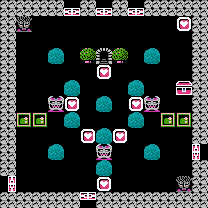
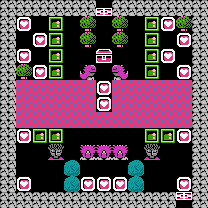
Start by collecting all of the Heart Frames located below the water. Push the Emerald Frame in the lower right corner in any direction to move it out of the way.
Cross over the bridge and collect the Heart Frame below the top center Gol.
Then push the Emerald Frame one square to the right of the final Heart Frame, but not to the wall. Collect the Heart Frame, and all of the Gols will wake up.
Push the Emerald Frame in front of the highest Gol. Then walk around the Emerald Frame and beyond the Arrow Tile to collect the Key to finish the stage.
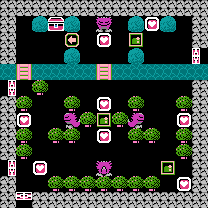
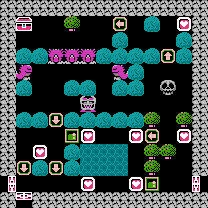
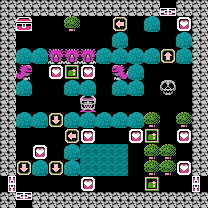
Start by pushing the two lowest Emerald Frames up one block, and pushing them in towards the Medusa so that she cannot harm you. Collect the two Heart Frames as you approach them, earning two egg shots from the right one.
Shoot the right Snakey, push the egg into the water, and use the egg to cross to the other side. Of the three Emerald Frames, push the left and right frames up. Push the center frame to the left, quickly grab the Heart Frame, and continue pushing the Emerald Frame in front of the right Medusa. Then quickly hop back over to the other side before the egg sinks in the water.
Collect the right Heart Frame below the water to gain two more egg shots, then push the center Emerald Frame to the left and above the left Heart Frame so that you can collect it. Cross over the ladder and stand to the right of the Emerald Frame below the top center Heart Frame and push it left below the left Medusa. Collect the top center Heart Frame.
Shoot the Snakey above the water twice to remove it from the screen. Walk to the left of the left Emerald Frame, and push it right once and up once to block the left view of the left Medusa. Collect the last Heart Frame. Then stand above the bridge and wait for the Snakey to return.
When the Snakey returns, use your last egg shot to turn it into and egg, push it to the left wall, and push it down to cross back over the water to the other side. Then walk down to the bottom to collect the key.
This room requires a great deal of agility compared to previous rooms. You must enter through the right of the two doors, or you will never get past the Medusa. Once you enter the room, move to the right, and push the Emerald Frame below you to the left against the Medusa. Now you can collect the first Heart Frame nearby.
Walk to the right, around the Arrow Tile, and prepare to push the Emerald Frame on the right out of the way in order to allow the Alma to escape. You may even wish to attract it so that it rolls out of the chamber to ensure that it leaves. All the while, you must watch out for the Rocky below. Do no attract him up to the area above the bridge.
Once the Alma is freed, cross the bridge to the section below. Head off to the right and collect the three Heart Frames near the Skull. Then push the bottom Emerald Frame to the left, and up one space. Push the next Emerald Frame up one space as well so that the lower Alma sees you and starts rolling toward you. Step out of the way and duck inside to collect the Heart Frame to the left, which gives you two egg shots, and you should now have the Ladder Power.
Start heading back out. If the Alma sees you and starts rolling towards you, you can shoot it and turn it into an egg to prevent it from hitting you. Walk back over to the right side of the room and up to the water. Activate the Ladder Power to cross over and collect the Heart Frame in the upper right hand corner, giving you another two egg shots. Once again, if the other Alma threatens you, you can shoot it and turn it into and egg.
Shoot the Skull near the Medusa and push it beneath her so it blocks her view of the chest. Now all you must do is collect the remaining Heart Frame near the center (egg the Rocky if it will help you), and walk up to the key before the Skull hatches. (If you run out of shots, there's a good chance the Skull will wander in front of the Medusa anyway.)
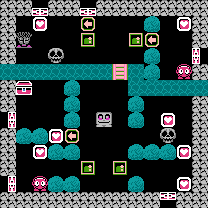
Throughout this stage, you must be mindful of the position of the Don Medusa that roams back and forth near the top of the stage. To start, make your way to the upper right Emerald Frame, and push it out one space to the right.
Then return to the starting position and walk through the Arrow Tile below. Collect the first Heart Frame, and push the Emerald Frame that you just moved all the way up to the Treasure Chest. Collect the lower left Heart Frame, but do not collect the upper left frame next to the treasure chest.
Push the Emerald Frame below the Skull two spaces to the left, so that it is under the bridge, and push it down so that you can collect the Heart Frame above and to the left of the Medusa. Carefully return to the starting point, and walk over to the Emerald Frame near the Arrow Tile. Push it up until it is even with the gap between the boulders to the left. Then walk through the Arrow Tile, and up and around so that you can push it straight through to the left, past the Skull and under the bridge. Walk around it, and push it back one space to the right, and then down between the Medusa and the bottom Heart Frame.
Collect the bottom Heart Frame and you will get two egg shots. You must egg the Skull and move it into the correct position before it hatches. Shoot the Skull once, push it beneath the bridge, then over the bridge and to the boulders, then to the right beyond the water, up one more space, and stop my positioning the egg between the two Heart Frames. At that time, you are free to collect the three Heart Frames in the vicinity.
Now carefully make your way all the way back to the starting point, and back around to the treasure chest. Before you collect the last Heart Frame, push the Emerald Frame all the way to the left and pin the Don Medusa in. With your remaining Egg shot, shoot the Gol so that it won't bother you when you collect the last Heart Frame and the key.
From the lower left corner, cross along the bottom, collecting two Heart Frames, and push the lowest Emerald Frame to the bottom right corner (be careful of being seen by the Don Medusa.) Collect the Heart Frame above, and then pass through the Arrow Tile to the left, collecting the next two Heart Frames. Push the Emerald Frame to the space above the glowing Heart Frame. Collect the frame to earn the Hammer Power.
Push the Emerald Frame one space back to the right below the Arrow Tile, and smash the boulder to the left of the Arrow Tile (again, watching out for the Don Medusa,) then walk around the water to push the Emerald Frame back to the left. Then wait for the Don Medusa to touch the left wall and push the Emerald Frame up to block him in.
By now you have four Egg shots, and before you collect the last Heart Frame, you must use them to reposition the Gols so that they can't kill you when you go to collect the key. Shoot the left Gol, and push it down to the Arrow Tile below. Then shoot the right Gol and push it down one space, shoot the center Gol and push it over to the left and down one space. Then push both eggs to the spaces next to the Gols on either end below the boulders.
You should have one egg shot left, so you can shoot the Skull just to be on the safe side. Then collect the last Heart Frame and gather the key to complete the stage.
You may think that you are having déjà vu, as this room is remarkably similar to Room 6, but is has a few minor differences that make it a little more challenging. You should arrive through the door in the lower right corner. When the Don Medusa retreats back to the left, push the bottom Emerald Frame two spaces to the left, and walk up and collect the two Heart Frames above the water.
Before you walk across the Arrow Tiles, retreat back to the start (watch the Don Medusa above), collect the two Heart Frames along the right wall, and push the Emerald Frame that you find there to the left, beyond the Arrow Tile and above the Heart Frame. Collect this Heart Frame, and the one below it, and you will gain the Arrow Power.
Walk back around and use the Arrow Power on the down Arrow Tile below the Don Medusa. Then position the Emerald Frame below the Arrow Tile, and push it up when the Don Medusa is all the way to the left. You'll have to double back to the gap in the trees below the Skull to get around, but it's much safe now. Push the Emerald Frame which is blocking the Don Medusa all the way to the left to minimize the trouble it will give you.
Now collect the left of the two Heart Frames above you to gain two Egg shots, but leave the right one alone. Walk through the Arrow Tile above the skull and collect the nearby Heart Frame. Walk over to the left most of the three Gols, and egg it. Push it down to the Arrow Tile. Now walk to the right of the remaining Heart Frame, but before you collect it, egg the Gol to your right. Then collect the frame and push the Emerald Frame to the left, blocking the left Gol's fire. Walk up through the gap that you created when you moved the left Gol and collect the key.
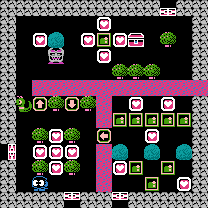
The first priority should be moving the two left Emerald Frames up against the Medusa in the top left corner. This can be tricky with the left Don Medusa bouncing up and down. The best way to approach this is to stand to the left of the boulder in the corner, wait for the Don Medusa to travel up, and push the right Emerald Frame up a little bit, but retreat when the Don Medusa reverses direction. Then repeat the process with the left Emerald Frame until it is one space ahead of the right frame. Now you should be able to easily push them up the remaining space when the Don Medusa is retreating to the bottom.
Once that is complete, you can go about collecting the top six Heart Frames in any order you wish, but remember that collecting the four lowest Heart Frames will expose you to attacks from the roaming Don Medusas. Therefore, timing is critical, and you must be equally fast at making your escape back to the safety of the boulders. Failure to do so will result in you getting killed.
Once those six Heart Frames are gathered, you must repeat the earlier process of moving the Emerald Frames up against the Medusa in the lower right corner. It shouldn't be nearly as difficult since the blocks are closer this time. Use the same method of running along with, but slightly behind, the Don Medusa and push the right block in first so that the left block gives you cover. Then push the two blocks into position around the corner Medusa.
Carefully time your approach to the final Heart Frame so that you don't get attacked by the lateral moving Don Medusa, then return to the lower right corner, and time your approach to the key so that you don't get attacked by the right Don Medusa. Once you collect the key, a Key Chamber door will appear.
The sand in this room will force Lolo to run at a slower pace. With only 11 seconds on the clock, you must execute the quickest path to the treasure chest with absolutely no hesitation in order to collect a key.
You have no choice but to end the large sand patch along the left side of the screen. Head straight down and to the right when you are even with the opening.
Once you are out of the sand, go up one space, and push the Emerald Frame to the right. Then continue up the path until you are even with another Emerald Frame on your right. Push it to the right once (don't push it too far,) then walk up, and push the next Emerald Frame to the right as well.
From there, simply head up and straight to the Treasure Chest. You will collect a large key.
When you enter the room, run to the middle of the five Heart Frames. Collect the bottom frame when you like. Then wait for the Don Medusa overhead to pass to the left. Then quickly collect the top and right Heart Frames, which will give you the Ladder Power.
You must continue to run to the lava, and then down one space until you are even with the Heart Frame beyond the lava. Place the bridge there and cross over to collect the frame, but do not push the Emerald Frame beyond to the right. Instead, get underneath it, and push it up. Then push the right Emerald Frame to the right and collect the lower right Heart Frame.
Collect the Heart Frame above the boulder. Of the five Emerald Frames above, push the left, right and center frames up. Then push the remaining frames to the left and right to give Lolo access to the Heart Frames beyond. You should have the second Ladder Power now.
Use the Ladder where the right Heart Frame was and cross over the lava. Collect the Heart Frames to the left of the Treasure Chest, above the Emerald Frame, and to the left of the Emerald Frame when the Don Medusa is moving away. Then quickly run back to the right side of the frame and push it left one space and down one space. Collect the remaining nearby frame and push the Emerald Frame to the left, trapping the Don Medusa.
Collect the last Heart Frame above the boulder, and go to the chest to collect the key.
There is actually a secret power related to the chest, but you do not need to use it to complete the board. If you shoot the chest from one space away with an egg shot, a transparent Lolo will appear in the lower left corner. If you touch it, you will freeze time, turn green, and be able to walk anywhere on the stage until you press .
Begin by collecting the Heart Frames on the left and right near the entrance. You must push the two Emerald Frames that you can push inward, and push the remaining frame on the left upward, and the remaining frame on the right downward. Once you are on the inside collecting the Hearts, you will be able to push one of the frames that you pushed inward back out so that you can collect the remaining Heart Frame.
You should have collected 8 Heart Frames by now, so walk south of the treasure chest to collect two more Heart Frames and gain the Ladder Power as well as two shots. Use the Ladder Power to cross over the lava.
Use an egg shot on the center Gol. This will cause the screen to flash, and rather than the usual white egg, you will see a blue egg. Push it down, and egg one of the Gols on either side and push it aside. Walk down and collect the three Heart Frames below the blue egg before pushing the blue egg back up and into the lava. Once the blue egg touches the lava, the lava will turn to sand.
Now use the sand to walk above the two Medusas, and push the Emerald Frames that rest along either side of the Medusas down one space so that you can continue to walk around them and collect the remaining Heart Frames. Once you have collected all four, you should be able to walk all the way around the edge of the stage to reach the key without risking the chance of getting hit by a Gol's fireball.