Caution! This page contains all the hints and solutions for every puzzle from 76 to 100. Scroll carefully or you might spoil the answer of a puzzle for yourself. The solutions are hidden behind spoiler tags, so only take a peek if you're desperate.
Puzzle 076[edit]
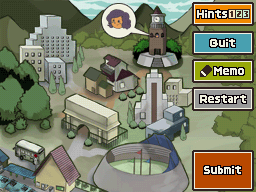
- Name: Top of the Tower
- Trigger: Talk to Geoff
- Location: Watchtower 2nd Floor
- Chapter: 4
- Picarats: 20
Description: In a quiet town, there's a tower that commands a view of the whole town. Since you can see the whole town from the tower, logic dictates you should be able to see the top of the tower from anywhere in town. However, there's one place in town shown on the map below from which you have clearly no chance of seeing the top of the tower. Find and circle this place.
- Hint 1: Looking for a place that has its view obscured by another building? Hmm, it doesn't look like there are any places around the town like that.
- Hint 2: You need to find a place where the tower's top can't be seen. To put it another way, you're looking for a place that doesn't allow you to see the outside of the tower.
- Hint 3: There's one indoor location from which you definitely won't be able to see the outside of the tower.
Puzzle 077[edit]
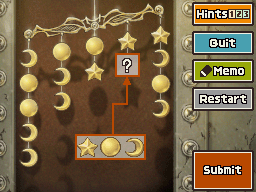
- Name: Balancing Ornaments
- Trigger: Talk to Pavel
- Location: Mine Machine Room
- Chapter: 6
- Picarats: 30
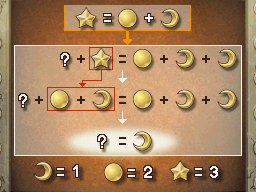
Description: Small ornaments dangle from a metal bar, and they've thrown the bar off balance. The five ornament strings are spaced equally apart, and each of the three types of ornaments weighs a different amount. The heaviest ornament weighs the same as three of the lightest ones, while a medium ornament weighs the same as two of the lightest ornaments. Place one of the three ornaments in the rectangle in the space marked with a question mark to restore the bar's balance.
- Hint 1: The center strand of ornaments won't affect the balance of the bar, so ignore it. Also, the two strands hanging the farthest out on the bar are the same weight, so try comparing the ornaments on the far left to the ornaments on the far right. You might find out something new.
- Hint 2: Look at the strands on the far left and the far right. While they both contain sun and moon ornaments, only the far right strand has a star. By comparing the ornaments on these two strands, you can probably figure out how many suns and moons it takes to equal the weight of a star.
- Hint 3: A single star weighs the same as one sun and one moon together. Now that the weight of one star is clear, you should be able to compare the two strands next to the center strand.
Puzzle 078[edit]
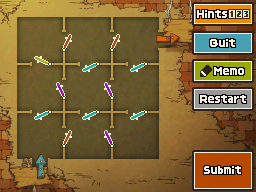
- Name: A Maze of Doors
- Trigger: Inspect the framed grid
- Location: Mine Room
- Chapter: 6
- Picarats: 25
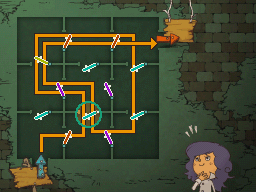
Description: All the doors in the maze below only open in one direction. Each door can be opened by pushing from the direction shown below, but when approached from the opposite direction, no amount of pulling or pushing will open it. If you tried to go through the whole maze from the start and passed through every room, you'd never make it to the exit. However, this feat would be possible if one of the doors could open in the opposite direction. Can you find and circle this door?
- Hint 1: Let's review this puzzle's conditions. You need to make one door open in the opposite direction, and you must pass through every room on your way to the exit. But no one ever said you can only pass through each room once.
- Hint 2: Starting from the IN sign, you'll soon bump into a door that should open the opposite way. So to proceed, one of the first door you meet will have to open in the opposite direction. The upper door in the first room and the two doors in the room to the immediate right of the first room open in a direction that keeps you from passing through. One of these three doors is the door you'll need to change.
- Hint 3: The upper door in the first room is fine the way it is.
Puzzle 079[edit]
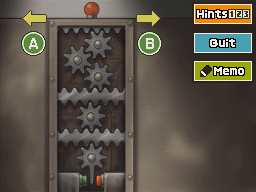
- Name: The Gear Switch
- Trigger: Check the door
- Location: Mine Machine Room
- Chapter: 6
- Picarats: 20
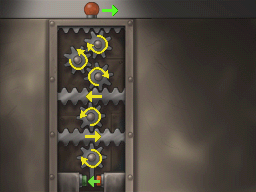
Description: The button that opens the door in front of you is buried deep within this machine, so you can't push it directly. However, by pulling the knob at the top to the left or right, you can move the various gears and plates in the machine, allowing you to press the button at the bottom. In order to hit the OPEN button, should you pull the knob toward A or B?
- Hint 1: When one gear rotates with another, the two gears must rotate in opposite directions. Use the Memo function to keep track of the direction of each gear's rotation.
- Hint 2: The gear at the bottom has to rotate clockwise to hit the switch, so the board of teeth directly above it will need to move to the right. Make sense? Now continue that line of thought as you move up toward the knob.
- Hint 3: The board of teeth underneath the three gears at the top needs to move to the left. Therefore, the gear directly above it needs to rotate clockwise. Keep going until you reach the knob at the top!
Puzzle 080[edit]
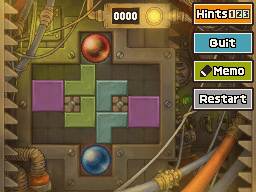
- Name: The Elevator Switch (US) / The Puzzling Lift (UK)
- Trigger: Attempt to use the elevator
- Location: Mine Lift
- Chapter: 6
- Picarats: 40
Description: The circuit board for the elevator contains a puzzle. According to the instructions, you need to make the blue and red balls switch places in order to restore power to the elevator. Are you up to the task?
- Hint 1: There are several ways to go about solving this puzzle. One surefire technique is to work with the L-shaped blocks. You can free up some extra room by moving these blocks so that they fit together neatly with neighbouring blocks.
- Hint 2: In order to get both of those balls to swap places, you first need to move one ball out of its hole and park it somewhere while you move the other one. To do so, clear up some space by gathering all those L-shaped blocks in either the left or right side of the box.
- Hint 3: If the method from Hint Two isn't working, here's another technique to try. Create space by slotting L-shaped blocks together to create pairs. In order to do this, move the L-shaped blocks to the opposite edges of the box, then combine them.
Move the right purple block up one space, then move the top blue block to the top and right. Move the lower blue block all the way to the right, then move the lower green block right and up between the grey squares. Move the lower blue block all the way to the left, then move the lower green block all the way to the lower right, and move the lower blue block to the right to join with the green block. Move the top green block right, down and left so that it touches the lower-right corner of the left purple block. Move the red ball down and left into the gap, then move the blue ball up into its spot. Move the red ball to its designated spot to finish the puzzle in 12 moves.
Puzzle 081[edit]
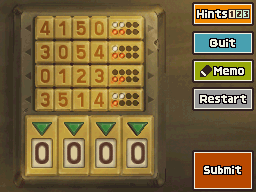
- Name: The Old Safe
- Trigger: Check the safe
- Location: Mine Safe Room
- Chapter: 6
- Picarats: 50
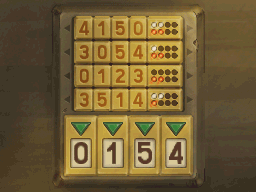
Description: Find the four-number code that opens the safe. You can use the numbers zerothrough five in your answer, but each number can be used only once. The small lights next to each row of numbers are the key to finding the code, as they tell you how much in common that row has with the final code. Each white light indicates a number that matches one in the code but it is in a different place within the sequence. An orange light indicates a number that is in the code and in its correct spot. Tap the numbers at the bottom to enter the code.
- Hint 1: Start by figuring out which numbers belong in the code, regardless of order.
- Hint 2: You may have already noticed, but every number in the code is in the very top row of numbers. Two of the numbers in 4150 are even in the correct spot relative to where they should be in the code.
- Hint 3: Take a look at the third row of numbers. You can see that two numbers match ones in the code and are in the correct position. Since you know the code uses 4, 1, 5, and 0, you can assume the 0 and 1 from this row are part of the code and in their appropriate spots. Now just figure out where 4 and 5 go.
Puzzle 082[edit]
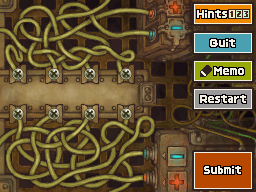
- Name: Restarting the Lift
- Trigger: Attempt to use the elevator
- Location: Mine Safe Room
- Chapter: 6
- Picarats: 30
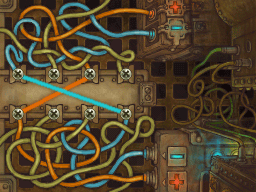
Description: The wires connecting the elevator to the buttons controlling it have somehow been severed. However, if you can connect the negative (-) and positive (+) wires on the top to the wires carrying the same charge below, you can fix the elevator. To do this, you need to draw lines between sets of X-shaped terminals. Draw two lines to connect each positive and negative terminal to its counterpart and get the elevator running again.
- Hint 1: You need to connect wires with the same symbol together. So + goes with + and - with another -. If you examine the tangle of wires, finding the solution should be simple enough.
- Hint 2: To make things simpler, identify the wires that are connected to some other area offscreen, and eliminate them as possible answers. In the top row of wires, the rightmost wire and the one third from the right run offscreen.
- Hint 3: The leftmost terminal in the upper set of four is connected to the wire carrying a (-) current. Now it's up to you to figure out the other three terminals you need to use.
Puzzle 083[edit]
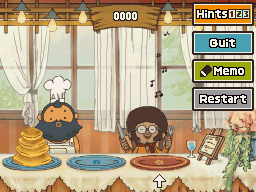
- Name: Pancake Stacks 2 (US) / Piles of Pancakes 2 (UK)
- Trigger: Talk to Gertie
- Location: Northeast Alley
- Chapter: 5
- Picarats: 30
Description: Now here's a tasty puzzle for you. You task is to take that big stack of pancakes on the left plate and move them to the plate on the far right. In doing so, however, You need to follow these rules:
- You can move only one pancake at a time.
- A pancake can never rest on another pancake smaller than itself.
Feel free to shift things around as much as you like and to use the middle plate in completing the puzzle.
- Hint 1: While you may have been able to solve the first Pancake Stacks puzzle by just moving around the pancakes randomly, you'll need to think harder if you wish to find a solution this time around. See if you can't come up with a rule for effectively shifting pancakes around.
- Hint 2: Developing an effective way of moving the smallest pancake is key, because you can't place anything on top of it. Think about a series of moves you can repeat to keep that littlest pancake out of your way.
- Hint 3: Move the smallest pancake to the middle plate, and place the second-smallest pancake on the far-right plate. Next, move the smallest pancake on top of the pancake on the right, and bring a new pancake over to fill the middle plate. After that, take the smallest pancake and move it to the left plate. if you repeat this pattern, as you move the other pancakes around, you'll solve the problem in no time flat.
Move the smallest pancake to the middle plate, then move the second smallest pancake to the right plate. Move the smallest pancake to the right plate, and move the second largest pancake to the middle plate. Move the smallest pancake to the left plate, and move the second smallest pancake to the middle plate. Move the smallest pancake to the middle plate, then move the largest pancake to the right plate. Move the smallest pancake to the right plate, then move the second smallest pancake to the left plate. Move the smallest pancake to the left plate, then move the second largest pancake to the right plate. Move the smallest pancake to the middle plate, and move the second smallest pancake to the right place. Finally, move the smallest pancake to the right plate to complete the puzzle in 15 moves.
Puzzle 084[edit]
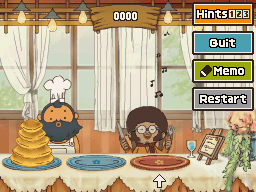
- Name: Pancake Stacks 3 (US) / Pile of Pancakes 3 (UK)
- Trigger: Talk to Gertie
- Location: Northeast Allley
- Chapter: 6
- Picarats: 40
Description: Now here's a tasty puzzle for you. Your task is to take that big stack of pancakes on the left plate and move them to the plate on the far right. In doing so, however, you need to follow these rules:
- You can only move one pancake at a time.
- A pancake can never rest on another pancake smaller than itself.
Feel free to shift things about as much as you like and use the middle plate in completing the puzzle.
- Hint 1: Having trouble? Just follow the hints given to you in Pancake Stacks 2. This is the last hint you're going to get for this kind of puzzle, so it would be a waste to spend another hint coin here.
- Hint 2: Looks like you went and spent that hint coin anyway. Must be nice having hint coins to burn. OK then, here's a little fun fact for you. These puzzle pancakes are based on a puzzle called the Tower of Hanoi, which can be solved using a basic concept in computer science known as recursion. Sure, it's not much of a hint, but it is interesting stuff, isn't it?
- Hint 3: Well, look at that, you spent yet another hint coin. All right, moneybags, time for more fun facts. Eduard Lucas, the man who thought up the Tower of Hanoi puzzle, introduced the puzzle saying that it was based on an Indian myth detailing the creation and destruction of the world. Though the myth is quite fascinating, many people believe Lucas fabricated it.
Move the smallest pancake to the right plate, then move the second smallest pancake to the middle plate. Move the smallest pancake to the middle plate, then move the medium pancake to the right plate. Move the smallest pancake to the left plate and move the second smallest pancake to the right plate. Move the smallest pancake to the right plate, then move the second largest pancake to the middle plate. Move the smallest pancake to the middle plate, then move the second smallest pancake to the left plate. Move the smallest pancake to the left plate, then move the medium pancake to the middle plate. Move the smallest pancake to the right plate, then move the second smallest pancake to the middle plate. Move the smallest pancake to the middle plate, then move the largest pancake to the right plate. Move the smallest pancake to the left plate, then move the second smallest pancake to the right plate. Move the smallest pancake to the right plate, then move the medium pancake to the left plate. Move the smallest pancake to the middle plate, then move the second smallest pancake to the left plate. Move the smallest pancake to the left plate, then move the second largest pancake to the right plate. Move the smallest pancake to the right plate, then move the second smallest pancake to the middle plate. Move the smallest pancake to the middle plate, then move the medium pancake to the right plate. Move the smallest pancake to the left plate, then move the second smallest pancake to the right plate. Finally, move the smallest pancake to the right plate to finish the puzzle in 31 moves.
Puzzle 085[edit]
- Name: The Missing Shape
- Trigger: Talk to Olsen
- Location: Western Path
- Chapter: 5
- Picarats: 30
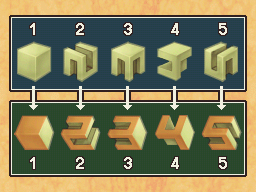
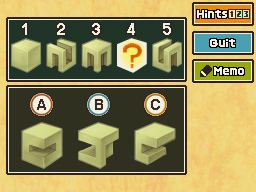
Description: Five shapes are arranged in a sequence, but the fourth shape is missing. Use the four available shapes to determine whether A, B, or C should be inserted as the fourth shape in the sequence.
- Hint 1: Rotate each shape 90 degrees to get a fresh perspective on the puzzle.
- Hint 2: If you look closely, you might notice that there's a number visible within each of the shapes.
- Hint 3: Once you rotate the shapes, you'll be able to see a number hidden within them.
Puzzle 086[edit]
- Name: Perplexing Figures
- Trigger: Inspect the picture of the hat
- Location: Alley End Room
- Chapter: 5
- Picarats: 35
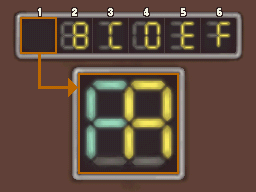
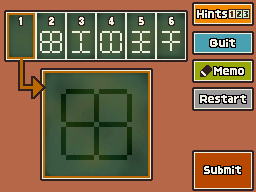
Description: A bunch of figures are arranged in a pattern as shown below. As you can see, the figure that should go in space 1 is missing. Can you draw the figure that belongs in this space? Drag you stylus through the divots in the board to draw the figure.
- Hint 1: Focus on the right half of the figures two through six.
- Hint 2: Look closely, there's a letter hidden within each picture.
- Hint 3: Considering the pattern going on in the shapes, the first figure should correspond to the letter A.
Puzzle 087[edit]
- Name: Different Suits
- Trigger: Talk to Ray
- Location: Fork in the Road
- Chapter: 6
- Picarats: 40
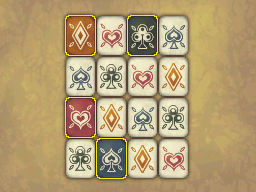
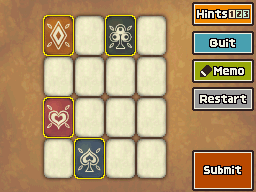
Description: Below are 16 cards. There are four cards from each suit: diamonds, clubs, spades, and hearts. The cards are arranged in a four-by-four grid as shown below, and four cards have already been put down. Arrange the remaining cards so that each vertical column, horizontal row, and diagonal line of four cards contains one card from each suit. Tap a space to place a card there or to change a card's suit.
- Hint 1: Let's start by seeing if we can't dig up a few hints to work from. There's a card on the table that belongs to the row the heart is in, the column the club is in, and the diagonal line the diamond is in. Therefore, you can safely conclude that this card in question must be a spade. This is the kind of logic you'll need to use to solve the problem.
- Hint 2: What card do you suppose belongs in the bottom-left corner? The column this space is a part of already has a diamond and a heart in it, and there's a spade to the immediate right of it. Taking the above into consideration, we can conclude the card in question must be a club. Knowing this, we can also fill in the last card in the leftmost column, which has to be a spade.
- Hint 3: Need another hint, do you? OK then, here's a good one. The card at the top-right corner is a spade, and the one at the bottom of that same column is a heart. The rest of the solution is up to you, but it shouldn't be too hard to figure out.
Puzzle 088[edit]
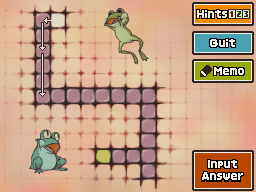
- Name: The Frog's Path
- Trigger: Revealed after solving the minigame of Photo 009
- Location: Machine Room
- Chapter: 7
- Picarats: 30
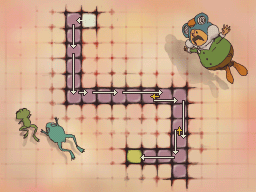
Description: A frog sits perched on the space labeled S in the diagram below. This little guy has an unusual jump. His first jump travels one space, his second jump travels two spaces, and his third jump travels three spaces. After his third jump, he repeats this pattern. The frog can't change his direction midjump, but he can turn around between jumps. This frog's goal is to move through the path below and land exactly on the space marked G. What is the fewest number of jumps he needs to make to do this?
- Hint 1: The solution for this puzzle requires the frog to jump back the way he came a number of times.
- Hint 2: Have you ever heard the saying "Take one step forward and two steps back"? That old line applies to this puzzle.
- Hint 3: The frog will need to backtrack a total of two times.
Puzzle 089[edit]
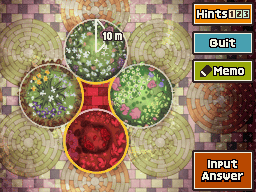
- Name: Flower Bed Fun
- Trigger: Talk to Derby
- Location: Clock Tower Plaza
- Chapter: 4
- Picarats: 40
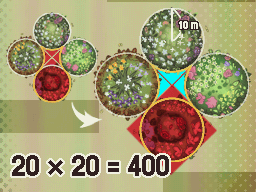
Description: Here are four circular flower beds, each with a radius of 10 feet. The way they're arranged forms a space between them. Can you find the area in square feet of the section colored red below? Ignore the width of the border around the flower beds when calculating your answer.
- Hint 1: Don't bother thinking about Pi. You won't need it to solve this one!
- Hint 2: If you draw straight lines between the four center points of each of the flower beds, it makes a square!
- Hint 3: From the points where the two flower beds touch, draw two diagonal lines that cut through the center of the diagram and end where two other flower beds touch. These two lines should divide that middle space between all four flower beds into four neat sections. What can you learn from those four sections?
Puzzle 090[edit]
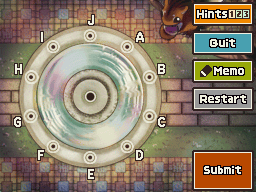
- Name: The Unusual Fountain
- Trigger: Check the fountain
- Location: Outside the Museum
- Chapter: 6
- Picarats: 20
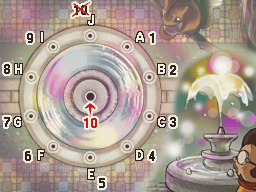
Description: The fountain shown below has the unusual ability to indicate the age of those who draw near it. For example, if a five-year-old child were to approach, the fountain would fire off water from spouts A, B, C, D, and E in that order. For age 15, the middle spout would fire and then be followed by spouts A through E. For someone aged 30, the middle spout would fire off three times. Given the fountain's method of indicating age, there's one utterly useless spout on the fountain. Find and circle this spout.
- Hint 1: The puzzle asks for you to find a spout that's utterly useless, meaning the spout never gets used. Which one could that be?
- Hint 2: Read over the conditions that cause each spout to spray water. Then try applying that knowledge. For example, think about how the fountain would indicate the ages of 10 through 20.
- Hint 3: Spout A fires off to indicate one year, B fires for two, C fires for three, D fires for four, and so on. So, if spout I is meant to indicate nine, then...
Puzzle 091[edit]
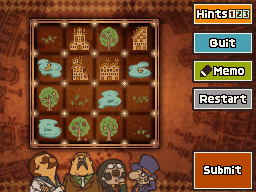
- Name: Sharing the Wealth
- Trigger: Talk to Opal
- Location: Outside the Hotel
- Chapter: 6
- Picarats: 30
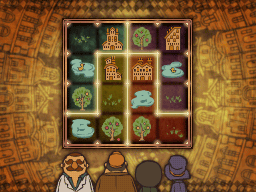
Description: A wealthy land baron passed away, leaving his land to be divided among his sons. A section of his will is written below. "I want my four boys to each receive a parcel of property containing an orchard, a house, a pond, and an open field. Everyone should receive the same amount of land." Use you stylus to draw lines that separate each son's plot of land.
- Hint 1: There are 16 squares of land and four people to divide it among, so every person should receive a parcel of land consisting of four squares.
- Hint 2: Draw a line right down the middle of the map from top to bottom.
- Hint 3: Next, lay down some boundaries so that no two houses are positioned on the same parcel of land.
Puzzle 092[edit]
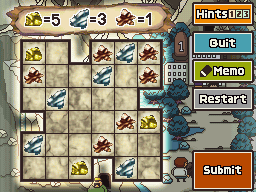
- Name: Precious Metals
- Trigger: Talk to Krantz
- Location: Hotel Lobby
- Chapter: 5
- Picarats: 40
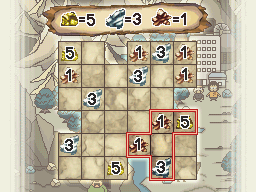
Description: Lucky you! You've inherited a five-square plot of land that's rich with precious metals. Each chunk of copper ore has a value of one, each silver chunk has a value of three, and each gold chunk has a whopping value of five. You're allowed to pick five squares of land for yourself, but the five squares must be connected to each other. Squares diagonal to one another don't count as connected. Your task is to claim the most valuable five-square plot possible. Can you do it?
- Hint 1: Gold ore is worth a whopping five times as much as copper, so focus on claiming some of that. Wouldn't it be great if you could find a five-square plot of land with two pieces of gold ore on it? Sadly, that doesn't seem likely.
- Hint 2: Unfortunately, no single five-square plot of land contains two pieces of gold ore. However, you just might be able to find a plot that has two pieces of silver ore, but remember, your first priority is choosing the plot with the highest total value.
- Hint 3: Copper is worth one, silver is worth three, and gold is worth five. should be able to find a plot of land worth 10. Find this plot, and you've found your answer.
Puzzle 093[edit]
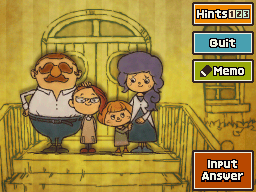
- Name: How Old Am I?
- Trigger: Talk to Joanie
- Location: Promenade
- Chapter: 4
- Picarats: 30
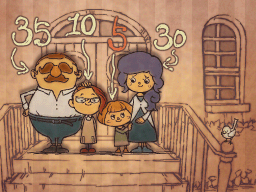
Description: "Hi there! Yeah, I know I'm all cute and stuff, but I'm ALSO really good at puzzles. What's that? You wanna know my age? Well...OK. "The difference between Mama's age and Papa's age is the same as my age. Oh, and my big sister is twice my age, which happens to be one-third my mom's age. And one more thing: in five years, I'll be my sister's age. "OK, enough hints! How old am I?"
- Hint 1: "When you've got a puzzle like this one, what you wanna do is go over all the info you've got and find the stuff you can use. The difference between my parent's ages probably won't help you. But...my sister's age could be kinda useful."
- Hint 2: "My sister is twice my age. Oh, and in five years, I'll be the same age as my sister."
- Hint 3: "Read Hint Two REALLY CAREFULLY, OK? "Five years ago, my sis was the same age as I am now, and she's now twice my age."
Puzzle 094[edit]
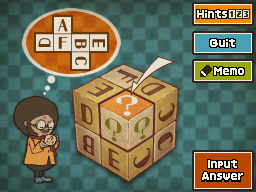
- Name: The Mystery Cube (US) / Puzzling Cubes (UK)
- Trigger: Serve The Layton Elixir to Grinko
- Location: Museum 1st Floor
- Chapter: 6
- Picarats: 40
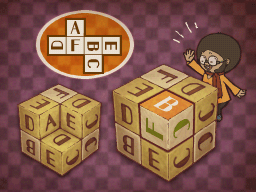
Description: The diagram that little guy's thinking about has been folded into eight tiny cubes, which in turn have been combined to build a larger cube. One of the eight small cubes has had the letter on each of its faces erased. The big cube is constructed in such a way that each small cube's face that isn't visible is pressed against the face of another cube containing the same letter. Knowing this, can you figure out what letter belongs on the face the arrow is pointing to? Your answer will be one letter, A through F.
- Hint 1: The answer to this puzzle won't simply pop into your head when you make some key realization. You need to work your way to it. Three different cubes are touching three different faces of the cube in question. Find the letters that must be on those faces of the unmarked cube.
- Hint 2: If the unmarked cube had its faces restored to it, all four letters on the right side of the big cube would be Cs. Note how all four Cs don't point the same way.
- Hint 3: Did you figure out which three faces of the unmarked cube were hidden? They are A, D, and E.
Puzzle 095[edit]
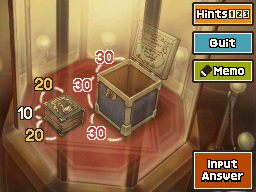
- Name: Box of Books
- Trigger: Revealed after solving the minigame of Photo 004
- Location: Museum 2nd Floor
- Chapter: 6
- Picarats: 30
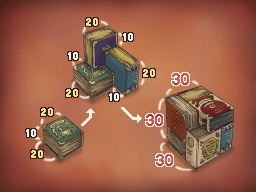
Description: The box shown below has a height, width, and depth of 30 inches. Within this box, you'd like to place as many books as possible. Each book is 20 inches wide by 20 inches long by 10 inches thick. How many books can you pack into this box? Books can only be placed in the box in the close position, but you can position each book however you like inside the box.
- Hint 1: If all you had to do to solve this puzzle was count how many books you can stack in the box before it fills up, it wouldn't be much fun. You'll need to think creatively and in three dimensions to solve this one.
- Hint 2: The bottom of the box measures 30 inches by 30 inches. Each book is 20 inches by 20 inches, so you can really only fit in one if you place it flat. But if you do that, you'll be left with 10 extra inches on one side. Say, isn't that the exact same size as the thickness of one book?
- Hint 3: Even if you place three books upright in the box and use two more to fill what gaps you can, you'll still have a good chunk of wasted space on your hands. Fitting the books together in a space-efficient way is of utmost importance in solving this puzzle.
Puzzle 096[edit]
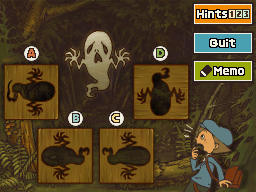
- Name: A Ghostly Puzzle
- Trigger: Talk to Joseph
- Location: Photo Studio
- Chapter: 5
- Picarats: 30
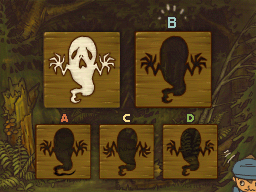
Description: Yikes! There's a ghost in the forest! ...Or so you thought, until you realized that the specter hovering in front of you was just a figure cut out of wood hanging from a branch. Looking around the area, you notice four pieces of wood scattered in the grass. Which one of these wooden slabs was the ghost cut out from? You have four choices: A, B, C, or D. Beware! The correct board may have flipped over while lying in the grass.
- Hint 1: Think you've found the answer? You're sure? Well, just to be safe, compare its outline to the ghost one more time. Don't forget to look at little details, like the shape of its hands.
- Hint 2: You should pay extra attention to the length of the ghost's tail.
- Hint 3: Make note of which way the ghost's arms should be facing! Oh...and just so you know, the board you're looking for needs to flip over to match the outline of the ghost.
Puzzle 097[edit]
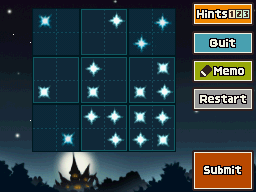
- Name: A Starry Sky
- Trigger: Revealed after solving Photo 007
- Location: Dark Forest 2
- Chapter: 6
- Picarats: 40
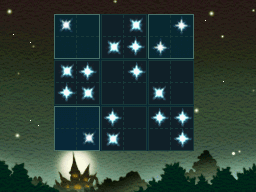
Description: It's said that ancient peoples came up with constellations by staring up at the stars in the night sky. Here's a star-laden puzzle to celebrate their achievements. Below is a six-by-six grid of sky and stars arranged into nine larger blocks. Move these larger blocks so that each row and column contains three stars. Blocks with no surrounding outlines can't be moved.
- Hint 1: You need to find a foothold to get started, and the stars that are locked in place should do nicely. Remember, if two stars are locked into a row, you can only place one more there.
- Hint 2: The topmost row of blocks contains two blocks locked into place. Within this row of blocks are two rows of stars. The top row has two stars locked in place, and the bottom row has one. Therefore, the one block you can place in this row must have one star in its top row and two in its bottom row.
- Hint 3: Let's take a look at the leftmost column of blocks, which also has two blocks locked in place. The left column of stars contained here has only one star locked in place, as does the right column. So the block you can move in this row must have two stars in both its left and right rows.
Puzzle 098[edit]
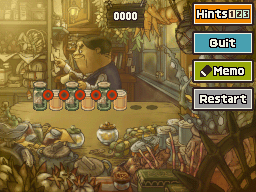
- Name: Jars and Cans 1
- Trigger: Check the pile of bottles in front of the counter
- Location: Grocery Store
- Chapter: 5
- Picarats: 25
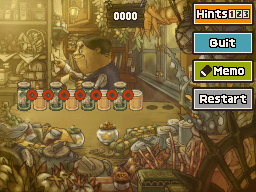
Description: A long line of jars and cans sits on the counter. Your job is to rearrange these items so that both jars and cans are grouped with items of the same type. However, in doing so, you must always move two containers at once. Move items around by touching the red icon between two containers and dragging the selected pair of items around with your stylus.
- Hint 1: This puzzle is all about finding the right order in which to make your moves. The more organized players out there should be able to solve this one on instinct alone. Since it's a relatively simple puzzle, don't expect to find anymore hints. Instead, you'll get some neat trivia on this type of puzzle. So if you're short on hint coins, stay away from Hints Two and Three on this one, OK?
- Hint 2: This is another one of those puzzles that's been around practically forever. Variations on it exist across the globe and have even been said to be played in places like Edo-era Japan.
- Hint 3: In Japan, this puzzle is often presented using pieces from Go, a strategic board game originally from China. In England, this puzzle was often set up using silver and gold coins.
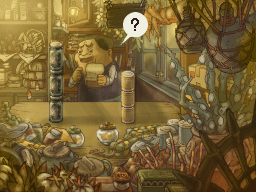
Puzzle 099[edit]
- Name: Jars and Cans 2
- Trigger: Check the pile of bottle in front of the counter
- Location: Grocery Store
- Chapter: 6
- Picarats: 30
Description: Look at that, another row of jars and cans all mixed up, and this time there are even more of them. As before, your job is to rearrange these items so that both jars and cans are grouped with items of the same type. However, in doing so, you must always move two containers at once. Move items around by touching the red icon between two containers and dragging the selected pair of items around with your stylus.
- Hint 1: This is another puzzle where the order of your moves is key. You won't get any hints on this one, but as a general tip for this type of puzzle, you should take care not to return items to their original position while moving them around. Also, you should know that this puzzle, like the previous one of the same type, can be solved in as few as four moves. Pretty interesting, considering you have more cans and jars to deal with this time.
- Hint 2: In Japan, the type of puzzle you're playing now is known as a Mandarin duck puzzle. Mandarin ducks are famous for the affectionate way male and female pairs of ducks get along. Some theorize that the game was known by this name because of the way Mandarin duck couples tend to move about together.
- Hint 3: Here's another piece of fun trivia. As stated in Hint Two, these puzzles are referred to as Mandarin duck puzzles, because of the affectionate behavior Mandarin duck couples exhibit toward each other. But it turns out that these birds are said to change mates every year. Yes, this fact has no relation to puzzles, but it sure is fascinating.
Puzzle 100[edit]
- Name: A Rickety Bridge
- Trigger: Try to move forward
- Location: Dark Forest Exit
- Chapter: 6
- Picarats: 30
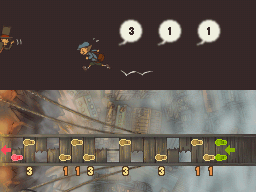
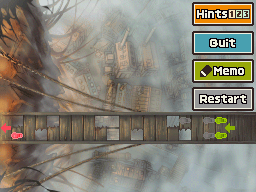
Description: Luke and Professor Layton stand at one end of a rickety old bridge. Afraid of falling into the chasm below, Luke's legs have become stiff with fear, and he can only walk across the bridge in increments of one or three planks at a time. The narrowness of the bridge prevents Luke from doubling back the way he came or switching the foot he's using to step forward while standing on it. Use your stylus to create a path that guides Luke safely across the bridge while avoiding any gaps in the planks.
- Hint 1: The first step Luke takes is with his left foot.
- Hint 2: The last step Luke takes is with his right foot. It carries him a distance of one plank.
- Hint 3: Luke's ninth step carries him to the goal.
