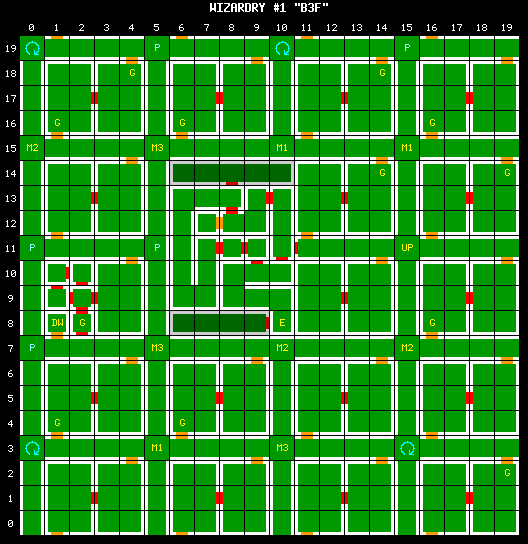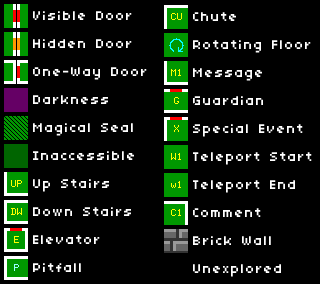

Most of this floor is laid out in a grid like fashion, with interesting (or dangerous) features in the intersections. You may find a message, a pitfall, or a rotating floor, and there's no warning about which one you will encounter. However, it is possible to move throughout this level without the need to visit most of the intersections at all if you take advantage of the secret doors that are found on the north and south sides of the blocks.
The rotating floors may give you the most difficulty here. It will not be apparent (on most versions) which new direction you are facing, and since the intersections look identical from any angle, you will be forced to rely on DUMAPIC to determine your new heading. However, if you have the WonderSwan version of the game, it is a little more obvious which new direction you're facing, due to the animation on the screen and the auto-map.
Another danger to be aware of is the possibility of running away from an enemy and winding up falling into a pit. Once again, the area that you arrive at through the elevator is closed off to the rest of the floor, although unlike the second floor, you can actually make it into that section through a one-way door, but then you're stuck there and forced to use the elevator.
There are no specific events that take place on the floor, the primary reason to visit is to level up and prepare for a major encounter on the fourth floor. Most of the monsters that appear are insects and animals. Watch out for the combination of GAS DRAGONS and DRAGON FLIES.
Up Stairs (E15-N11)[edit]
You will arrive on the third floor via these stairs. Take then back up to return to Floor 2
Down Stairs (E1-N8)[edit]
The stairs leading down to Floor 4 are hidden behind a secret door. If you miss it and go too far, you'll wind up in a pitfall.
Elevator (E10-N8)[edit]
While you can explore a little more via the Elevator than you could on the second floor, you won't find anything of actual interest here.
Pitfall (E0-N7, E0-N11, E5-N11, E5-N19, E15-N19)[edit]
Avoid these pitfalls as best as you can. Use the secret doors that take you through the chambers to avoid the intersections that contain pitfalls
Message 1 (E5-N3, E10-N15, E15-N15)[edit]
THE FLOOR HAS A MOSAIC READING: "TURN AROUND."
Message 2 (E0-N15, E10-E7, E15-N7)[edit]
THE FLOOR HAS A MOSAIC READING: "TURN LEFT."
Message 3 (E5-N7, E5-N15, E10-N3)[edit]
THE FLOOR HAS A MOSAIC READING: "TURN RIGHT."
The messages located in these intersections are merely intended to mislead your party. If you actually follow them, they will lead you to pitfalls, rotating floors, or even a never ending circle around the floor. Pay them no heed.
Rotating Floor (E0-N3, E0-N19, E10-N19, E15-N3)[edit]
When you step on these tiles, you will wind up facing a random direction not of your choosing. Once you step off, camp and use DUMAPIC to be sure of your new direction before you progress through the maze once more, or you are likely to become very lost.