| Map Name | Initial Coordinates |
|---|---|
| mine3 | (-1215 320 -465) : 0° (facing north) |
Level objective
The objective for this level is to lower the access bridge and find the service access to the Factory.
Strategy
(Expand this section)
Walkthrough
Lowering the Access Bridge
Coming from the elevator, deal first with four Gunners and four Guards clustered around a short stairway and a cavern below. Stay near cover and employ the usual weapons for these Strogg types. There is Combat Armor under the stairway. The cavern leads to a passage patrolled by a Gladiator. A fifth Guard will also attack from the other end. The right hand wall of the passage is barred and through the bars you can see the lower part of the Drilling Area that you will need to visit later. If you look down and perhaps jump you may catch a glimpse of some of the enemies you will face, although it's hard to kill them from up here. At the other end of the passage a left turn and then a right turn takes you to a tunnel in which plates move continuously up and down, making it difficult to pass through. As if that's not bad enough, a Gunner at the other end throws Grenades and fires his Machinegun at you. You may, at this point, wish that you'd found and taken the secret alternate route from the Borehole so that you'd start at the other end of this tunnel. Nevertheless, by crouching and with some patience you can fire an accurate long-range weapon at the feet of the Strogg and eventually be rid of them. As with all barriers of this type, the easiest way through the moving plates is to press against them when they are down and move a short distance forward as soon as they rise. Yet another Gunner will greet you at the other end, coming out from hiding to the right of the tunnel exit, then another Gunner in the next passage, then a Gladiator, then a final Gunner in the room with the lever that lowers the bridge. Whew! Operate the lever and watch the bridge lower through the bars. In addition to operating the bridge, the lever has drawn back bars across a doorway in the lower part of the level. You need to go there now, find your way to the Lower Mines and thence to the final part of this level where you will cross over the bridge and exit. Your field computer changes your secondary objective to "Access bridge lowered. Find service elevator to Factory", which isn't really helpful. Unless you took out Strogg in the lower area, you should at this point have 18 of the 26 enemy kills. Retrace your steps to where you came in, go back to the Borehole and use the balcony-like elevator there to go down to the lowest level and re-enter the Drilling Area.
Around the corner from the bridge control lever, there's a hatchway in the floor tucked into an alcove. It doesn't open from here nor give you a message explaining why not, so you're probably wondering what it's for. All will be revealed in due course.
Getting Down to the Lower Mines
At the lower area entrance you are immediately faced with two Gunners in the corners on the far side of the room. They have their backs to you and won't move until you either cross the threshold of the door or fire a weapon, so you have a moment to plan. The HyperBlaster is good if you can keep it aimed as your target moves or use the Rocket Launcher and fire at the Strogg's feet to avoid the missile sailing harmlessly past. Where the Gunner's stood, there are two electrical fuses. Shoot them out with your Blaster. After the first one you'll get the message "1 more to go" and after the second "Sequence completed!" In the middle of the room a bar will lower allowing you to enter a downward-sloping tunnel into the rock. See Secrets, below, at this point.
The tunnel leads around two turns to a cavern in which there are two Mutants (everything in twos). Recall their long leaps and damaging melee attacks, so back away and use the Chain Gun to kill them as they follow you. From their cavern, the way leads through an opening to the left. If you come here too soon, i.e. before lowering the access bridge, you will find this opening barred and approaching it will produce the message "Drilling area. Access denied". Go though, follow the tunnel and you'll quickly come to a cavern containing a drilling laser. Operate the wall button to turn on the laser, keep clear and a new hole will be made in the cavern floor. You will get the message "New passage to lower mines created". You should have have 22 of the 26 enemy kills. You will be able to come back here later, but it will be quite a journey, so collect anything you need now, drop into the new passage and play through the Lower Mines level.
Finding the Service Elevator
When, on returning from the Lower Mines, you enter the final part of the Drilling Area, your field computer updates your secondary objective to "Service elevator to Factory accessible". Not only is it accessible, it's just a hop, skip and a jump (and the last four Strogg) away! Cross the bridge to the tunnel entrance. Now, if the bridge isn't down, don't despair, you just forgot to operate the lever that you can see through the bars in the room ahead of you (probably due to cheating or loading levels at the console). Drop into the water on the right-hand side of the central platform and swim into a well-lit underwater tunnel. You will come up through the mysterious hatchway that was mentioned a while ago. Go around to the left, operate the lever and return through the hatchway and the underwater tunnel, climbing a ladder back up onto the walkway near the door.

The tunnel leads around two bends to a large room with the service elevator in the middle. Your field computer updates again and, somewhat prematurely, shows "Primary unit objective complete" as the primary objective and "Proceed to the Factory" as the secondary. In the room are two Tanks, two Light Guards and some exploding barrels. You may not see the Guards because when the Tank on your left swings his Machinegun around he often takes them out by accident. Anyway, there is good cover at the corner of the tunnel, so strafe to the left, fire at one of the Tanks and strafe right back to safety. Grenades will work very nicely. If you want to reach all the secrets, however, there is one small complication - do not set off the exploding barrels that are around to the right of where the tunnel opens out into the room. If you stay back in the tunnel, you'll be OK, you only risk messing up the secret if you run out into the room to fight the Tanks. See below for details of the Secret.
After killing the Tanks, use the elevator to exit the level and move on to the Factory unit. If, first, you need to go back to complete enemy kills, find secrets or collect any items that you left behind you can reach all parts of the level, and, in fact, backtrack to anywhere in the unit, but it will be quite a hike. Begin by taking the underwater tunnel back to the first area in this level as described above. Try to exit the unit with full ammunition for all weapons and 100 armor points.
Secrets
This level has two (2) secrets:
- After killing two Guards and shooting out two electrical fuses to lower a bar, you go into a tunnel that slopes gently down to a bend to the left. There is a crack in the rock wall of the tunnel on the right just at the bend. Shoot it to break open an alcove containing an Invulnerability item. When you do this, you'll receive the message "You have found a secret area".
- In the final room, where you find the service elevator that takes you to the next unit, there is an Adrenaline vial in plain sight on a high ledge to the right. To reach it, jump on a barrel and from there jump to the stack of crates and climb up. When you take the vial you'll get the message "You have found a secret". Be careful not to explode the barrel when fighting the Tanks and Guards in this room or you won't be able to get the secret (other than using a Rocket jump).
- Gallery : Secrets in the Drilling Area level.
-
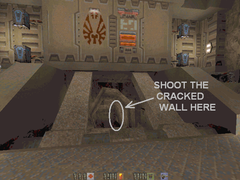
The way ahead lies down this sloping rock tunnel.
-
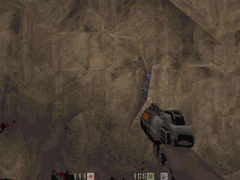
Here's the crack in the rock wall at the bend.
-
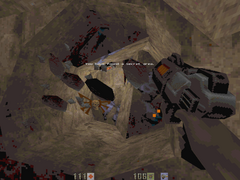
Shoot the crack to reveal this secret alcove.
-
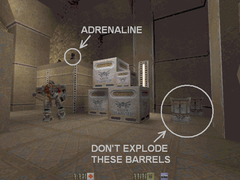
These barrels are needed to get to the Adrenaline vial.
-

Jump onto the barrel and climb the stack of crates.


