Jump to navigation
Jump to search
Notmyhandle (talk | contribs) (cleanup, fixed links, added footer nav) |
m (Text replacement - "Infobox_SMW_Level" to "SMW/Level") |
||
| (3 intermediate revisions by 3 users not shown) | |||
| Line 1: | Line 1: | ||
{{Header Nav|game=Super Mario World}} | {{Header Nav|game=Super Mario World}} | ||
{{ | {{SMW/Level | ||
|level name = Forest Ghost House | |level name = Forest Ghost House | ||
|level type = Ghost House | |level type = Ghost House | ||
|entrance = [[Super Mario World/Forest of Illusion 1|Forest of Illusion 1]] | |entrance = [[Super Mario World/Forest of Illusion 1|Forest of Illusion 1]] & [[Super Mario World/Forest of Illusion 3|Forest of Illusion 3]] | ||
|exit = [[Super Mario World/Forest of Illusion 4|Forest of Illusion 4]] | |exit = [[Super Mario World/Forest of Illusion 4|Forest of Illusion 4]] | ||
|secret exit = [[Super Mario World/Forest of Illusion 1|Forest of Illusion 1]] | |secret exit = [[Super Mario World/Forest of Illusion 1|Forest of Illusion 1]] | ||
|time at start = 400 | |time at start = 400 | ||
}} | }} | ||
==Walkthrough== | |||
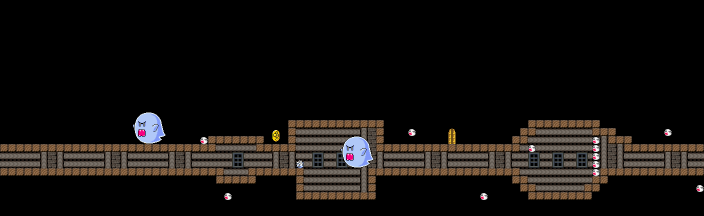
{{Scrolling map|SMW-FGH-1.png}} | |||
* When you first appear here, you will be inside the narrow corridor. | |||
* Duck or jump over the Eerie coming towards you, but be sure to face the Boos so they don't ambush you. Afterwards, you will need to lure the Big Boo away so you can pass him and continue onwards. | |||
* The wall of Boos may look dangerous, but in practice sprite overload will keep most of them from appearing, meaning you can just spin jump off the remaining ones to continue. | |||
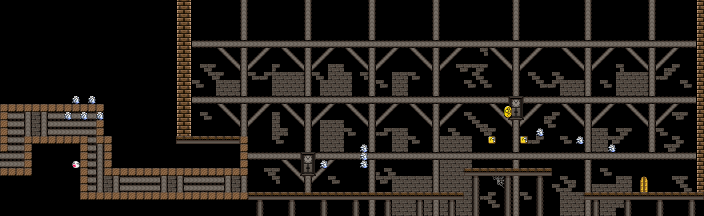
{{Scrolling map|SMW-FGH-2.png}} | |||
* The Eeries here move in a wavy pattern, so if you jump you might get hurt by them. Again, due to sprite overload, you might only see two or three of them. | |||
* In the large hall, the right ? block contains a feather. Enter the door at the end to get to the second area. | |||
* If you thought about flying up above the wall to get on top of the corridor, it is possible but you'll need to do it from the ledge at the left to get enough height to clear the wall. It skips a large portion of the level, so you can just enter one of the two doors on top of the corridor. | |||
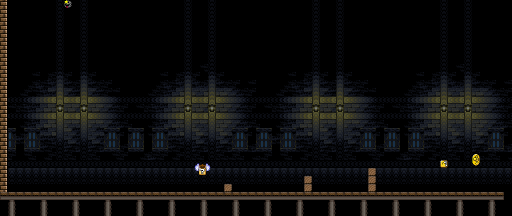
{{Scrolling map|SMW-FGH-3.png}} | |||
* You'll have to deal with a Boo ceiling here that swoops down on you in this area. Keep moving or the Boos will get you. | |||
* The ? block flying towards you contains a flower. Later on, the stationary ? block contains a feather. | |||
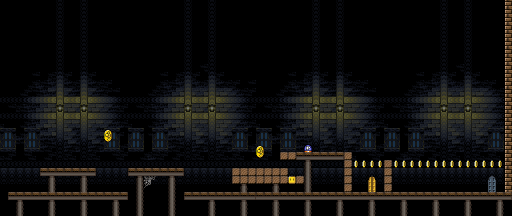
{{Scrolling map|SMW-FGH-4.png}} | |||
* Small Mario can hit the turn block at the very bottom for a 1-up mushroom. | |||
* The visible door is a trap that leads back to the beginning. Instead, grab the P-Switch and jump through the coins to the very end. Step on it and a hidden door will appear. | |||
* The hidden door leads back to the beginning as well, but this time you will be on top of the corridor. Go to the left and enter the first door you see to find the exit. | |||
{{sidebar|float=right|width=250px|title=3-up moon|contents=Just in front of the goal tape of the secret exit, a 3-up moon will be lying on the ground - an almost too generous reward, given how easy it is to find the secret exit in this level.}} | |||
==Secret Exit== | |||
The secret exit is rather straightforward. Once on top of the corridor, get past the first door that leads to the normal exit. Near the end (obscured by the Big Boo on the map) there's a second door which leads to the secret exit. | |||
Note that if you have already unlocked the path from Forest of Illusion 1 to the Forest Ghost House, taking the secret exit has no effect, but it still counts towards your totals so you should complete it at least once. | |||
==Dragon Coin locations== | |||
The five Dragon Coins in this level are located as follows: | |||
* On top of the corridor, past the normal exit. | |||
* In the large hall, between the ? blocks. | |||
* The other three are in plain sight in the room with the Boo ceiling. | |||
{{Footer Nav|game=Super Mario World|prevpage=Forest of Illusion 3|nextpage=Forest of Illusion 4}} | {{Footer Nav|game=Super Mario World|prevpage=Forest of Illusion 3|nextpage=Forest of Illusion 4}} | ||
Latest revision as of 15:52, 26 February 2020
| Forest Ghost House | |
|---|---|
| Level type | Ghost House |
| Entrance | |
| Exit | |
| Secret Exit | Forest of Illusion 1 |
| Time at Start | 400 |
Walkthrough[edit]

- When you first appear here, you will be inside the narrow corridor.
- Duck or jump over the Eerie coming towards you, but be sure to face the Boos so they don't ambush you. Afterwards, you will need to lure the Big Boo away so you can pass him and continue onwards.
- The wall of Boos may look dangerous, but in practice sprite overload will keep most of them from appearing, meaning you can just spin jump off the remaining ones to continue.

- The Eeries here move in a wavy pattern, so if you jump you might get hurt by them. Again, due to sprite overload, you might only see two or three of them.
- In the large hall, the right ? block contains a feather. Enter the door at the end to get to the second area.
- If you thought about flying up above the wall to get on top of the corridor, it is possible but you'll need to do it from the ledge at the left to get enough height to clear the wall. It skips a large portion of the level, so you can just enter one of the two doors on top of the corridor.

- You'll have to deal with a Boo ceiling here that swoops down on you in this area. Keep moving or the Boos will get you.
- The ? block flying towards you contains a flower. Later on, the stationary ? block contains a feather.

- Small Mario can hit the turn block at the very bottom for a 1-up mushroom.
- The visible door is a trap that leads back to the beginning. Instead, grab the P-Switch and jump through the coins to the very end. Step on it and a hidden door will appear.
- The hidden door leads back to the beginning as well, but this time you will be on top of the corridor. Go to the left and enter the first door you see to find the exit.
Secret Exit[edit]
The secret exit is rather straightforward. Once on top of the corridor, get past the first door that leads to the normal exit. Near the end (obscured by the Big Boo on the map) there's a second door which leads to the secret exit.
Note that if you have already unlocked the path from Forest of Illusion 1 to the Forest Ghost House, taking the secret exit has no effect, but it still counts towards your totals so you should complete it at least once.
Dragon Coin locations[edit]
The five Dragon Coins in this level are located as follows:
- On top of the corridor, past the normal exit.
- In the large hall, between the ? blocks.
- The other three are in plain sight in the room with the Boo ceiling.