The following requires the Carrier Map Battles Pack, from either Games for Windows Live Marketplace (PC) or the Xbox 360 Marketplace (Xbox).
Phillipines is an island map set obviously in the Phillipines. The map layout is nothing out of the ordinary, but the map has a focus on submarines and destroyers rather than cruisers and battleships.
Escort
A damaged South Dakota class battleship is stranded near an island. US players must protect the battleship and destroy the incoming Japanese carriers, whilst the Japanese side has to sink the US battleship and protect their own carriers.
—Map description

On this escort mission, both sides are fairly even, but it still favours the Americans. The Allies have a considerably easier time with this mission than the Japanese will, but a Japanese victory is not entirely out of reach either.
The Japanese start to the north of two US groups. The western area contains a beached South Dakota-class, two Fletchers, and an airfield where US players can spawn. The eastern fleet consists of six repair ships, two Fletchers, and a Yorktown-class. The carrier acts as a spawn point for US players. The target battleship is at half health upon the mission start.

The Japanese must first sink the repair ships, but it is extremely difficult, if not impossible, to sink all of them. This is due to the amount of flak each repair ship (a troop transport) puts up, not to mention the destroyer escort that makes things even harder. Topping off the Allies' defences around the repair ships is the fighter CAP the Japanese must face.
The Allies' objective is simple; escort the repair ships to the damaged battleship. Once they're within about one to one and a half kilometres out, the repair ships will set to work and the battleship's health will rise. How much it rises depends on the number of repair ships that have survived up to that point. A single repair ship will repair approximately 20-30% of its health. That is why it is important for the Japanese to sink as many repair ships as possible. A convoy of six repair ships will inevitably bring the battleship to 100% health, and Japanese defeat at that point is inevitable.
Both sides must keep in mind that the true objective is the battleship: if the Japanese are confident they can destroy the battleship before the repair ships arrive, then all the better. However, the battleship is beached, making it extremely difficult to damage with torpedoes.
If the battleship gets repaired, it begins to advance on the Japanese carriers. The carriers, in desperation, will unlock suicidal Zeroes in a last-ditch effort to sink the battleship and protect themselves. The mission ends when the Japanese sink the battleship, or if the battleship sinks the two carriers.
Siege
Allied forces are carrying out an amphibious operation in the Phillipines. The US has to destroy the Japanese headquarters, whilst the Japanese must destroy the US carrier.
—Map description

This is a fairly straightforward map. The Americans have access to a mere two units: the Cleveland-class CL and the F6F Hellcat. They can spawn from two locations fairly close to each other. Their other assets include the three respawning troop transports and a Yorktown-class carrier escorted closely by four Atlanta-class CLs.
The Japanese have more units, but are generally weaker. Kuma-class destroyers can spawn from the southern side of the island. Japanese players can also choose to spawn at an airfield in the middle of the island. It has access to A6Ms, B6Ns, and H6Ks.
The Allies have it easy on this map; they must simply neutralize the headquarters. The HQ is actually within shelling range from the shore, but it is heavily guarded by fortresses, batteries, and coastal guns. The Cleveland-class is tough, though, and can get off several hits on the headquarters before going down. Any players flying Hellcats will want to simply destroy any fliers from the airfield in the middle, or destroy the many coastal guns and heavy AAs to help secure the area.
The Japanese have it considerably tougher. They must seek to either neutralize the Yorktown-class carrier or reduce the Allies' strengths to zero. The former is extremely difficult; the Atlantas make everything harder, and can easily finish off any Kumas that run the gauntlet of player-controlled Clevelands. An air attack against four Atlantas and a carrier is tantamount to suicide.
The defenders must therefore focus on the enemy landing fleet to the northeast of the island. The troop transports positioned there will constantly respawn and can deduct approximately 10 points off of the Allies' strength. The Allies, however, can spawn extremely close to the troop transports, so the Japanese will want to hurry their ships around the island to fight them. Camp this area to the best of your ability to whittle down the Allies' strength.
Competitive
A US carrier and enemy cargos are heading through an area controlled by Japanese submarines. Your task is to stop those cargo ships and their carrier escort.
—Map description


This fairly simple competitive match is extremely difficult, especially to get the achievement The Survivalist. In order to get it, you must both win and not die. It's usually best to take this in single player, or in multiplayer with friends who can distract the ASW Fletchers and the depth charge-equipped SB2Cs. It's extremely unsafe on the surface, not just because the ASW Fletchers have guns, but because the carrier launches Rocket Corsairs that will cook any submarine that stays surfaced for too long. These corsairs will also easily down any recon planes sent up by the subs.
The Survivalist can be obtained in single player through a delicate balance of AIs. Add too many and you'll be unable to win; add too few and you won't be able to stay alive. Use crush depth liberally to avoid depth charge and especially hedgehog attacks.
The cargo ships and the ASW Fletchers will continuously respawn, but the carrier won't. That said, it's suicide to try and surface to either launch a seaplane or try to shoot down the Corsairs and Helldivers. Crush depth will be your friend, even if you take damage from it. Simply sink as many cargoes as possible to win.
Duel

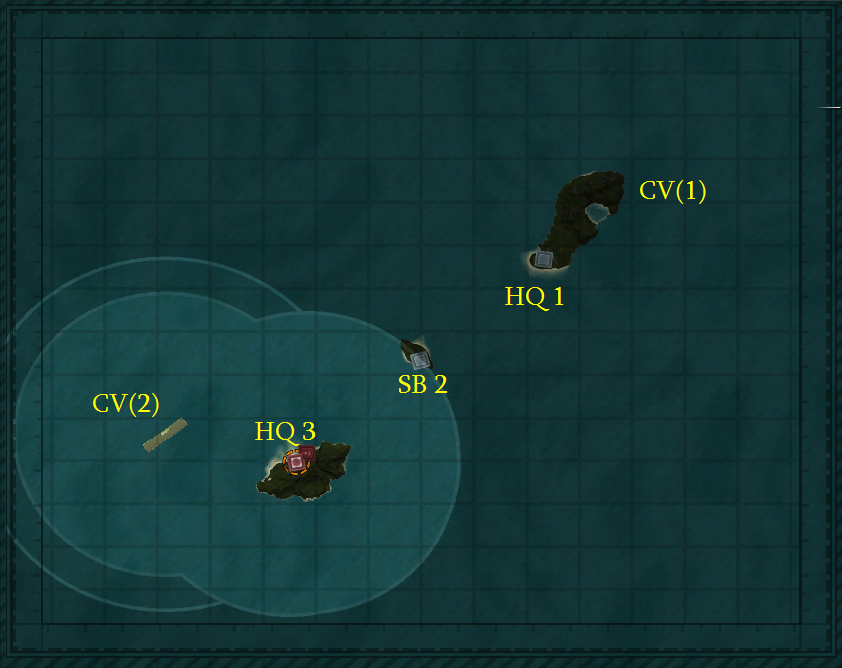
Island Capture - Small
Map Description: This map is extremely interesting, as the focus is, for once, on submarines and destroyers rather than cruisers and battleships. This is one of the few maps, therefore, where anti-submarine units - namely the ASW Fletcher and the FIDO Avenger are powerhouses. That said it's entirely possible for players to focus on destroyers and ignore submarines altogether.
Unlock Data:As aforementioned, destroyer and submarine unlocks are the only real way to go here. It's possible to pick the J9Y Kikka dive bomber or the TBM Avenger torpedo bomber, but naturally destroyers are the best. TBMs are excellent ASW units as well, so at least one player on the US side will usually pick it.
Balancing Notes: While not entirely balanced, this map is quite balanced. TBMs are what unbalance the map, as their FIDO torpedoes can easily fry Japanese submarines. They can also eliminate the Japanese base, and the Japanese don't have much to respond to them with aside from fighters. P-51s are also somewhat overpowered on this map, due to the lack of heavily armoured cruisers on this map.
Click on a Headquarters to see what it can spawn.
HQ 1 (Allied)
- Elco PT boat
- Fletcher-class DD
- Narwhal-class SS
- ASW Fletcher-class DD
- Allen M. Sumner-class DD
- Gato-class SS
- Gyoraitei PT boat
- Fubuki-class DD
- Type B SS
- Akizuki-class DD
- Shimakaze-class DD
- I-400-class SS
- Kaiten Carrier SS
None
None
HQ 3 (Japanese)
- Elco PT boat
- Fletcher-class DD
- Narwhal-class SS
- ASW Fletcher-class DD
- Allen M. Sumner-class DD
- Gato-class SS
- Gyoraitei PT boat
- Fubuki-class DD
- Type B SS
- Akizuki-class DD
- Shimakaze-class DD
- I-400-class SS
- Kaiten Carrier SS
None
None
CV(1) - Yorktown-class
Allied planes
- F6F Hellcat
- SB2C Helldiver
- TBF Avenger'
- P-51 Mustang
- TBM Avenger
- P-80 Shooting Star
CV(2) - Akagi-class
Japanese planes
- J2M Raiden
- D4Y Judy
- B6N Jill
- J9Y Kikka
- J7W Shinden
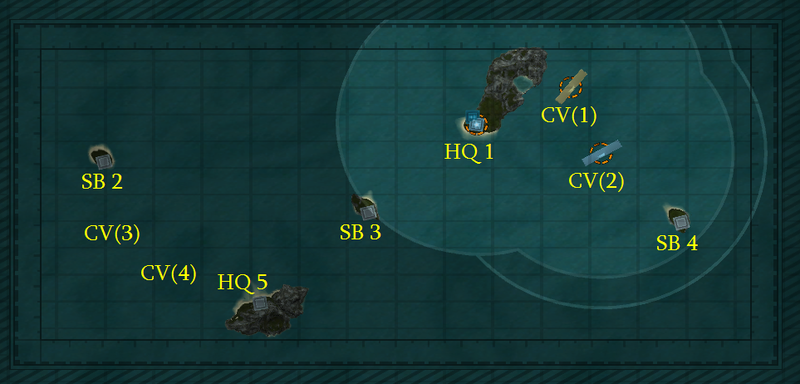
Island Capture - Medium
Map Description: This map is pretty much the same as Small, but has a few additional supply bases on the sides, and each side has an additional carrier. Other than that the two maps are identical. Focus should be on submarines and anti-submarine warfare. As a result of a lot of submarines, expect a few torpedo battles on this map between subs.
Unlock Data: As aforementioned, destroyer and submarine unlocks are the only real way to go here. It's possible to pick the J9Y Kikka dive bomber or the TBM Avenger torpedo bomber, but naturally destroyers are the best. TBMs are excellent ASW units as well, so at least one player on the US side will usually pick it.
Balancing Notes: While not entirely balanced, this map is quite balanced. TBMs are what unbalance the map, as their FIDO torpedoes can easily fry Japanese submarines. They can also eliminate the Japanese base, and the Japanese don't have much to respond to them with aside from fighters. P-51s are also somewhat overpowered on this map, due to the lack of heavily armoured cruisers on this map.
Click on a Headquarters to see which units it can spawn.
HQ 1 (Allied)
- Elco PT boat
- Fletcher-class DD
- Narwhal-class SS
- ASW Fletcher-class DD
- Allen M. Sumner-class DD
- Gato-class SS
- Gyoraitei PT boat
- Fubuki-class DD
- Type B SS
- Akizuki-class DD
- Shimakaze-class DD
- I-400-class SS
- Kaiten Carrier SS
None
None
HQ 5 (Japanese)
- Elco PT boat
- Fletcher-class DD
- Narwhal-class SS
- ASW Fletcher-class DD
- Allen M. Sumner-class DD
- Gato-class SS
- Gyoraitei PT boat
- Fubuki-class DD
- Type B SS
- Akizuki-class DD
- Shimakaze-class DD
- I-400-class SS
- Kaiten Carrier SS
None
None
CV(1) - Yorktown-class
Allied planes
- F6F Hellcat
- SB2C Helldiver
- TBF Avenger
- P-51 Mustang
- TBM Avenger
- P-80 Shooting Star
CV(2) - Yorktown-class
Allied planes
- F6F Hellcat
- SB2C Helldiver
- TBF Avenger'
- P-51 Mustang
- TBM Avenger
- P-80 Shooting Star
CV(3) - Akagi-class
Japanese planes
- J2M Raiden
- D4Y Judy
- B6N Jill
- J9Y Kikka
- J7W Shinden
CV(4) - Akagi-class
Japanese planes
- J2M Raiden
- D4Y Judy
- B6N Jill
- J9Y Kikka
- J7W Shinden
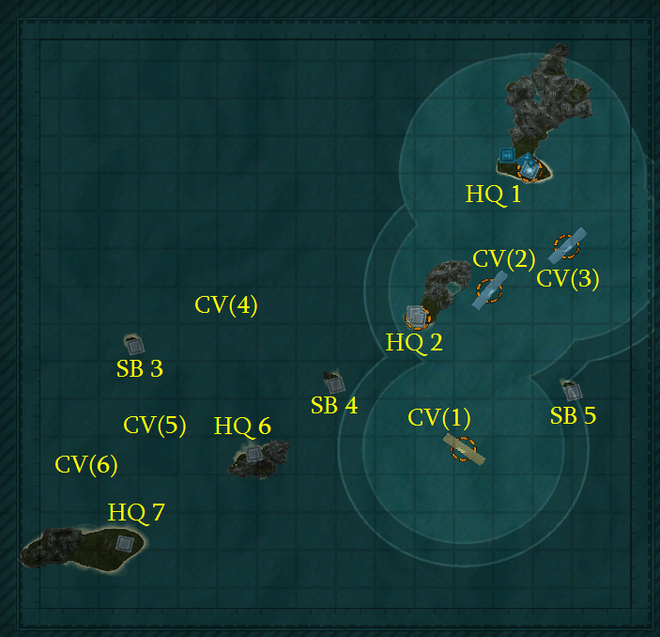
Island Capture - Large
Map Description: Size Large still focuses on submarines and destroyers. The Japanese however must be aware of Allied TBM Avenger attacks from their carriers; all three of them sport this devastating long-range weapon, making the Allied carriers far more deadly. However, the Japanese land bases are capable of equipping the relatively slow-moving but devastatingly accurate H8K Emily flying boat. Fighter screens are a must on this map to protect submarines and carriers from the skies. This map is one of only two places where players can control the Bogue class escort carrier and the only map where players can control a Shoho class CVE.
Unlock Data:As aforementioned, destroyer and submarine unlocks are the only real way to go here. It's possible to pick the J9Y Kikka dive bomber or the TBM Avenger torpedo bomber, but naturally destroyers are the best. TBMs are excellent ASW units as well, so at least one player on the US side will usually pick it.
Balancing Notes: While not entirely balanced, this map is quite balanced. TBMs are what unbalance the map, as their FIDO torpedoes can easily fry Japanese submarines. They can also eliminate the Japanese base, and the Japanese don't have much to respond to them with aside from fighters. P-51s are also somewhat overpowered on this map, due to the lack of heavily armoured cruisers on this map. The Japanese can finally employ the Ohka Carrier, but they take a long time to get into the fight and therefore are more of a defensive unit.
Click on a Headquarters to see what units it can spawn.
Click on a Headquarters to see which unit it can spawn.
HQ 1 (Allied)
- Clemson-class DD
- LST Mark 2
- ASW Fletcher-class DD
- Allen M. Sumner-class DD
- Minekaze-class DD
- SB Boat LST
- Akizuki-class DD
- Shimakaze-class DD
- PBY Catalina
- OS2U Kingfisher
- B-17 Flying Fortress
- B-29 Superfortress
- H6K Mavis
- F1M Pete
- G4M Betty
- Ohka Carrier (MXY-7 Ohka)
- G5N Liz
- H8K Emily
HQ 2
- Elco PT boat
- Fletcher-class DD
- Narwhal-class SS
- ASW Fletcher-class DD
- Allen M. Sumner-class DD
- Gato-class SS
- Gyoraitei PT boat
- Fubuki-class DD
- Type B SS
- Akizuki-class DD
- Shimakaze-class DD
- I-400-class SS
- Kaiten Carrier SS
None
None
HQ 6
- Elco PT boat
- Fletcher-class DD
- Narwhal-class SS
- ASW Fletcher-class DD
- Allen M. Sumner-class DD
- Gato-class SS
- Gyoraitei PT boat
- Fubuki-class DD
- Type B SS
- Akizuki-class DD
- Shimakaze-class DD
- I-400-class SS
- Kaiten Carrier SS
None
None
HQ 7 (Japanese)
- Clemson-class DD
- LST Mark 2
- ASW Fletcher-class DD
- Allen M. Sumner-class DD
- Minekaze-class DD
- SB Boat LST
- Akizuki-class DD
- Shimakaze-class DD
- PBY Catalina
- OS2U Kingfisher
- B-17 Flying Fortress
- B-29 Superfortress
- H6K Mavis
- F1M Pete
- G4M Betty
- Ohka Carrier (MXY-7 Ohka)
- G5N Liz
- H8K Emily
CV(1) - Yorktown-class
Allied planes
- F6F Hellcat
- SB2C Helldiver
- TBF Avenger
- TBM Avenger
- P-80 Shooting Star
- P-51 Mustang
CV(2) - Yorktown-class
Allied planes
- F6F Hellcat
- SB2C Helldiver
- TBF Avenger
- TBM Avenger
- P-80 Shooting Star
- P-51 Mustang
CV(3) - Bogue-class
Allied planes
- F6F Hellcat
- SB2C Helldiver
- TBF Avenger
- TBM Avenger
- P-80 Shooting Star
- P-51 Mustang
CV(4) - Akagi-class
Japanese planes
- J2M Raiden
- D4Y Judy
- B6N Jill
- J7W Shinden
- J9Y Kikka
CV(5) - Akagi-class
Japanese planes
- J2M Raiden
- D4Y Judy
- B6N Jill
- J7W Shinden
- J9Y Kikka
CV(6) - Shōhō-class
Japanese planes
- J2M Raiden
- D4Y Judy
- B6N Jill
- J7W Shinden
- J9Y Kikka