From StrategyWiki, the video game walkthrough and strategy guide wiki
Jump to navigation Jump to search
m (Added cats and infobox.)
No edit summary
 
(25 intermediate revisions by 8 users not shown)
Line 1: Line 1:
{{wip}}
{{Header Nav|game=Hydro Thunder}}
{{needcontrols|Dreamcast}}
{{Game
 
|completion=3
{{infobox|
|image=HydroThunderDCBoxArt.jpg
|title=Hydro Thunder
|title=Hydro Thunder
|boxart=[[Image:HydroThunderDCBoxArt.jpg|275px]]
|developer=[[Midway San Diego]]
|developer=[[Midway Games]]
|publisher=[[Midway Games]]
|publisher=[[Midway Games]]
|categories=[[Racing]]
|year=1999
|systems=[[PC]]<br />[[Nintendo 64]]<br />[[PlayStation]]<br />[[Dreamcast]]<br />[[Arcade]]
|systems={{syslist|cade|dc|ps|n64|win}}
|releasedates=[[1999]]
|ratings={{ESRB|E}}
|genre=[[Racing]]
|players=1-2
|players=1-2
|ratings=ESRB: E (Everyone)
|modes=[[Single player]], [[Multiplayer]]
|requirements=unknown
|series=Thunder
|pcgamingwiki=Hydro Thunder
}}
}}
__TOC__
'''Hydro Thunder''' is a powerboat [[racing]] game, originally an [[arcade]] game and later released for the [[Sega Dreamcast]] in November [[1999]]. It was also released for [[PlayStation]] and [[Nintendo 64]] in early [[2000]]. This game is part of [[Midway]]'s {{c|Thunder}} series of racing games, which includes [[Offroad Thunder]], [[4 Wheel Thunder]], and [[Arctic Thunder]]. A sequel, [[Hydro Thunder Hurricane]], was released for the [[Xbox 360]] on July [[2010]] on Xbox Live Arcade.
== Known Versions ==
 
=== Arcade ===
The original.  Never actually played it myself, so I can't comment.
Apparently does not contain the Catacomb & Castle Von Dandy tracks.
Some of the tracks are hidden from normal play also.
 
=== Sega Dreamcast ===
Control of the boats is not always good & sometimes they don't respond to
turning even if you go at a snails pace - really frustrating when you don't
get the angle right when heading for an obscured boost.  Only thirteen
tracks are in the game, not the mis-printed 14 that is in the manual (the
'test' track got pulled before release).  Lighting on some levels makes for
difficult visuals, but realistic.  This version has the most annoying name
entry system for high scores as the control is via the control pad's left &
right with no auto-repeat and the game does not remember the last name
entered.
 
=== Sony Playstation (PSX) ===
Graphically the worst of the lot.  Plays well with a good sense of speed.  A
little too dark in places though.  As with the Dreamcast version, control of
the boats is not always good & sometimes they don't respond to turning even
if you go at a snails pace.  Has two additional features to the basic 13
tracks: Time Trial & Circuit Mode. In Time Trial you get to pick a course &
run through it without any opponents.
 
In Circuit Mode you have a pot of money & enter each track.  You have to
race all the easy tracks before being allowed to enter any medium tracks,
race all medium before hard & all hard before bonus.  You can race the
tracks within each difficulty in whichever order you care to. You begin with
a pot of $3,000 and it costs $500 to enter each of the easy tracks, $1,000
for medium, $1,500 for hard and $2,000 for the bonus tracks.  Prize money is
$3,000 for 1st place, $2,000 for 2nd place and $1,000 for 3rd - nothing for
any other place.  The high score is based on your earnings only - not the
amount left after track entry fees - so a maximum of $39,000 is possible.
 
=== Nintendo 64 ===
Graphically OK.  Plays very sluggish and gets far too dark in far too many
places to really see what you're doing. No sense of speed in this version at
all.  Very big let-down compared to other versions.
 
=== IBM PC ===
Visually superb but the qwerk with the super start was off-putting at first.
Control of the boat is responsive.  Record entry is the easiest as the
developers took into consideration the keyboard being present so you can
simply type it in.  Some great visual effects in terms of lighting but this
can make some areas of the game difficult to navigate until you are used to
the course.
 
== The Controls ==
 
Controls in all versions of the game have the basic form of: Left, Right,
Accelerate (forward), Brake (backward) and Boost. Pick up the Boost targets
as you go through the game to enable the boost.  Use the boost version of
super start to get a 4 second boost right at the beginning (see further
down).
 
=== Super Starts ===
There are various ways to get a super start, all involve using the controls
of the boat during the 3-2-1 start sequence.  The most effective I've found
is the boost super start - a way of getting a jump start at the beginning as
well as a 4 second boost immediately.  To pull this off, perform the
following: as soon as the track appears you should be holding the brake or
boost control (note: for the IBM PC and Sega Dreamcast versions hold brake,
for Nintendo 64 and Sony PSX hold boost).  As soon as the figure 3 starts to
fade switch to the accelerate control.  When the figure 2 starts to fade
switch back to the brake/boost control. When the figure 1 starts to fade
switch back to the accelerate control.  Done correctly this will get you
that jump start (literally a little jump on the IBM PC and Sega Dreamcast)
as well as a 4 second boost - you'll have to wait for the engines to switch
to boost mode though.
 
=== Hydro Jumping ===
At any time you have some boost in reserve & are on the flat you have the
option of performing a jump.  To do so, follow the sequence of
accelerate-brake-boost (let go of each in turn).  You will find better
performance by overlapping the switch from brake to boost, the longer the
overlap, the higher the jump (up to a maximum).
 
== Some Simple Rules ==
 
Avoid hitting anything unless it's a ramp.  If it's a ramp with arrows going
up it, try to hit only one side of it - following the arrows to get their
speed increase - the longer & flatter the ramp the more speed increase it
gives.
 
Use the check point times as a guide to how well you are doing over previous
runs.  Be careful on circuit tracks not to over use the boost early on to
gain the best split times as you will end up with none or next to no boost
on the last lap.
 
For cornering try to take a longer, wider path along the turns and avoid
sharp turns if you can.  The less the boat turns at faster speeds, the less
the speed you loose because of that turn.  This is exactly the same
principal as any other (road) based racing game & is usually referred to as
a "racing line" around the corner.
 
Get used to hydro-jumping, it's the only way you'll win on the harder tracks
& get good times on any track - you can max out the speed when in the air
using boosts and as soon as you are at maximum speed you can let go of the
boost & continue at that speed until you land (or hit something).  An
extension of this is hydro-bouncing - hydro-jumps, one after each other.  To
pull this off, towards the end of a jump, go through the sequence of another
jump. Get it right & you'll jump straight back into the air and with a
little boost you'll be right back up to max speed so you can kill the boost
and preserve it.
 
If you're just after high placements and not particularly interested in the
times, then stick with the boats you get at the beginning - the "easy"
boats. My own preference for this is Damn the Torpedoes.  The reason being
is the computer boats will go at a comparable speed to the boat you select
and the slower boats still boost at max speed giving you that added
advantage over the computer boats as they are going at their slowest speeds
in the game. For setting times, I always use Cut Throat - it's stability,
max speed (when not boosting) and ability to fly well make for an excellent
combination.  Don't get me wrong - it's not the best at each but it's the
combination that makes it the best. Note: just as the Easy boats are easier
to complete in first place, the Hard boats are harder to complete in first -
don't be discouraged if you're not finishing first in these boats until you
are used to the individual track and it's secrets.
 
== The Tracks ==
 
=== Lost Island (Easy Track) ===
Begin with a super boost & head straight for the ramp that's immediately in
front & pick up the 4 second boost.  The track takes a right & you'll see a
waterfall ahead while the main track heads left.  Go under the waterfall &
pick up the 9 second as you glide left and the next 4 second boost off the
ramp at the end.  It's a good idea to perform a jump off the end instead of
relying on the ramp as you'll travel further before rejoining the main track
below.
 
As you join the main track again look to the left - you'll see a series of
huts here followed by a rocky outcrop and then an archway straight ahead -
as you join the main track a host of arrows will fly above your head.  Use
your boost to get between the second hut & the rocky outcrop. You're now in
a secret tunnel.
 
Once in the tunnel, go headlong to the 9 second boost & left to the check
point.  Shortly after, head right to a 4 second boost & then right again out
of the tunnel to an elevated section just off the main track which is below
to the right of you.  Collect the four second boost and, keeping on the
elevated section, head short right then left to another ramp, aiming for the
9 second boost that is just after the ramp.  You'll drop back down to the
main track.
 
The main track takes a sweeping right passing the next check point and a 4
second boost.  A series of gangplanks make up a sort of quay just above the
track - be careful not to jump straight into one or you'll loose control of
the boat very easily.  Carry on through the archway and down the dip of the
track which takes a left here.  There's a long straight here to do some
hydro bouncing to get you're speed up and it ends in a waterfall down away
from you - there's a bridge just after it & another waterfall on your left.
Ignore the waterfall on your left but if you can catch the top of the bridge
it'll keep your speed consistent for a bit longer & prevent you from hitting
the water.  Head straight for the 4 second boost ahead & into the tunnel.
 
After entering the tunnel the track heads right and enters a cavern with a
ramp and volcano ahead.  Use the ramp to jump over the volcano and pick up a
hidden 9 second boost.  On the other side of the cavern (straight ahead from
the ramp-volcano jump) is a 4 second boost.  Another right turn and then a
drop into another cavern lead you to a skull-capped archway.  Under the
archway and you can see the finish line.
 
Keep to the left side under the skull archway and head for the ramp & 4
second boost combination ahead.  Boost your way to the finish line.
 
==== Times to beat ====
* [[http://www.cyberscore.net/chart-21986.php Cyberscore Scores]]
* [[http://www.twingalaxies.com/index.aspx?c=22&g=lost+island Twin Galaxies Scores]]
 
=== Thunder Park (Easy Track) ===
 
A circuit race set in a crowded purpose-built arena.  As with all the
circuit races, boost management is essential.  It may take a few runs just
to figure out the best order to get each boost, but make sure you leave some
for each of the three laps.
 
You begin on the long start-finish straight with a 4 second boost just ahead
on a bridge. Just after that boost is another 4 second boost on the main
track. Only get one of these two first time around, saving the other for the
second or third lap, depending on how your boost is going.  At the end of
the straight is a tunnel with a u-turn & a 9 second boost on the inside of
the turn at the end.  Save this one until the third lap.  You soon exit the
tunnel & hit some big waves which will slow you down - try to jump over
them.  In amongst the waves is another 4 second boost.  Get it on the first
lap if you can (you can still collect boosts even though you may be high
above them) and then continue into the glass tunnel ahead.  The glass tunnel
takes you right then left. Just after the right is another 4 second boost -
collect this one if you missed the one at the waves.  Exit the glass tunnel
on the left-hand side as there is a decent ramp with a 9 second boost at the
top (though if you're boost management is particularly good you may be able
to save it 'till a later lap).
 
After the ramp is a straight - good air time followed by a 90 degree left &
a 4 second boost on the inside of the turn.  Another straight (more good air
time) and another 4 second boost, followed by another 90 degree left.
Around this corner and you're back on the start-finish straight.  Before the
finish line on the left is a ramp with a 4 second boost.  Just before this
on the right, however, is a crane with a speed boat dangling over the water.
Jump at the boat for a 9 second boost.
 
Boost management is all you now need.
 
==== Times to beat ====
* [[http://www.cyberscore.net/chart-21985.php Cyberscore Scores]]
* [[http://www.twingalaxies.com/index.aspx?c=22&g=thunder+park Twin Galaxies Scores]]
 
=== Arctic Circle (Easy Track) ===
As with Lost Island, you begin on a long straight & there's a boost
immediately ahead (though no ramp).  Head for the boost & follow the track
right slightly. You'll notice a series of buildings on the left, one of
which looks suspiciously like a ramp - it's just before the big outcrop of
rock on the left.  Use the building (it is a ramp) and boost of the rock to
skip the next corner. After landing, follow the track down & right and you
will see a tunnel ahead with a 4 second boost at it's entrance.  Enter the
tunnel & take a right as the track dips down to another 4 second boost &
then the tunnel's exit.
 
On exitting the tunnel, look straight ahead - the track heads left but
there's an icecap with a hole in the middle.  Jump into the hole & go for a
ride along ice.  Do your damnedest to keep the boat straight - if you fail
to you'll regret it on exitting the tunnel.
 
You'll exit the tunnel at max speed where there's a huge ocean-going liner
on the right & a checkpoint just in front.  Head over the checkpoint keeping
control if you can. You'll see a 4 second boost immediately ahead and
another icecap with another hole slightly obscured by a directional arrow.
If you have a decent amount of boost, use the hole - if you're after a good
time then this is the only way to go. Otherwise, the track takes a slight
detour to the left & back where there's a 9 second boost.  Either way,
you'll end up at a 4 second boost on the main track.
 
At this point an annoying ship flying the Jolly Roger flag will join you. On
the left just after it joins you - opposite the polar bears - is a slight
cavern.  If you're running low on boost, pop in & get the 9 second boost
otherwise just carry on past.  The track takes a slight right here & ahead
you will see a large ramp with another 9 second boost on it.  Jump the ramp
& collect the boost before heading left into another tunnel up a slight
incline.  The tunnel is initially water-based but will turn icy & proceed
downwards - don't bother boosting here as you will reach max speed quickly.
 
On exitting the tunnel at the bottom you'll find a short ramp with a 4
second boost on top.  Collect the boost & when you land follow the track
right.  Just after turning right is a boost mounted on the hill in front,
jump up to get it & turn to your left to boost in the direction the track is
now going.  At this point you'll see another icecap with another hole in
it - stick to the left of this one & you'll see a load of penguins just in
front.  Jump past the penguins (you may knock some off - it doesn't matter
for the purposes of the game) and use the entrance of the huge liner that
sits there, collecting a hidden 4 second boost for doing so.
 
Once inside the liner head for the big ramp & collect the 9 second boost
being careful not to bounce yourself off the roof of the liner too hard!
Exit the liner, collect the 4 second boost & follow the track to the right.
A long ramp is just around the corner - use it to get a big speed boost &
head straight over the finish line.
 
==== Times to beat ====
* [[http://www.cyberscore.net/chart-21987.php Cyberscore Scores]]
* [[http://www.twingalaxies.com/index.aspx?c=22&g=arctic+circle Twin Galaxies Scores]]
 
=== Greek Isles (Medium Track) ===
 
Start off by heading straight for the ramp with the 4 second boost & then
right to the ramp with the 9 second boost. The track takes you on a long
left with a 4 second boost on it's inside.  You could collect this boost and
then continue on to the ramp ahead with the 4 second boost and the check
point.  Alternatively, as you land from the ramp with the 9 second boost you
will find a banked rim to the right of the track which is just big enough to
fit your boat on.  Keep your speed up by jumping and land on the banked turn
and slide your way to the ramp with the 4 second boost. Either way, ignore
the annoying Greek Police boat - you're about to leave it behind.
 
After the check point look to the left - there's a waterfall.  Drive
straight under it using your boost to ensure no boats knock you out of the
way.  On the other side of the waterfall you'll take an left and a long
sweeping right-hander with a pair of 9 second boosts along the way.  About
four 'turns' after the second 9 second boost is a waterfall you drop off,
try to be in the middle of the track & don't use a boost. As you drop off
look to the left so you are ready for the landing.  If you positioned
yourself correct at the top you will collect the 4 second boost at the
bottom and if you've oriented to the left while dropping you'll be ready to
boost yourself from the stand still along past the pillars that will be on
your right.
 
After the pillars there's a 4 second boost in the air.  This one is only
worthwhile if you are already running low on booster.  Immediately after the
boost is a slide down to a flooded colluseum and another ramp, this time
with a 9 second boost at the top.  As with other slopes there's no need to
boost down this one so you can conserve booster if you need to.  Boost on
through the 9 second boost and you will land just short of a tunnel.  Part
way through this tunnel is a waterfall on the right-hand side which you have
to boost to get up to & there's a 9 second boost at the top - don't bother
it's not worth it.  Keep going straight & collect the four second boost
instead.  At the end of the tunnel you'll drop into a cavern and a four
second boost lies infront as well as the exit of the cavern.
 
Out of the cavern you'll go under two archways and the second has a bridge
of somekind immediately after it.  Get ready to jump as there's a 9 second
boost hanging in the air just afterwards.  You'll now be on a canal which
leads left then right & is great for a boost jump to jump over the
right-hand side even though it's tight as the invisible wall stops you.
Carry on straight, collect the four second boost and you'll be going under
another series of archways/bridges & pop out the other side on a long
sloping part of the canal with various archways along the way.  Again, as
with other slopes there's no need to boost down this though you may like to
near the top to get the speed up to max earlier.  The slope goes right, left
right & then straight to the bottom.
 
At the top of the slope you'll be able to see the finish line, so when
you've got to the bottom, boost through the 4 second boost to the ramp and
you should be able to fly your way to the finish line.
 
==== Times to beat ====
* [[http://www.cyberscore.net/chart-21988.php Cyberscore Scores]]
* [[http://www.twingalaxies.com/index.aspx?c=22&g=greek+isles Twin Galaxies Scores]]
 
=== Lake Powell (Medium Track) ===
 
You start this one in a very wide section of track.  Stay roughly to the
left, even though the first turn you'll make is to the right.  As the
left-side rock face starts to encroach prepare to turn sharp right to head
for a ramp - you'll get used to it. Head straight up the ramp and collect
the 9 second boost.  As you leave the ramp, turn your boat to the right and
start boosting as soon as you collect the boost.  You'll fly over the
archway where the 9 second boost is & head on down the straight that will
now be apparent. Don't boost all the way down this straight as there's a
sharp left turn at the end.
 
Around the left is a boat - stay to the right of it & head for the 4 second
boost in front and the next check point is as you go around the
right-hander.  At this point a ramp is in front with a four second boost.
In the air from that four-seconder turn to your right and boost down the
next turn.  This flight is a repeat of the one at the start - don't boost
too far as the next turn is an even sharper left with a boat on the
right-hand side which can easily be in the way if you're not used to it.
Past the boat and under a huge archway is another 4 second boost and another
check point on a right hand turn.
 
Immediately after the check point is a left hand turn and a waterfall drop.
Try to be on the right of the drop to land on a 4 second boost and then a
right hand turn into a tunnel.  Inside the tunnel and another right hand
turn looms as a part of a cavern - stick to the inside as there is a rock in
the middle of the track - to the left is a 4 second boost and to the right
is a 9 second boost, so stick to the right (it is possible to get both
boosts if you go to the left, but the gain is not worth it in my opinion).
After the short split in the track the tunnel is back with a left hand turn
and a short straight ending in another sharp turn - this time to the left.
A 4 second boost will be hanging in the air near the end of this next short
straight and followed very quickly by a left hand turn so try to jump early
& be on your way down when getting this boost.
 
After getting the hanging boost go left, but take it wide.  You'll be
approaching a check point with two boosters - one 4 second in the middle and
one 9 second to the left. It is very simple to get both of these boosts if
you start towards the right & boost through the 4 second boost at the 9
second boost.  Immediately after the 9 second boost is a small drop and a
cavern where the main track goes to the right and a waterfall in front.
Head under the waterfall's middle and shortly after you'll find a 4 second
boost followed by a left hand turn and another tunnel straight. A sharp
right hand turn ends the straight and after an archway a 4 second
boost preceeds a left hand turn.  Take the turn wide until you're used to it
as you'll need to get used to straightening up for the ramp that's at the
end with a 9 second boost which is easy to miss if you're not in good
control of your boat.
 
On landing, if you got your control of the boat fairly straight, you'll land
on a 4 second boost immediately followed by a left hand turn and a check
point.  Head down the straight after the check point and turn sharp right.
Straight on in the big cavern that now surrounds you at the ramp and a 9
second boost.  As an alternative to this jump to two boosts, look to the
left to see a quay and a cave tunnel hidden away just towards the end take
the cave for a 4 second boost and exit at the next check point. If you head
for the ramp straight on you will be able to hit the helicopter (no bonus
for it alas!) and land on another 4 second boost.  This is immediately
followed by a left with another hanging 4 second boost.  If you have plenty
of boost don't bother with this one as there's a sharp right immediately
after it to get you to the next check point and join where the tunnel
exits - if you need to get it jump early so you're landing as you get the
boost.
 
Past the check point and the right-hander you'll find a bridge with two
large archways and a 4 second boost in each archway.  Depending on version
you may also be able to see a bridge in the distance with a 9 second boost.
Ignore the 4 seconders - it's the 9 seconder you're after.  To achieve this
head straight at the middle of the bridge where you'll see a ramp - boost up
the ramp and you'll get an extra jump and fly over towards the 9 second
boost.  As you fly you can see a pair of 4 second boosts below - see if you
can aim at one.  If not don't worry as you should be able to get to the
finish on the 9 seconder you've just caught. Immediately after the 4 second
boosts is a left hand turn towards the finish.  The ramp doesn't really
matter as you should have enough boost left to bounce your way to the
finish.
 
==== Times to beat ====
* [[http://www.cyberscore.net/chart-21989.php Cyberscore Scores]]
* [[http://www.twingalaxies.com/index.aspx?c=22&g=lake+powell Twin Galaxies Scores]]
 
=== The Far East (Medium Track) ===
As you start there's a long straight in front of you and a mountain at the
end.  Look carefully & there's a cave in the side of the mountain. Save
some boost for this as you need to jump to avoid crashing into the left side
of the track.  Once into the cave/tunnel it's a simple ride along through
the tunnel which takes you left.  Try to exit the tunnel high off the water
as you'll get a speed shunt as a reward (but it makes the next bit more
difficult).  As you exit the tunnel there's a drop down to the main track &
a ramp to another 4 second boost.  Keep the boost going for a little after
leaving the ramp as there's another 4 second boost further up.  You can
either keep the boost going and clear the boat that's in the middle of the
track or land & boost through it. After the boat is an archway which leads
up into an left-right pair of turns and another archway. Through the archway
you will see a ramp and a 9 second boost high up - use the ramp and turn
your boat to the left, boosting that way once you have the 9 second boost as
the track makes another left-right turn by the time you land with a bridge
between them.  Note that it is possible with some versions to clear the
bridge but until you're used to the track I'd advise aiming at landing
before the bridge & coping with slaming into the side of the track on the
right (as you look at the bridge).
 
Once you've dealt with the left-right turns you go under a bridge which is
immediately followed by a 4 second boost and another left-right, this time
with a check point just before the right-hand turn. You may be running out
of boost at this point, but make sure you keep some in reserve regardless.
This left-right combination is followed by a left-hand turn under a bridge
where you'll notice a 4 second boost hanging in the air.  The bridge is
immediately followed by a drop in the water level - if you have quite a bit
of boost you could go for this 4 second boost by jumping before the drop
otherwise don't bother as you'll need the boost.  The drop is followed by
another two drops - boost before the last one and boost hard.  You'll notice
that the last drop will take you into a tunnel - you are aiming at getting
ontop of that land mass and not entering the tunnel.
 
You will land on a water-barren area which will act as a slope - use some
boost if you have it to get up to max speed quickly.  The slope will take
you around a right turn and into a straight where there will be patches of
water which are good for jumping over if you have the boost left & a 4
second boost to collect at the top of a small ramp.  This are finishes with
a small right-hand turn back into the main courseway which is at a section
which is a long straight with a tunnel from middle to end.
 
Just before the tunnel is a ramp with a 4 second boost and once into the
tunnel there is a 4 second boost hanging in the air.  After the tunnel is a
90 degree left hander and a wide canal way.  Part way along here is a small
island with a chinese dragon moving around - head straight for this and jump
over it to collect another 4 second boost.  Just afterwards is a small drop
and ahead you will see a 9 second boost on the left and a large ramp on the
right - take your pick.  If you have a lot of boost to use head for the ramp
and boost away.  Otherwise collect the 9 seconder and hydro bounce your way
along.  It's straight on from here down a couple of dips to the finish line.
 
==== Times to beat ====
* [[http://www.cyberscore.net/chart-21990.php Cyberscore Scores]]
* [[http://www.twingalaxies.com/index.aspx?c=22&g=the+far+east Twin Galaxies Scores]]
 
=== Ship Graveyard (Hard Track) ===
You start on a long straight (seeing the repetition yet?) which narrows in
the middle and then widens back out quickly.  Towards the end a left hand
turn takes you onto another straight where you'll see a pair of ships to the
left as you go down that are moored away from the quay.  You want to be on
the left side of these boats to grab the 9 second boost that's at the left
of the second.  You can do this safely either by going left before the first
boat or between the two.  Nip through at your comfortable point & get the 9
seconder before turning right and rejoining the main courseway ready to turn
right before the liner that's in front of you.  Head up alongside the liner
& take a left at it's end.  Here you will find a 4 second boost straight
ahead & the main track will then meander to the left before revealing a
check point, ramp and a 4 second boost for you to aim at.
 
Head slightly left of the ramp as there's a rocky outcrop that prevents you
going straight ahead.  The track then turns right - you'll notice there's a
water fall ahead though & that's where you should be headed.  Under the
waterfall follow the tunnel as it turns right and head for the ramp to get
the 4 second boost - you will need some boost to get the 4 second boost.
Again, try to head left off the ramp as by the time you land you'll be on a
left turn.  Keep going and you will shortly join the main courseway again
and soon after see in front a bridge.  Try to jump over the middle of the
bridge as there's a 9 second boost hidden there.
 
You are now on a long straight and probably running out of boost if you
missed the hidden 9 seconder - make sure you keep some in hand.  At the end
of the straight is a drop which you should jump off of at about the middle
but not keep the boost on. As you fall you will see a pair of courseways,
one on top of each other & the top one has a 9 second boost in it's
entrance.  Use your boost if you need to to make sure you enter the upper
courseway and collect the 9 second boost before dropping back down to the
main courseway & turn slightly left before a sharp right inside a tunnel.
The tunnel exit will be in front of you with a 4 second boost moving around
just outside.  Dodge the wings of the two crashed aeroplanes and line
yourself up for the 4 second boost that is ahead.  Drop down to the next
level and hydro jump at the 4 second boost before making a huge drop down to
the next section.
 
Once you've landed you'll be heading for a check point and a waterfall
which, of course, holds a hidden passage. Personally, I don't bother with
the hidden course (which contains a sharp rise followed by a 9 second boost,
IIRC). Instead I follow the main course left & jump the ramp collecting the
4 second boost.  By the time you've landed you'll already be on a right-hand
turn with huge waves which severaly affect the movement of the boat.  Do
your best to keep control, stay left and keep tight left around the next
turn (which is left-handed).  Around the corner is a pair of boosts - a 4
second boost in the middle and a 9 second one at the left - which you will
probably have to use your boost to get to as the waves will push you out to
the right.  After the huge waves you will pass through a check point and
enter another tunnel.  The tunnel will take you right-left-right and on the
final right turn you will see daylight & a 4 second boost hanging in the
middle of the courseway.  Grab the boost & try to keep fairly straight with
the courseway while you head for another ramp with another 4 second boost
and eventually the finish line.
 
==== Times to beat ====
* [[http://www.cyberscore.net/chart-21991.php Cyberscore Scores]]
* [[http://www.twingalaxies.com/index.aspx?c=22&g=ship+graveyard Twin Galaxies Scores]]
 
=== Venice Canals (Hard Track) ===
 
One of the few (only?) tracks without a long straight to start and also one
of the easiest when you're used to it's layout.  There is a left turn almost
immediately after the start. Around the bend and under a walk-way style
bridge you find your first 4 second boost.  This boost sits on a long right
hand bend which has a slightly concealed short cut in between the buildings
on the right. Don't worry if you miss it - there's very little gain in using
it.  At the end of the right-hander is a concrete plateau where the
cut-through rejoins the main track.  You can either jump this concrete
plateau or use it as a ramp.  By the time you've landed (if you didn't go
via the short-cut) you are faced with a left hand turn and a large bridge in
front which contains a middle section holding a 9 second boost. It's not the
easiest of boosts to get but if you do, don't boost much else.  There's a
secret tunnel to the right here - just right of the quay being held up by
columns - containing a 4 second boost and not much else.  It leads out just
after the next split (described below) and isn't worth while using.
 
Quickly after this bridge is another left hand turn and a short straight
leading to a short split in the track along a right hander.  You don't want
to go down either split but instead jump over the island that splits the
track to collect the 9 second boost sitting high there - remember to turn to
the right to boost yourself in that direction as you fly otherwise you will
happily meet the buildings opposite and a nasty building blockage.  At the
end of the right hand turn is a quay with a 4 second boost underneath.  The
track then takes a two way split as it vears right again.  If you take the
outside split you will be rewarded with a 9 second boost whereas the inside
split splits again to two seperate short canals with one 4 second boost
each.  All three splits join back up to cross the second check point.  With
good direction & timing both the 9 second and the inner-most 4 second boosts
can be retrived with a a short jump just after the exit of the left-most
split.  There is a gap between the left-most and middle splits, but have not
found it useful.
 
Keep to the right at the check point and line yourself up for the gap that
begins to form between the buildings on the left - you will find that the
track takes a sharp left and then u-turns back on itself and another left.
Instead of attempting this complexity of the track simply jump the quay that
is sitting in the middle.  As you land, there's a ramp in front of you with
a 4 second boost atop - if you have control head straight for it & boost up
it to collect the boost & start flying.  Again the track takes a little
jaunt, this time to the right and back and again there's no need to take
it - keep flying from the ramp or jump if you missed - as the grass verge in
front of you forms a nice short cut.
 
On landing the track takes a sharp right and you should be sticking close to
the right hand side of the track.  The track takes another right but just in
front is a gap between the buildings holding a small ramp and a 9 second
boost. Collect the boost to cut off another section of the track - but don't
boost through as it quickly takes a left under a bridge.  Boost along a
straight to the next bridge and cut the boost to take the right-hander as a
4 second boost sits on the inside of this turn which is easy to miss when
using boost. This leads you onto a straight at the start of a tunnel which
is deceptively long when using my memory - I frequently turn the next left
too early!  As you head left the track straightens to show another 4 second
boost in front and the exit of the tunnel.
 
Back in the open the track takes a short right onto a straight before
another short right and then a sharp left - cut the boost for this one as
you need to line yourself up for a ramp.  Hit the ramp and boost to collect
a 4 second boost and you'll land in a tunnel with swinging chandaleers.  As
you boost along jump at the second chandaleer to collect a hidden 9 second
boost and by the time you've landed you'll be ready to exit the tunnel.
Here you have a choice of two tunnels, the left hand one has a luring 4
second boost in front of.  Use the left hand tunnel to collect another 4
second boost along the way.  Both tunnels meander somewhat before joining
back up for a long straight with an obvious ramp at the end.  As you get to
the ramp you will notice on the right a series of columns and a 9 second
boost behind it.  Take your pick - if you have plenty of boost left hit the
ramp collect the 4 second boost and fly through the window at the end of the
church (which you are now in).  If you're running low on boost, vear right
avoiding the columns, collect the 9 second boost and vear back out from
under the columnar section and through the main doors of the church and down
a drop.  On landing from either choice, the track takes it's final left turn
and reveals a ramp with a four second boost atop ready to launch you to the
finish line.
 
==== Times to beat ====
* [[http://www.cyberscore.net/chart-21992.php Cyberscore Scores]]
* [[http://www.twingalaxies.com/index.aspx?c=22&g=venice+canals Twin Galaxies Scores]]
 
=== N.Y. Disaster (Hard Track) ===
 
Beginning on the now familar long straight your first turn will be right and
contains a 4 second boost before crossing the first check point.  After the
checkpoint you head into a multi-storey car park and another slight right.
Here on the left you will notice some checkered-flag like patterns - head
between them to cut a fair chunk of the start of the track.  If you happen
to miss this one, collect the 4 second boost just after it & then the track
will take a left and a slight drop after which there is another entrance to
this same passage way and another 4 second boost.  The two entrances join
and the exit to the main track has a 9 second boost hanging precariously
close to the ceiling of an archway - either jump early so you collect the
boost as you land or jump late so you take off just before the boost
otherwise you will very likely hit the archway and ruin any gain you had
from the short cut.
 
After heading out of the short cut on a short straight you will rejoin the
main track and head left.  Don't take this left too sharp despite it's look
as the track heads right very quickly and with a little practice you will
make this a convenient s-bend.  After the s-bend the track takes a dip and
into a tunnel, offering a 4 second boost along the way.  Take a slow right
then left and you'll be out of the tunnel ready for another right where a
huge inveterate sewage crocodile swims in the water.  Take this one wide &
line yourself up for the boost that sits high later on just after a dip.  To
get the boost either jump from the top of the dip or drop & immediately jump
back up.
 
You are now very much out in the open & only frame works of buildings line
the track.  Follow the track left and through another check point where you
have the choice of left for a 9 second boost or straight on for a ramp and a
4 second boost.  Personally I take the ramp 'cause I'm too stupid to
remember the 9 seconder!  These two choices join together again before a
tight straight, a 4 second boost and a huge dip.
 
Jump from the top of the dip & get your speed up to max before cutting the
boost & flying high for a long straight.  If you use too much boost here you
wind up smashing into the rock at the end and not making a smooth right
through the fourth check point.  It's not much of a right either as it soons
turns left under a large archway.  Hug the left side of the track here as
the wall almost disappears revealing a 4 second boost before the track heads
right and into a subway tunnel.
 
The tunnel meanders slightly before taking a definite split.  It doesn't
matter which way you go here as you soon see the subway platform and a 9
second boost on it.  Jump at the boost and slide your way to the other side
before continuing on your way.  The split joins shortly afterwards for
another check point.  After this the track takes a long right hander before
showing a subway train.  Just before the train is a dip where you need to
keep to the left but don't hug the wall too much as you'll miss the 4 second
boost at the bottom of the dip.  Collect the boost and follow the track to
the end of the tunnel by way of a long left hand turn.  On exitting the
tunnel you will see the finish line off to the left and a ramp and 4 second
boost between you and the line.  Collect the boost and boost to the line.
 
==== Times to beat ====
* [[http://www.cyberscore.net/chart-21993.php Cyberscore Scores]]
* [[http://www.twingalaxies.com/index.aspx?c=22&g=n.y.+disaster Twin Galaxies Scores]]
 
=== Catacomb (Bonus Track) ===
 
Starting on yet another long straight, this circuit track is entirely based
inside great caverns and tunnels. Just before going headlong into the first
bend, a left-hander, you find a 4 second boost towards the right hand side
and around the bend the track has a pair of columnar structures reaching top
to bottom of the tunnel. Between them is a hidden 9 second boost and beyond
them on the right of the track is a 4 second boost.  Towards the end of the
straight is another 4 second boost on the left which leads you into a sharp
left hand turn.  At the end of the turn you find a ramp directly in front of
you (or to the left it you took it wide) which conceals a 4 second boost
just past it and can be used to boost up to another 4 second boost high in
front of it.
 
If you jump the ramp, try not to boost too much as there is a right turn
quickly after it with a waterfall on it's left side. Note that this
waterfall does not conceal an entrance like many others so you need to take
this turn and yet it appears to offer a tunnel at it's top - those versions
I've managed to get up there just dump me back on the main track again, so
it's a red herring so far. That said, there is a hidden 9 second boost
hanging in the air around here - it's in a different position for different
versions & I have yet to find it on all versions, so happy hunting. Around
the corner on the right is yet another 4 second boost but on some versions
this one can be difficult to get to unless you are facing it as it appears
and this is particularly dependant on the boat you have.  The track
continues on heading away from this 4 second boost to the left and into a
short tunnel with stalagtites in plentiful supply.  A 4 second boost is on
the left here but the track heads right shortly after it.  Just before you
continue around the corner you have a choice - look straight ahead and you
will find a tunnel that you can jump into - and both are worthwhile.  In the
tunnel you will find a hidden 4 second boost and on the main track you will
find a 4 second boost.  On different laps get each & on the final lap go
through the tunnel.
 
If you take the tunnel choice, turn left as you go through it.  Soon
afterwards you get back on the main track again as it is only a short short
cut.  Almost immediately afterwards you will find another choice and again
both directions are of use.  Both directions have 9 second boost available.
Directly in front you can see a waterfall behind the wall of the track - you
can boost over the wall where you will find a 9 second boost and a ramp out
of the hidden section. On another lap (I'd suggest the first or last) follow
the track as it heads left & collect the 9 second boost that sits in the
corner ahead as the track turns back right to the place where the short cut
will exit.  Immediately after where the choice joins again there is another
turn, this time to the left and on the inside of this corner is another 9
second boost.  I recommend getting this boost on the first or second lap as
just beyond it is a ramp and then the finish line.
 
==== Times to beat ====
* [[http://www.cyberscore.net/chart-21995.php Cyberscore Scores]]
* [[http://www.twingalaxies.com/index.aspx?c=22&g=catacomb Twin Galaxies Scores]]
 
=== Castle Von Dandy (Bonus Track) ===
 
Starting on a now-familiar long straight you can see the first 4 second
boost in the distance before the track takes an easy right hand turn onto a
shorter straight.  At the end of this second straight a sharp left hander
reveals another short straight and another 4 second boost before another
right hander.  Take this right-hander easy as it soon becomes a left hander
with twin archway spanning the track.  The left archway here has a 4 second
boost under it and if you look between the archways a bell tolls just above
them hiding a 9 second boost if you manage to time your jump correctly.
Through the archway or the bell a the left hand turn continues and you will
soon be on another straight but tucked into the corner of the left-hander is
a 4 second boost. On the right-hand side of the straight is a ramp with a 4
second boost atop and from here you will be able to see the track takes a
slight diversion ahead to the left.  The diversion itself holds a 4 second
boost whereas jumping over the crematorium in front will yield a hidden 9
second boost - be careful of the gravestones as your boat could come a
cropper on them.  Diversion or not, you will then have a ramp with another 4
second boost on the left before entering into the castle that the track is
named after.
 
Inside the castle you will notice on the right hand wall are a series of
four windows.  You can jump through any of these windows onto a hidden
section of track.  The second window holds a hidden four second boost and
the hidden part of the track holds tight to the outside wall of the inside
track, so on going through the window, expect to land by hitting the far
track barrier and then take a left.  You will find a 9 second and a 4 second
boost as you head around - the 9 second boost is tucked into the crevice of
a right-hand turn.  Heading around that right-hander will take you
left-hander and to a long ramp back on the main courseway.  Staying inside
the castle, the track takes a series of left-handers which form into a long
single left hander if taken correctly and culminate in a sharp right-hander
with a 9 second boost on the outside, again tucked into the crevice of the
turn.  After the right-hander is a short straight to the exit of the castle
where the outside track rejoins.  Keep to the left if you are coming out of
the castle as you are back on the start-finish straight here and there's a
long ramp (not the same one as the outside track) with another 9 second
boost just before the finish line.
 
==== Times to beat ====
* [[http://www.cyberscore.net/chart-21994.php Cyberscore Scores]]
* [[http://www.twingalaxies.com/index.aspx?c=22&g=castle+von+dandy Twin Galaxies Scores]]
 
=== Hydro Speedway (Bonus Track) ===
 
Hydro Speedway bears a number of similarities to Thunder Park - in
appearance, it's a circuit and the hidden 9 second boost.  Look just ahead
of you on the start line's long straight and you will see a boat hanging.
Jump at the boat and you will find a 9 second boost.  At the end of the
start-finish straight the track heads right onto another long straight which
narrows towards the end.  Just before it narrows is a 4 second boost and
just after it turns right.  On this inside of this right hander is a 9
second boost which leads you on a short straight before turning left onto
another short straight and then a right again. This right also has a boost
on the inside albeit a 4 seconder.  A slighter longer straight follows
before another right hander and another short straight.  On this straight,
in the middle, is a 4 second boost hanging mid-air.
 
By the time you land this from the boost the track takes a mirrored split
which you are blocked from jumping the middle of.  In both directions you
find a curve out and back to what would otherwise have been a straight run.
On the way back in there is a ramp with a 4 second boost sitting there.  Try
to take the turn on the inside and head diagonally across the ramp as the
track then performs another similar split but this time your jump off the
ramp can take you straight across the middle of the island if aimed
correctly. As the two sides join again a 4 second boost is drifting side to
side across the track in front of a tunnel.  Head through the tunnel and
take the right turn at the end back onto the start-finsh line.  Before the
finish line is a ramp on the left with a 4 second.
 
Not a difficult track to understand but can be a tad frustrating getting
that first place until you are used to it.
 
==== Times to beat ====
* [[http://www.cyberscore.net/chart-21996.php Cyberscore Scores]]
* [[http://www.twingalaxies.com/index.aspx?c=22&g=hydro+speedway Twin Galaxies Scores]]
 
=== Nile Adventure (Bonus Track) ===
 
Of the bonus tracks, Nile Adventure is the only non-circuit.  Instead it's
the longest track of all, more than a third longer than most of the others
(based on time).  As with many tracks you start on a long straight this time
heading for a bridge with three archways.  Head for the middle archway and
try to boost over it - a 4 second hidden boost is waiting for you.  As you
land or go through an archway, the track heads right under a bridge and
immediately right after the bridge to a pair of ramps.  The closest ramp
offers a 9 second boost and the farther ramp a 4 second boost.  Grab a boost
and by the time you land the track will be headed left again only to turn
sharply right at the end of the rock face you've no doubt hit once or twice.
Take the right-hander and cross the first check point before turning left
onto a long straight.  The straight has a drop halfway along with a 4 second
boost hanging in the air in the near distance.  To get the boost you can
either jump from before the drop and boost to get it or drop and immediately
jump to grab it.  Either way, there are a pair of waterfalls, one to either
side and an entrance to a tunnel. Take the tunnel as these waterfalls only
mask rocks.  Once in the tunnel the track takes a series of turns, between
each turn the water slopes downward.  The turns are left, right, right and
finally left with a 4 second boost after the first right.
 
After the turns you will be in a long straight with some basic hyeroglyphics
on the walls and a gaurdian statue at the end.  Just before the guardian is
a 4 second boost and a long drop to beneath the guardian, so if you are
jumping along the straight be sure to land before it.  At the bottom of the
long drop is the second check point and another guardian this time guarding
the entrance to a tunnel.  Look ahead as you go under the guardian.  The
track goes left under another tunnel entrance and a smaller tunnel entrance
is to the right.  Don't bother with either one, instead look up to see three
archways which would otherwise be a large single archway if it weren't for a
pair of very solid pillars.  Aim to get between the two pillars and land at
the entrance that is there.  Manage this correctly and not only will you get
the 9 second boost for passing through any of these three archways but you
will get an instant speed boost that will put you at maximum speed
immediately.  You are now on a long upward straight which jetisons you high
into the air over a long thin canal and culminates in long narrow slope
where you collect a 4 second boost on the way down.
 
Exitting the slope and you plumet into a wide tunnel with a snake's head in
front forming the exit and almost swallows the 4 second boost that sits
there as you pass by.  Inside the snake's innards, the track takes an
immediate left revealing a small straight followed by a long right hander
that begins sharp.  As the right-hander straightens the river slopes down to
a 4 second boost and a long left hander.  By the time you collect the four
second boost and start on the left hand turn you will be out of the snakes
innards as it changes to be a rock tunnel with snake moving through it.  At
the end of the left hander you can see the snake moving through the
right-hand side of a long straight and a 4 second boost at the end of the
tunnel.  As you collect the 4 second boost there's a large drop down and a
sphinx's head gaurding another tunnel. Jump before the drop and you will fly
through the face of the sphinx and into the tunnel.
 
This tunnel forms the nastiest part of this track and probably any of the
tracks.  It is lined with sarcophagi and the track itself is lined with
triangular forms either side that will slow you down if you hit them - and
that's pretty easy to do. The tunnel takes a left shortly after starting and
then a long right before a sharp left with a 4 second boost.  This is
followed with another long right and on the next left is another 4 second
boost which leads you onto a short straight. Depending on version, you'll
have already noticed many of the sarcophogi drop down as you travel along
the water of the track.  No matter which version, this next straight will
drop down various sarcophagi and may hit you as you attempt to jump at the
hanging 9 second boost.  Try to get the boost as you land as the track takes
a sharp right hand turn.  You'll notice at the end of this straight a
sarcophagus opens to show a hidden section of track.  Despite containing two
9 second boosts (one hidden as you enter the tunnel) it's actually a longer
way through. Take the right hand turn and you will find check point 3 under
another archway.  After the archway the track heads right then left and onto
a long straight where you can see the exit.  Along this section of track
large sections of roof drop down to keep you at track level so don't try
jumping anywhere here.
 
Exitting the tunnel you find the only location that allows the night sky to
shine - this is the same part where the hidden section of track will lead
you to.  As you drop down from the tunnel exit to the water below you can
see a ramp with a 4 second boost atop and in the distance another tunnel
entrance this time in the shape of a traingle (think pyramid).  This tunnel
takes you right then left before taking an even sharper right then left.
Don't boost around this last left as you will overshoot and miss the 9
second boost that sits before another large drop and the tunnel's exit.  At
the bottom you enter another tunnel.  This tunnel heads straight and soon
enters a section where the roof and sides are circular and revolving.  The
track takes a mirrored split that you can safely ignore. Instead jump over
the islands in the middle to collect a 4 second boost in the middle of
each - 3 island in all.  Just prior to the third island is a 9 second boost
traversing the width of the tunnel.  After the last island, the revolving
ceiling finishes and you career along a now rock-lined straight which ends
in a left.  This left initially hides a climbing bargeway heading right then
right and climbing again.  At the top it heads left and back into a the
rock-lined tunnel for a short straight with a 4 second boost and another
long drop at it's exit.
 
You will now be flying along a huge cavern with a single-eyed scorpion-like
creature lying beneath the surface of the water with it's legs flailing
around in the air.  Ahead of you is another guardian over a tunnel entrance
and it's eyes fire a pair of beams which intersect at the water just in
front of you for the duration of this long straight.  As you near the eye of
the creature beneath the surface, in some versions, it rears the eye & you
can use this to bounce off to get the 9 second boost or you can simply jump
at the boost and avoid the speed reduction that occurs with the collision of
the eye. Land you boat and enter the final tunnel of the track.  The tunnel
begins with a short straight followed by a right then left before exitting
on that left turn with a 4 second boost and the now familiar drop.  Go
headlong at the finish line which will now hopefully be in front if you took
the left turn correctly between the feet of a sphinx.


==== Times to beat ====
{{ToC}}
* [[http://www.cyberscore.net/chart-21997.php Cyberscore Scores]]
* [[http://www.twingalaxies.com/index.aspx?c=22&g=nile+adventure Twin Galaxies Scores]]


=== Circuit Mode ===
==External links==
* [http://speeddemosarchive.com/HydroThunder.html Speed Demos Archive]: Speed run videos
* [http://www.cyberscore.me.uk/game-hydro-thunder.php cyberscore]: High score board
* [http://www.twingalaxies.com/index.aspx?c=22&g=hydro+thunder Twin Galaxies]: High score board


As mentioned, only relevant for Sony Playstation (PSX) version.  Maximum possible score is $39,000.
[[Category:Midway San Diego]]
{{GFDL Article}}
[[Category:Arcade]]
[[Category:Sega Dreamcast]]
[[Category:Nintendo 64]]
[[Category:PC]]
[[Category:PlayStation]]
[[Category:Midway Games]]
[[Category:Midway Games]]
[[Category:Racing]]
[[Category:Racing]]
[[Category:1999]]
[[Category:Single player]]
[[Category:Multiplayer]]

Latest revision as of 12:21, 29 November 2023

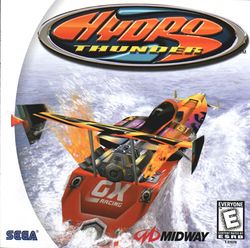
Box artwork for Hydro Thunder.
Hydro Thunder
Developer(s)Midway San Diego
Publisher(s)Midway Games
Year released1999
System(s)Arcade, Sega Dreamcast, PlayStation, Nintendo 64, Windows
SeriesThunder
Genre(s)Racing
Players1-2
ModesSingle player, Multiplayer
Rating(s)ESRB Everyone
LinksHydro Thunder at PCGamingWikiHydro Thunder ChannelSearchSearch

Hydro Thunder is a powerboat racing game, originally an arcade game and later released for the Sega Dreamcast in November 1999. It was also released for PlayStation and Nintendo 64 in early 2000. This game is part of Midway's Thunder series of racing games, which includes Offroad Thunder, 4 Wheel Thunder, and Arctic Thunder. A sequel, Hydro Thunder Hurricane, was released for the Xbox 360 on July 2010 on Xbox Live Arcade.

Table of Contents

edit

External links[edit]