E-123Wario54 (talk | contribs) (second visit) |
E-123Wario54 (talk | contribs) (finished hollow bastion) |
||
| Line 1: | Line 1: | ||
{{Header Nav|game=Kingdom Hearts II}} | {{Header Nav|game=Kingdom Hearts II}} | ||
[[File:KH2 logo Hollow Bastion.png| | [[File:KH2 logo Hollow Bastion.png|right|200px]] | ||
==First visit== | ==First visit== | ||
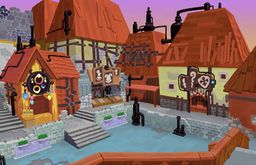
[[Image:HollowBastionArt1.jpg|256px|thumb|right|The Marketplace.]] | [[Image:HollowBastionArt1.jpg|256px|thumb|right|The Marketplace.]] | ||
| Line 68: | Line 67: | ||
==Second visit== | ==Second visit== | ||
Head to Merlin's House, then to the Bailey. Continue down and to the right to enter a new area, the Restoration Site, and at the end of the path, the Postern. Jump onto a pipe by the entrance for a '''Mythril Gem'''. On the other side of the round structure next to this chest is another one containing the '''Castle Perimeter Map'''. Head down the path for an '''AP Boost''' and the entrance to the Corridors. This area is a bit of a maze, holding four chests in total. Turn left at the fork for a '''Dark Crystal'''. Take a right at the next fork, then another right and finally, a left for an '''AP Boost'''. Backtrack and take the next right for a '''Myhtril Crystal'''. Backtrack and take the next right again, then another for the final treasure, a '''Mythril Stone'''. Follow the path back to a large room and walk the path to the left to reach Ansem's Study. Open the chest for a '''Skill Recipe''', then speak to Leon. Head through the door opened by Leon to enter a new world: [[../Space Paranoids|Space Paranoids]]. | Head to Merlin's House, then to the Bailey. Continue down and to the right to enter a new area, the Restoration Site, and at the end of the path, the Postern. Jump onto a pipe by the entrance for a '''Mythril Gem'''. On the other side of the round structure next to this chest is another one containing the '''Castle Perimeter Map'''. Head down the path for an '''AP Boost''' and the entrance to the Corridors. This area is a bit of a maze, holding four chests in total. Turn left at the fork for a '''Dark Crystal'''. Take a right at the next fork, then another right and finally, a left for an '''AP Boost'''. Backtrack and take the next right for a '''Myhtril Crystal'''. Backtrack and take the next right again, then another for the final treasure, a '''Mythril Stone'''. Follow the path back to a large room and walk the path to the left to reach Ansem's Study. Open the chest for a '''Skill Recipe''', then speak to Leon. Head through the door opened by Leon to enter a new world: [[../Space Paranoids|Space Paranoids]]. | ||
After returning from Space Paranoids for the first time, examine the wall in Ansem's Study. King Mickey will then arrive to provide valuable information and send the party back to Tron. After the scene, Sora will obtain a new, more powerful Drive Form: <font color=orange>'''Master Form'''</font>. Open the chest on the way back to the computer for the '''Ukulele Charm''', giving Sora the ability to summon Stitch. Once you're ready, access the computer to return to [[../Space Paranoids#Second visit|Space Paranoids]]. | |||
===Invasion of the Nobodies=== | |||
[[File:KH2 screen Hollow Bastion Dancers.png|thumb|right|In Final Mix, Limit Form's ranged attacks are effective in dealing with the Dancer Nobodies.]] | |||
After returning from Space Paranoids for the second time, access the computer for a lengthy scene in which Mickey explains the truth about Ansem. Exit to the Corridors for a battle against both Nobodies and Heartless. After defeating them, the group will come across the Gullwings and Sephiroth. This is the point in Final Mix where the [[../Cavern of Remembrance|Cavern of Remembrance]], an all-new dungeon, becomes available. However, entering now is not recommended, as the enemies inside are incredibly strong and the abilities Sora receives from maxed Drive Forms are required to reach the end of it. Exit to the Restoration Site to enter a battle against Dancer Nobodies, which are capable of grabbing Sora before he can attack and throwing him far, greatly decreasing his HP. Use Limit Form's Sonic Rave or Strike Raid before they can do so. Aerial combos and Donald's Comet limit also prove useful in this situation. After the battle, you'll find yourself in the Bailey. Exit to the Castle Gate for a boss fight against one of Organization XIII's members. | |||
====Boss: Demyx==== | |||
[[File:KH2 screen Hollow Bastion Demyx.png|thumb|left|Perform the Wild Dance reaction command to destroy the forms and stun Demyx, giving Sora the chance to attack.]] | |||
This battle, like many of the battles against Organization XIII, is one of the more difficult boss battles of the game. Begin by completing the same mini-game that you cleared during your last encounter with Demyx in the Underworld of Olympus Coliseum, this time for a chance to fight the powerful Nobody. If you have trouble clearing this in time, go into Wisdom Form and perform Fire combos. Wisdom Form also proves useful for the actual fight, as being a water-based fighter, Demyx's ultimate weakness is Fire. If you have any drive remaining when Demyx is stunned, use Wisdom's Fire to chase after the unsuspecting Nobody. Once your combos are concluded, Demyx will begin his attack. | |||
[[File:KH2 screen Hollow Bastion Demyx 2.png|thumb|right|Avoid Demyx when he summons columns of high-pressure water out of the ground, as this attack cannot be guarded or canceled.]] | |||
The first and most powerful of his attacks will have him dash across the field, leaving a trail of water columns in his wake that launch Sora into the air if caught. Don't bother pursuing him after this attack, as he will surround himself with more water when he lands. Another attack has him playing his sitar as bubbles fall from the sky; this can easily be avoided, so this is the recommended time to combo him. Music notes will also sometimes appear; if you're having trouble, use Wild Dance to stun him. After enough damage is done, the mini-game will restart, requiring Sora to defeat another group of water forms to continue to attack. In normal battle, he will also begin attempting to trap Sora with columns of water, leaving horizontal trails in his wake. Dodge these before continuing to attack. Defeat Demyx for an extra armor slot and an upgrade in Blizzard magic for Sora, '''Blizzard Boost''' for Donald, and an increase in maximum HP for Goofy. | |||
===1000 Heartless=== | |||
After the scenes, Sora will lose his party but gain an ally from Final Fantasy in every battle (Yuffie, Leon, Tifa, and Cloud, in that order), significantly decreasing the difficulty of the next series of fights. This is also a good time to level Limit Form by performing one of the limits in the {{psx|L1}} menu (Ars Arcanum, Strike Raid, Sonic Rave, and Ragnarok) to its completion (this is done by pressing {{psx|T}} until Sora finishes the attack). Enter the Crystal Fissure at the end of the path for a scene and an upgrade in Sora's Cure magic, as well as the return of the party, though only temporary. Open the large chest to the left for '''[[../100 Acre Wood|Torn Pages]]''', and the chests to the right for an '''AP Boost''', the '''Great Maw Map''', and an '''Energy Crystal'''. Save if you wish before heading into the final battle for Hollow Bastion. | |||
[[File:KH2 screen Hollow Bastion 1000 Heartless.png|thumb|right|Defeat the 1000 Heartless surrounding Sora to clear the world.]] | |||
This next battle will require Sora to defeat no less than 1000 Heartless on his own. A counter in the corner of the screen shows your progress, and while this may seem like a daunting task initially, it is mostly just tiring. This is also a prime location to level Limit Form, as Sora's drive gauge increases rather quickly from the many Heartless that he hits with one attack (particularly with abilities such as Vicinity Break). Keep in mind that the reaction commands provided by the Heartless do not affect Sora's drive gauge, so use them only if you find yourself desperate for an opening. Eventually, the field thins out and the crowd becomes much more manageable, until you finally reach a kill count of 1000. Sora will earn '''Guard Break''' for surviving the battle and, after some scenes, you will also receive '''[[../Secret Ansem Reports|Secret Ansem Report 1]]'''. After some more scenes, Sora will lock the world for good and you can continue to a revisit of the [[../The Land of Dragons#Second visit|Land of Dragons]]. | |||
{{Footer Nav|game=Kingdom Hearts II|prevpage=Twilight Town (Sora)|nextpage=The Land of Dragons}} | {{Footer Nav|game=Kingdom Hearts II|prevpage=Twilight Town (Sora)|nextpage=The Land of Dragons}} | ||
Revision as of 22:42, 26 September 2017

First visit
| Wedge's Armor Shop | |
|---|---|
| Item | Price |
| Elven Bandana | 100 |
| Shadow Anklet | 150 |
| Huey, Dewey & Louie's Accessory Shop | |
| Item | Price |
| Ability Ring | 80 |
| Huey, Dewey & Louie's Weapon Shop | |
| Item | Price |
| Hammer Staff | 100 |
| Adamant Shield | 100 |
| Huey, Dewey & Louie's Item Shop | |
| Item | Price |
| Potion | 40 |
| Ether | 120 |
| Tent | 100 |
Once you land in Hollow Bastion, you'll discover that all of the shops are in the first area (the Marketplace), and that they sell exactly the same items as Twilight Town, with the addition of Ethers in the Item Shop. As you move onward, you'll see a Moogle hanging out in front of the Synthesis Shop. If you wish, you can hand over your two types of materials, and receive an Elixir in return.
When you enter the Borough area, you'll be greeted by Yuffie, but are then attacked by Dusks. Use this opportunity to test out Valor Form (this requires Goofy to be in the party and alive). Even without this, you'll be helped by the town's defensive system, which launches enemies into the air via beams of energy from the ground. After the battle, you'll receive the Marketplace Map for your troubles. Head to Merlin's House where you'll be greeted by the "Hollow Bastion Restoration Committee", consisting of Leon, Aerith, Cid, Yuffie and Merlin. After the cutscene, you will receive a Membership Card and the ability to use magic in the form of Blizzard.
Afterwards, feel free to pick up the treasure scattered around the "Borough". Grab the Hi-Potion to the left as you exit Merlin's House. For a Tent, follow the path to the right as you leave Merlin's House, and it's between two houses (found to the right of the two). A Drive Recovery can be found on the walkway leading to the Bailey, on the left-hand side. Find an AP Boost straight ahead of you as you walk up the ramp to get to the top of the Borough, and lastly, pick up the Mythril Shard to the right immediately before you enter the Bailey. Head to the Bailey, and, after the cutscene, you will be presented with your next task: defend the gate from the hoards of Nobodies.
Defending the Gate
The gate has a health bar, and if it happens to runs out, the task must be restarted. The enemy ranks consist of the familiar Dusks and Creepers, as well as newcomer Samurai. These Nobodies are unique in that they only seem to attack Sora when he attacks them first; while this gives them the appearance of slowness, they tend to hit hard and cause a great deal of damage, particularly when their reaction command is not formed successfully. The aforementioned reaction command, called Duel Stance, has Sora's command list empty if activated. This is with the exception of a sole command that may appear at any place in the list, called "The End". When this appears, you must select it quickly. If you don't select the command with enough speed, Sora will get hit instead. Make sure to make use of the Blizzard magic that you just received, as it may prove useful against the Samurai as well as other faraway foes. Additionally, the Nobodies drop many MP orbs, constantly giving Sora new opportunities to test his magic.
Donald and Goofy are not present for this task, so the use of Valor Form is impossible, but to make up for this, a powerful guest character aids Sora in the form of Leon. Leon's attacks include a fireball and slashes of his gunblade. After a while, his gunblade will glow white and grow considerably, giving it a much larger range and doing more damage.
Once the battle has finished, you will receive Fire magic. A cutscene shows the remaining members of Organization XIII arriving in Hollow Bastion to taunt Sora. Despite the sudden appearance and subsequent disappearance of the mysterious enemies, the Keyhole for the world will be sealed, and you'll receive Secret Ansem Report 7.
After you leave the world automatically, you have two choices - either the Land of Dragons or Beast's Castle. This walkthrough will assume that you head to the former first (which also has the lower battle level).
Second visit
Head to Merlin's House, then to the Bailey. Continue down and to the right to enter a new area, the Restoration Site, and at the end of the path, the Postern. Jump onto a pipe by the entrance for a Mythril Gem. On the other side of the round structure next to this chest is another one containing the Castle Perimeter Map. Head down the path for an AP Boost and the entrance to the Corridors. This area is a bit of a maze, holding four chests in total. Turn left at the fork for a Dark Crystal. Take a right at the next fork, then another right and finally, a left for an AP Boost. Backtrack and take the next right for a Myhtril Crystal. Backtrack and take the next right again, then another for the final treasure, a Mythril Stone. Follow the path back to a large room and walk the path to the left to reach Ansem's Study. Open the chest for a Skill Recipe, then speak to Leon. Head through the door opened by Leon to enter a new world: Space Paranoids.
After returning from Space Paranoids for the first time, examine the wall in Ansem's Study. King Mickey will then arrive to provide valuable information and send the party back to Tron. After the scene, Sora will obtain a new, more powerful Drive Form: Master Form. Open the chest on the way back to the computer for the Ukulele Charm, giving Sora the ability to summon Stitch. Once you're ready, access the computer to return to Space Paranoids.
Invasion of the Nobodies
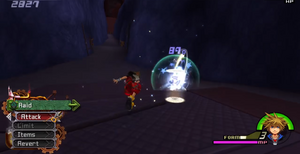
After returning from Space Paranoids for the second time, access the computer for a lengthy scene in which Mickey explains the truth about Ansem. Exit to the Corridors for a battle against both Nobodies and Heartless. After defeating them, the group will come across the Gullwings and Sephiroth. This is the point in Final Mix where the Cavern of Remembrance, an all-new dungeon, becomes available. However, entering now is not recommended, as the enemies inside are incredibly strong and the abilities Sora receives from maxed Drive Forms are required to reach the end of it. Exit to the Restoration Site to enter a battle against Dancer Nobodies, which are capable of grabbing Sora before he can attack and throwing him far, greatly decreasing his HP. Use Limit Form's Sonic Rave or Strike Raid before they can do so. Aerial combos and Donald's Comet limit also prove useful in this situation. After the battle, you'll find yourself in the Bailey. Exit to the Castle Gate for a boss fight against one of Organization XIII's members.
Boss: Demyx
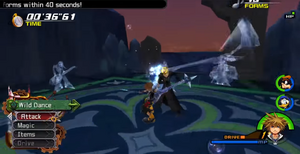
This battle, like many of the battles against Organization XIII, is one of the more difficult boss battles of the game. Begin by completing the same mini-game that you cleared during your last encounter with Demyx in the Underworld of Olympus Coliseum, this time for a chance to fight the powerful Nobody. If you have trouble clearing this in time, go into Wisdom Form and perform Fire combos. Wisdom Form also proves useful for the actual fight, as being a water-based fighter, Demyx's ultimate weakness is Fire. If you have any drive remaining when Demyx is stunned, use Wisdom's Fire to chase after the unsuspecting Nobody. Once your combos are concluded, Demyx will begin his attack.
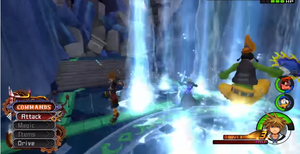
The first and most powerful of his attacks will have him dash across the field, leaving a trail of water columns in his wake that launch Sora into the air if caught. Don't bother pursuing him after this attack, as he will surround himself with more water when he lands. Another attack has him playing his sitar as bubbles fall from the sky; this can easily be avoided, so this is the recommended time to combo him. Music notes will also sometimes appear; if you're having trouble, use Wild Dance to stun him. After enough damage is done, the mini-game will restart, requiring Sora to defeat another group of water forms to continue to attack. In normal battle, he will also begin attempting to trap Sora with columns of water, leaving horizontal trails in his wake. Dodge these before continuing to attack. Defeat Demyx for an extra armor slot and an upgrade in Blizzard magic for Sora, Blizzard Boost for Donald, and an increase in maximum HP for Goofy.
1000 Heartless
After the scenes, Sora will lose his party but gain an ally from Final Fantasy in every battle (Yuffie, Leon, Tifa, and Cloud, in that order), significantly decreasing the difficulty of the next series of fights. This is also a good time to level Limit Form by performing one of the limits in the ![]() menu (Ars Arcanum, Strike Raid, Sonic Rave, and Ragnarok) to its completion (this is done by pressing
menu (Ars Arcanum, Strike Raid, Sonic Rave, and Ragnarok) to its completion (this is done by pressing ![]() until Sora finishes the attack). Enter the Crystal Fissure at the end of the path for a scene and an upgrade in Sora's Cure magic, as well as the return of the party, though only temporary. Open the large chest to the left for Torn Pages, and the chests to the right for an AP Boost, the Great Maw Map, and an Energy Crystal. Save if you wish before heading into the final battle for Hollow Bastion.
until Sora finishes the attack). Enter the Crystal Fissure at the end of the path for a scene and an upgrade in Sora's Cure magic, as well as the return of the party, though only temporary. Open the large chest to the left for Torn Pages, and the chests to the right for an AP Boost, the Great Maw Map, and an Energy Crystal. Save if you wish before heading into the final battle for Hollow Bastion.
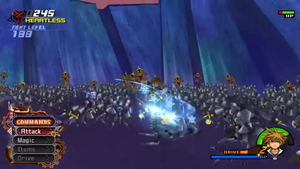
This next battle will require Sora to defeat no less than 1000 Heartless on his own. A counter in the corner of the screen shows your progress, and while this may seem like a daunting task initially, it is mostly just tiring. This is also a prime location to level Limit Form, as Sora's drive gauge increases rather quickly from the many Heartless that he hits with one attack (particularly with abilities such as Vicinity Break). Keep in mind that the reaction commands provided by the Heartless do not affect Sora's drive gauge, so use them only if you find yourself desperate for an opening. Eventually, the field thins out and the crowd becomes much more manageable, until you finally reach a kill count of 1000. Sora will earn Guard Break for surviving the battle and, after some scenes, you will also receive Secret Ansem Report 1. After some more scenes, Sora will lock the world for good and you can continue to a revisit of the Land of Dragons.
