m (moving NES sprites off) |
|||
| (8 intermediate revisions by 6 users not shown) | |||
| Line 1: | Line 1: | ||
{{Header Nav|game=Mega Man}} | {{Header Nav|game=Mega Man}} | ||
[[File:Mega Man 1 portrait Ice Man.png|right]] | |||
Ice Man's stage takes place in an icy, watery cavern. Mega Man must learn to jump from block to block before they disappear, and navigate across an empty chasm on flying platforms that fire at adjacent targets. Originally designed for the exploration and mapping of regions far below the temperature that humans can withstand, Ice Man also supervises transportation of supplies to various research teams on the continent. Afterwards, he got the job of transporting materials in frozen food warehouses. He has the ability to shoot waves of super-chilled air from his mouth which is laced with liquid nitrogen, which crystallizes into a projectile. | |||
[[ | {{-}} | ||
== Stage == | |||
<center>[[File:Mega Man 1 Ice Man map1.png]]</center> | |||
[[ | * '''A''': When you begin the stage, you will encounter the Crazy Razy robots. They are robots who, if allowed to get close enough to Mega Man, will split at the torso. The legs will continue to run towards Mega Man, while the upper body will float overhead and dive down to attack him. If you fire your gun while running towards them, you will hit the legs. Destroying the legs leaves the upper body free to fly around. However, if you manage to hit the head before they split, the entire robot will be destroyed. Be sure to hop off the ground a bit when you fire in order to hit the head and take them out instantly. | ||
<center>[[File:Mega Man 1 Ice Man map2.png]]</center> | |||
* '''B''': Once you're past the Crazy Razys, get ready to dive in the lake. You don't have to worry about the temperature of the water, but you do have to worry about the flying Pepes that advance towards you while you make your way across. Gabyoalls add to the mix in the small spaces between blocks. Never allow Mega Man to drop down in there and deal with them unless a defeated Pepe happens to drop a very valuable item nearby. Fire continuously to the right in hopes of defeating the Pepes right when they appear. When you hop out of the water, you'll have a chance to collect a large health capsule after clearing away the two Suzys which guard it. Then drop down the pipe on the right. | |||
<center>[[File:Mega Man 1 Ice Man map3.png]]</center> | |||
[[File:Mega Man Iceman Puzzle 1.jpg|thumb|right|Location C]] | |||
[[File:Mega Man Iceman Puzzle 2.jpg|thumb|right|Location D]] | |||
* '''C''': This is the first of two disappearing block obstacles. When you land, there's a Gabyoall on the ground which you can clear away with the Rolling Cutter, Thunder Beam, or Hyper Bomb. Without any of those weapons, you'll have to jump and dodge the Gabyoall when it approaches. Wait for the first block to appear just above the water. Jump on it, and wait for the second to appear completely, and then leap to where the third should appear before the first one disappears beneath your feet. From here, you can either hop onto the fourth on the right and ignore the fifth block, or simply wait for the fifth block to appear and jump over to it before the third block disappears. Either way, jump to the sixth block and up onto the seventh and final block, and then leap to the ledge on the left. If you miss a jump and fall to the bottom, the pattern will repeat after the highest block appear. | |||
* '''D''': When you arrive at the second block obstacle, you can destroy the Gabyoall, or you can get rid of it simply by running to the right, and letting it slide out of view to the left. The pattern of block appearances is a little more complicated. Start by jumping on the block which appears in the lower right corner, and jump on the next three blocks to appear. When you're close to the pipe you arrived from, wait for the next block to appear, and then jump to the right in time for another block to appear beneath your feet. When you land, jump up again, and you should land on a new block that arrives. Then hop to the next block on the right and over to the ledge to continue. | |||
* '''E''': The next challenge is even more dangerous than the blocks. You must now cross a chasm by landing on and riding on two sets of four Foot Holder platforms. Landing on the platforms is not the dangerous part; staying on them while avoiding shots being fired at you by neighboring Foot Holders is. You can easily get hit and knocked off if you're not careful. If you have the Magnet Beam, this is a very good opportunity to use it to bypass a lot of the danger. Hold the fire button down to create long platforms, and begin creating the next platform as you run along the first one. Then jump up to the new platform before the old one disappears. If you don't have the Magnet Beam, you're going to have to jump on the Foot Holder and wish for good luck. A large weapon capsule lies on a small platform in the middle of the chasm, good for recharging the Magnet Beam if necessary. After you pass the platform, Pepes complicate things by joining the fight and crowding the air space, making it more difficult to safely jump to the next Foot Holder. When you make it to the end, you'll have an opportunity to collect a 1-Up as you fall down the pipe to the next screen below (try making a small hop before you jump into the pipe for a better chance to land on the platform below). | |||
<center>[[File:Mega Man 1 Ice Man map4.png]]</center> | |||
* '''F''': Before you fall down here, you'll be able to collect some health and weapon energy if you keep pushing left as you fall. When you reach the bottom, you'll encounter a Big Eye. You're not afforded the usual block layout, and to make matters worse, the floor is slippery, so timing your attempt to run beneath it when it jumps will be tricky. You can try to take it out before it reaches you, but this is difficult to do and you're better off just trying to race beneath it and get to the door on the other side. | |||
* '''G''': The tunnel before Ice Man is guarded by flying Pepes. Like many tunnels that lead to Robot Masters, you can use this tunnel, you can use this tunnel to collect health before you go into battle. The trick, however, is that you must not get close to Ice Man's door. Once the door is in view, the Pepes will stop appearing, even if you run all the way back to the left. Instead, stand still and fire to the right, destroying each Pepe as they appear. When one drops an item you want, run over and grab it, and then run back to the left. Repeat this process until you feel you are ready to fight Ice Man, then run all the way to the right. | |||
==Ice Man== | |||
[[File:Mega Man 1 boss Ice Man.png|left]][[File:Mega Man 1 battle Ice Man.png|right]] | |||
Ice Man may not move around a lot in this fight, but he doesn't have to. His weapon, the Ice Slasher, is powerful enough that he only needs to hit you a few times to defeat you. That being said, his strategy is very uncomplicated. He jumps up, sending Ice Slashers your way at three heights. The lowest one must be jumped over, but the remaining two fly over Mega Man's head when he's standing on the ground. He fires off three more on his way down. Then he approaches you a little bit and repeats the same attack before backing up and starting over again. Without knowing his weakness, you can defeat Ice Man fairly easily if you're good at jumping the lowest Ice Slasher without getting hit by the others. Simply stand back and fire at Ice Man, and leap over any low Ice Slasher. Knowing his weakness only makes the battle quicker since the same basic strategy will apply. Once you defeat him, you will earn the ability to use the '''''Ice Slasher''''' for your own purposes. Unlike other weapons, this one has the ability to interact with the environment in some useful ways. | |||
{{spoiler|title=Ice Man's weakness|content=You might think that Ice Man is weak to fire, but he's not all that concerned about heat. In order to use his weapon however, he must surround himself in environments where water particles are in abundant supply. Water particles are particularly good at conducting electricity. As a result, Ice Man receives a pretty good jolt whenever you hit him with Elec Man's Thunder Beam weapon. It will only take three hits to knock Ice Man out of commission.}} | |||
{{Footer Nav|game=Mega Man|prevpage=Guts Man|nextpage=Wily Fortress 1}} | |||
{{Footer Nav|game=Mega Man|prevpage=|nextpage=}} | |||
Latest revision as of 15:55, 3 December 2015

Ice Man's stage takes place in an icy, watery cavern. Mega Man must learn to jump from block to block before they disappear, and navigate across an empty chasm on flying platforms that fire at adjacent targets. Originally designed for the exploration and mapping of regions far below the temperature that humans can withstand, Ice Man also supervises transportation of supplies to various research teams on the continent. Afterwards, he got the job of transporting materials in frozen food warehouses. He has the ability to shoot waves of super-chilled air from his mouth which is laced with liquid nitrogen, which crystallizes into a projectile.
Stage[edit]

- A: When you begin the stage, you will encounter the Crazy Razy robots. They are robots who, if allowed to get close enough to Mega Man, will split at the torso. The legs will continue to run towards Mega Man, while the upper body will float overhead and dive down to attack him. If you fire your gun while running towards them, you will hit the legs. Destroying the legs leaves the upper body free to fly around. However, if you manage to hit the head before they split, the entire robot will be destroyed. Be sure to hop off the ground a bit when you fire in order to hit the head and take them out instantly.

- B: Once you're past the Crazy Razys, get ready to dive in the lake. You don't have to worry about the temperature of the water, but you do have to worry about the flying Pepes that advance towards you while you make your way across. Gabyoalls add to the mix in the small spaces between blocks. Never allow Mega Man to drop down in there and deal with them unless a defeated Pepe happens to drop a very valuable item nearby. Fire continuously to the right in hopes of defeating the Pepes right when they appear. When you hop out of the water, you'll have a chance to collect a large health capsule after clearing away the two Suzys which guard it. Then drop down the pipe on the right.


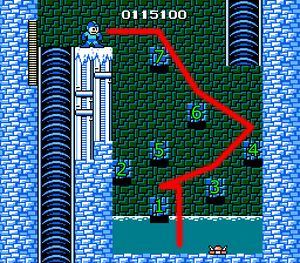
- C: This is the first of two disappearing block obstacles. When you land, there's a Gabyoall on the ground which you can clear away with the Rolling Cutter, Thunder Beam, or Hyper Bomb. Without any of those weapons, you'll have to jump and dodge the Gabyoall when it approaches. Wait for the first block to appear just above the water. Jump on it, and wait for the second to appear completely, and then leap to where the third should appear before the first one disappears beneath your feet. From here, you can either hop onto the fourth on the right and ignore the fifth block, or simply wait for the fifth block to appear and jump over to it before the third block disappears. Either way, jump to the sixth block and up onto the seventh and final block, and then leap to the ledge on the left. If you miss a jump and fall to the bottom, the pattern will repeat after the highest block appear.
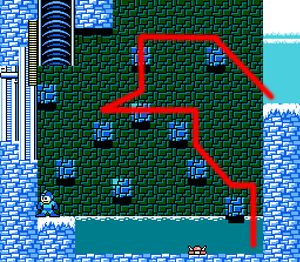
- D: When you arrive at the second block obstacle, you can destroy the Gabyoall, or you can get rid of it simply by running to the right, and letting it slide out of view to the left. The pattern of block appearances is a little more complicated. Start by jumping on the block which appears in the lower right corner, and jump on the next three blocks to appear. When you're close to the pipe you arrived from, wait for the next block to appear, and then jump to the right in time for another block to appear beneath your feet. When you land, jump up again, and you should land on a new block that arrives. Then hop to the next block on the right and over to the ledge to continue.
- E: The next challenge is even more dangerous than the blocks. You must now cross a chasm by landing on and riding on two sets of four Foot Holder platforms. Landing on the platforms is not the dangerous part; staying on them while avoiding shots being fired at you by neighboring Foot Holders is. You can easily get hit and knocked off if you're not careful. If you have the Magnet Beam, this is a very good opportunity to use it to bypass a lot of the danger. Hold the fire button down to create long platforms, and begin creating the next platform as you run along the first one. Then jump up to the new platform before the old one disappears. If you don't have the Magnet Beam, you're going to have to jump on the Foot Holder and wish for good luck. A large weapon capsule lies on a small platform in the middle of the chasm, good for recharging the Magnet Beam if necessary. After you pass the platform, Pepes complicate things by joining the fight and crowding the air space, making it more difficult to safely jump to the next Foot Holder. When you make it to the end, you'll have an opportunity to collect a 1-Up as you fall down the pipe to the next screen below (try making a small hop before you jump into the pipe for a better chance to land on the platform below).

- F: Before you fall down here, you'll be able to collect some health and weapon energy if you keep pushing left as you fall. When you reach the bottom, you'll encounter a Big Eye. You're not afforded the usual block layout, and to make matters worse, the floor is slippery, so timing your attempt to run beneath it when it jumps will be tricky. You can try to take it out before it reaches you, but this is difficult to do and you're better off just trying to race beneath it and get to the door on the other side.
- G: The tunnel before Ice Man is guarded by flying Pepes. Like many tunnels that lead to Robot Masters, you can use this tunnel, you can use this tunnel to collect health before you go into battle. The trick, however, is that you must not get close to Ice Man's door. Once the door is in view, the Pepes will stop appearing, even if you run all the way back to the left. Instead, stand still and fire to the right, destroying each Pepe as they appear. When one drops an item you want, run over and grab it, and then run back to the left. Repeat this process until you feel you are ready to fight Ice Man, then run all the way to the right.
Ice Man[edit]


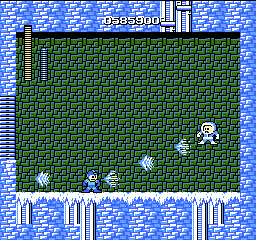
Ice Man may not move around a lot in this fight, but he doesn't have to. His weapon, the Ice Slasher, is powerful enough that he only needs to hit you a few times to defeat you. That being said, his strategy is very uncomplicated. He jumps up, sending Ice Slashers your way at three heights. The lowest one must be jumped over, but the remaining two fly over Mega Man's head when he's standing on the ground. He fires off three more on his way down. Then he approaches you a little bit and repeats the same attack before backing up and starting over again. Without knowing his weakness, you can defeat Ice Man fairly easily if you're good at jumping the lowest Ice Slasher without getting hit by the others. Simply stand back and fire at Ice Man, and leap over any low Ice Slasher. Knowing his weakness only makes the battle quicker since the same basic strategy will apply. Once you defeat him, you will earn the ability to use the Ice Slasher for your own purposes. Unlike other weapons, this one has the ability to interact with the environment in some useful ways.
You might think that Ice Man is weak to fire, but he's not all that concerned about heat. In order to use his weapon however, he must surround himself in environments where water particles are in abundant supply. Water particles are particularly good at conducting electricity. As a result, Ice Man receives a pretty good jolt whenever you hit him with Elec Man's Thunder Beam weapon. It will only take three hits to knock Ice Man out of commission.