Jump to navigation
Jump to search


(Coin Count) |
Mechamind90 (talk | contribs) (Description of Coin Rooms) |
||
| Line 7: | Line 7: | ||
== Coin Room A == | == Coin Room A == | ||
{{Scrolling map|SMB2j_Coin_Room_A.png}} | {{Scrolling map|SMB2j_Coin_Room_A.png}} | ||
* A Poison Mushroom is easily accessible, and should be avoided. | * A Poison Mushroom is easily accessible, and should be avoided. | ||
* Create a platform to the real Power-Up in the ceiling by revealing two hidden Coin Blocks. For a Mushroom, you need to make it rebound by hitting the right brick. | |||
== Coin Room B == | == Coin Room B == | ||
{{Scrolling map|SMB2j_Coin_Room_B.png}} | {{Scrolling map|SMB2j_Coin_Room_B.png}} | ||
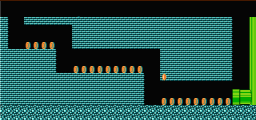
* The coin line is a total of 16 coins in length. | * The coin line is a total of 16 coins in length. You have plenty of room to dash and crouch to reach them, but watch out for Bullet Bill! | ||
* If you are big, you can reach the 10-Coin Block from the middle of the three high blocks just before the pipe. | * If you are big, you can reach the 10-Coin Block from the middle of the three high blocks just before the pipe. | ||
== Coin Room C == | == Coin Room C == | ||
{{Scrolling map|SMB2j_Coin_Room_C.png}} | {{Scrolling map|SMB2j_Coin_Room_C.png}} | ||
* It's a tight squeeze in this room if you're super-sized. | * It's a tight squeeze in this room if you're super-sized. You will need to dash and crouch to reach the four coins underneath. | ||
* You need to be super-sized to be able to reach the 10-coin Block. | |||
== Coin Room D == | == Coin Room D == | ||
{{Scrolling map|SMB2j_Coin_Room_D.png}} | {{Scrolling map|SMB2j_Coin_Room_D.png}} | ||
* It's a real challenge to get | * It's a real challenge to get coins or a Power-up in this Coin Room. If you are super-sized, you can break through the bricks for a Fire Flower. If you are Luigi, you can jump from the right without dashing for either Power-up. | ||
* But if you are regular-sized Mario, you will need to dash right and jump left from the pipe. | |||
* Either way if you are small, it will be a Mushroom and you will need to make it rebound by hitting the right brick. | |||
== Coin Room E == | == Coin Room E == | ||
{{Scrolling map|SMB2j_Coin_Room_E.png}} | {{Scrolling map|SMB2j_Coin_Room_E.png}} | ||
| Line 27: | Line 31: | ||
== Coin Room G == | == Coin Room G == | ||
{{Scrolling map|SMB2j_Coin_Room_G.png}} | {{Scrolling map|SMB2j_Coin_Room_G.png}} | ||
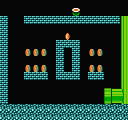
* The Power-Up in this Coin Room is boxed in by bricks. If your hero is small, it is unreachable. | * The Power-Up in this Coin Room is boxed in by bricks. If your hero is small, it is unreachable, and you can only reach six of the coins. | ||
* Watch out for that Poison Mushroom on the right, although it is boxed in by the same bricks. | |||
== Coin Room H == | == Coin Room H == | ||
{{Scrolling map|SMB2j_Coin_Room_H.png}} | {{Scrolling map|SMB2j_Coin_Room_H.png}} | ||
Revision as of 03:05, 24 June 2008
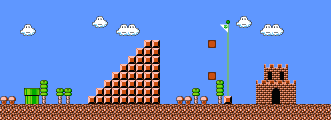
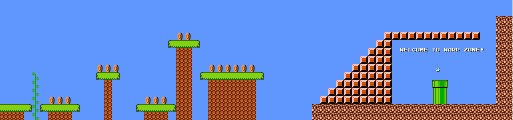
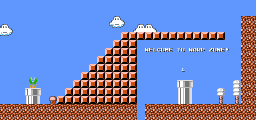
Standard Ending

- The hidden blocks near the flagpole will give you a boost. Jump up to the top block, then grab the pole for 5,000 points.
- You may even have an opportunity for a 1-Up.
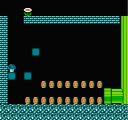
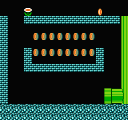
Coin Room A

- A Poison Mushroom is easily accessible, and should be avoided.
- Create a platform to the real Power-Up in the ceiling by revealing two hidden Coin Blocks. For a Mushroom, you need to make it rebound by hitting the right brick.
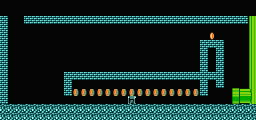
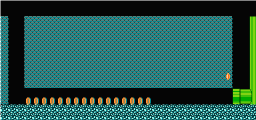
Coin Room B

- The coin line is a total of 16 coins in length. You have plenty of room to dash and crouch to reach them, but watch out for Bullet Bill!
- If you are big, you can reach the 10-Coin Block from the middle of the three high blocks just before the pipe.
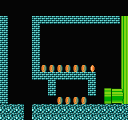
Coin Room C

- It's a tight squeeze in this room if you're super-sized. You will need to dash and crouch to reach the four coins underneath.
- You need to be super-sized to be able to reach the 10-coin Block.
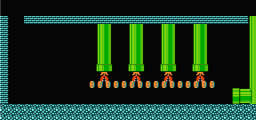
Coin Room D

- It's a real challenge to get coins or a Power-up in this Coin Room. If you are super-sized, you can break through the bricks for a Fire Flower. If you are Luigi, you can jump from the right without dashing for either Power-up.
- But if you are regular-sized Mario, you will need to dash right and jump left from the pipe.
- Either way if you are small, it will be a Mushroom and you will need to make it rebound by hitting the right brick.
Coin Room E

- The coin line is a total of 16 coins in length.
- If you are big, you can break the bricks closest to the exit and unveil a 10 coin block.
Coin Room F

- Collect the coins here by jumping carefully. If you aren't careful, you may end up becoming Piranha Plant food.
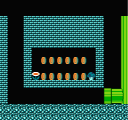
Coin Room G

- The Power-Up in this Coin Room is boxed in by bricks. If your hero is small, it is unreachable, and you can only reach six of the coins.
- Watch out for that Poison Mushroom on the right, although it is boxed in by the same bricks.
Coin Room H

- Hit the lowest brick to the left quickly and try to knock all ten coins out of the block.
Coin Room I

- After your pint-sized plumber pops the Power-Up, hit the brick to the right so that he can collect it.
- Once you're bigger, smash one side (not the bottom middle brick) of the block cluster and hit the top middle block to reveal a 10 coin block.
Coin Heaven A

- The brick wall is too long to jump over it. You'll have to hop off the platform in order to continue on with the platform on the other side.
- This Heaven has a 73 coin potential.
Coin Heaven B

- Hop on the platform and grab as many coins as possible, then drop down and leap over the clouds while collecting more.
- After you're done jumping the cloud-hurdles, hop on the platform and jump more clouds while grabbing coins.
- You'll encounter a higher row of clouds (there are a few small gaps in the row). Run across it. You can run right over the gaps.
- This Heaven has a 77 coin potential, but Mario won't be able to reach all of them.
Coin Heaven C

- Hop on the platform, grab coins, drop down, then grab more coins, and repeat the process until the level ends.
- This Heaven has a 55 coin potential, but Mario won't be able to reach all of them.
Swim Area A

- Swim around and grab the coins, but try not to get cornered by the Bloopers or the Buzzy Beetles. If you are Fire Mario, you can blast the Bloopers away.
- You can not jump on or even use fireballs against the Buzzy Beetles. You can only swim over them.
- Make sure the Blooper guarding the exit pipe doesn't chase you into the pit.
- This Swim Area has 40 coins total.
Swim Area B
| Note to All-Stars players |
| In the original game, this area has a 50 coin potential. However, in All-Stars - The Lost Levels, the last 16 coins are missing. Fortunately, there is actually ground underneath instead of a whirlpool drain. |

- Be careful around the Koopa and the Bloopers. Once again, avoid being cornered or chased into a pit, and if you have a Fire Flower, use it.
- When you reach the exit, wait for the Koopa Paratroopa to float down toward the pit, or blast it with fireballs.
Warp Zone A

- Don't fall, or you will lose a life. Stock up on all 17 coins. If the Warp Zone backtracks to an earlier level, there is no suicide pit. Just wait for the time to run out.
Warp Zone B

- This type of Warp Zone is very convenient, because if the pipe leads to World 1, you can jump into pit on the left to avoid being sent back.