Jump to navigation
Jump to search


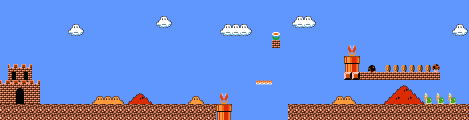


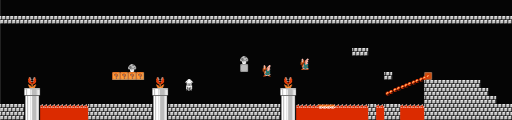

World 8-1[edit]
Part A[edit]

- Start by jumping over those nasty Piranha Plants. Stomp the Buzzy Beetle and kick its shell to get out of the way some enemies ahead. Don't forget your Power-Up on the seventh "?" Block.
- Quickly jump above the "?" Blocks, collect your Power-Up, and let the Koopa Paratroopas transit. Once they're gone, proceed ahead.
- If you missed your Power-Up, don't worry. Wait for it above, it'll bounce back and when the time is right, get down for it while avoiding the messy Koopa Paratroopas that might still be hanging there.
- You'll encounter some gusty wind when crossing the third pipe, right in the middle of this part. Use it for your advantage and proceed full-speed ahead to jump over that pile of blocks that serve as a wall and land carefully on the Red Koopa Troopa.
- Try to kick its shell towards the incoming Buzzy Beetles, but if it's too far to the left, knock down one of the Buzzy Beetle and kick it instead, to make some points.
- Once the threats are gone, leap carefully to the solid block and prepare to do a couple of precision jumps towards some Koopa Paratroopas.
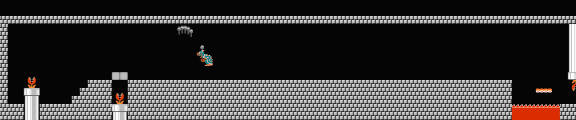
Part B[edit]

- As you jumped from the last platform, the wind will cease erratically, and may affect your precision jump to step on the first Koopa Paratroopa. Stomp carefully all three of them so you land on the top of the first pipe in this Part, so you can avoid the dangers below, including the Piranha Plant and the Bullet Bills.
- Quickly stomp the Buzzy Beetle while it's near the Bill Blasters, so you don't get shot while stomping it, and kick its shell to the right to knock out the approaching Hammer Brother.
- After you pass the second pipe, dash to the left and jump up between the pipe and the edge of the screen to pop the Power-Up.
- Dash over the small gaps from the pipe to the ledge and leap with super speed to the Koopa Paratroopa.
- One Hammer Brother follows another here. Jump over them when they're not tossing Hammers, or run under them as they jump. It's tricky, but you can do it.
- An easy trick is to stand on the single block over the pit, far left side, wait for Hammer Bro to come and then leap over him.
Part C[edit]

- It's not shown in the picture however directly adjacent to the brick staircase in the beginning of this part is a hidden one-up block.
- Beware of the pipe just before the tiny mid-air block island. If you drop down, you may think that you're being treated to a nice swim through swim area B, but when you finish, you'll sadly find yourself at a Warp Zone where you will be forced to take a trip back to World 5. Let time run out and sacrifice a life if you don't want to give up your position.
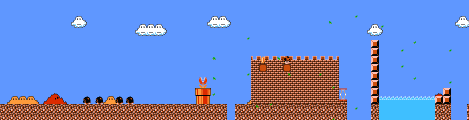
World 8-2[edit]
| Important note to All-Stars players! |
| Unfortunately, castle walls are not individually placed in the background in Worlds 8-2 or 8-3. If you want to find the hidden blocks, you have to rely on any pipes, walls, enemy positions or other hidden blocks. |
| World 8-2 is booby trapped with Poisonous Mushrooms! Collect the star first if you want the bonus. |
| In addition, while the Japanese Version contains solid blocks obscured by the brick walls, the blocks in All-Stars are not even there! Also, partially camouflaged bricks are replaced with hidden coin blocks. They must be uncovered, possibly costing some valuable time. |
| Before you arrive at World 8-3, you should look at its map first! Remember that there are no visible blocks at all! You need to uncover at least the hidden poison mushroom block if you want to proceed! |
Part A[edit]

- As you leap from the falling platform, hit the floating brick from below and grab the Power-Up.
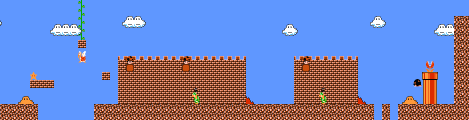
Part B[edit]

- The wind is blowing and the wall is tall. Bounce from the Spring as high as possible and fly to the top.
- It's easier to fly over the really tall wall and go for the small solid-block steps than trying to land on top of the tall wall and then jumping again.
Part C[edit]

- The vine in the highest brick leads to the Flagpole Goal. Bounce off the Koopa Paratroopa, hit the brick, land carefully and climb the vine.
- Be cautious with the empty brick that you'll need to climb the vine. If you destroy it, you'll need to take the dead end filled with several hazards.
- You'll find several hidden blocks in this dead end, but don't collect the items in the blocks because they are Poison Mushrooms.
- The pipe at the end leads to coin room F, but when you leave, you will be deposited back in the middle of Part B for another chance to escape. Watch the timer.
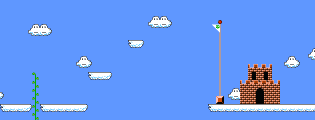
Part D[edit]

- This special aerial flagpole is the entrance to the cloud-filled sky level of World 8-3.
World 8-3[edit]
Part A[edit]

- The best way to get through the long gap in the middle of this Part is by getting to the top cloud rather than taking the Red Spring, since you may collide with some mid-air enemies.
- Star by taking down Lakitu, and carefully jumping on the Green Koopa Paratroopa when it's near of the could above. Then dash and leap from the top cloud, stepping on the Red Koopa Paratroopa and then go for the falling platform.
- It's best to aim for the Red Koopa Paratroopa first because there's the risk that your jump may be a little too early and you miss the platform. Let's stay in the safe side!
- Right after you land from the falling platform, and before getting to the next gap (or even while jumping through this gap), it'll be about time for Lakitu to re-spawn. Carefully avoid the Koopa Troopas, and the falling Spinies, and when you have a chance, jump to the solid-block pile and knock down Lakitu.
- Once you get rid of Lakitu, hurry up to the next Part, so the threats ahead would be lesser.
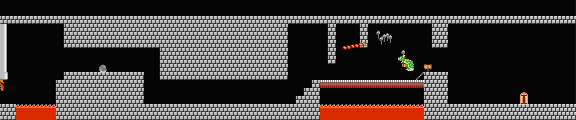
Part B[edit]

- A Lakitu throwing Spinies, Hammer Brothers throwing hammers, and a hidden block with a Poison Mushroom in your path can cause a lot of trouble here. If you got rid of Lakitu at the end of the Part A, there should be less things to worry about and this Part shouldn't be that difficult. Watch those Hammer Brothers carefully, especially the second one, since the hidden Poison Mushroom is right above of him and will cause you some trouble when you attempt to jump over him to escape.
- If you don't have the Fire Suit, the best way to get rid of the last Hammer Bro, is to stick to the right until the camera gets him out of the way. But be careful not to lose out of camera-sight your hidden Power-Up and a vine that takes you to coin heaven B. Take it and you'll be dropped off at just the right place to take advantage of the hidden Starman.
- Take the hidden Starman, and dash quickly towards the Red Spring. Make a good long-jump and you won't need to jump off the Red Koopa Paratroopas.
Part C[edit]

- Since you still have the Starman power, these last Hammer Brothers shouldn't bother you at all. Take them out quickly before the power fades.
- There are two hidden blocks here at the end, near the edge of the gap, camouflaging with the castle walls like the ones we saw before. Pop the right one, and let the Poison Mushroom fall out of your way, and the left one is a 10-coin block. Collect the most of them and when you're ready, climb above the left one. Stick to the far-left of this block (the more room you have for your run, the better) and make a run for the balance platforms, jumping at the farthest right part of the right block. Watch out! As soon as you're in the air, aiming for the highest platform, be careful not to slip off of it, especially if you're playing with Luigi.
- In Super Mario All-Stars, the 10-coin block is replaced with an invisible block that contains only one coin.
World 8-4[edit]
Part A[edit]

- Naturally, Bowser's eighth dungeon is a misleading maze of tunnels and repeating passages. The trick to the first section is dropping down the very first pipe with the platform above the opening to Part B.
- If you quickly run past the first two fire bars and then jump as soon as you reach the second lava pit, you will avoid any hazards. You will most likely pass underneath the fireball and land on the platform when the third fire bar is facing downward.
- If you were sent back to the second pipe from Part F as a super-sized hero, you will need to jump extremely skillfully to land on the fourth pipe. Otherwise, you may need to sacrifice your power-up.
Part B[edit]

- Swim carefully through this Fire-Bar and Blooper infested area. Lure the Bloopers away so that you don't have to contend with both dangers at once.
Part C[edit]

- Don't miss the hidden power up on the left side of this room.
- Walk off the ledge to the right and move to the left in mid-air to land on the pipe.
Part D[edit]

- The third pipe in this area takes you back to Part B. Although you could try for a Fire Flower, it's best to wait until you approach the end of Part E to save lots of time.
- This part is a maze (just like Castles 3-4 and 6-4), but with only one point to clear. The extended fire-bar must remain in sight in order for you to clear the path.
- When the sliding platform is within a block's width of the bricks, dash from the platform to the bricks and make a Fire-Bar clearing jump.
Part E[edit]

- A pair of Koopa Paratroopas make leaping over this lava pit a tricky task. Watch the Green Koopa carefully and bounce off its back when it's in the right position.
Part F[edit]

- Don't fall into the Piranha Plant's trap, or you will be forced to go down and return to the second pipe in Part A. The first pipe in Part A will be too far to the left, and you will need to take the wrong route to return to the first pipe.
- You're in for a surprise. Bowser's got a twin. Watch out for his Hammers and pelt him with Fireballs, or make a run for it.
Part G[edit]

- No more fakes, this is the real King of the Koopas and he's meaner than his brother.