Jump to navigation
Jump to search


World 1-1
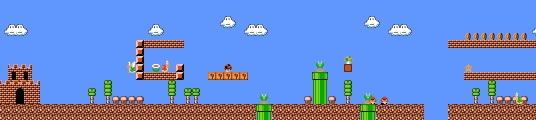
part 1

- The Mushroom Power-Up in the enclosed area at the beginning slides back and forth. Hit it from below so that it bounces over the wall.
- Expert players can create a multiple 1-Up opportunity for themselves in the enclosed area. When the Red Koopa Troopa is on the right side of the platform, flip it upside down while you're small. Hit the Power-Up brick and quickly grab the mushroom without going too far to the right. Break the block just right of the Power-Up brick to create a tiny staircase before the Troopa wakes up. Jump up and knock the shell into the back brick so that you get stuck and bounce continuously off the shell until you earn many extra lives.
part 2

- After you capsize the Koop Troopa on the top row, kick it to the right. The shell will ricochet and wipe out the Koopas below.
- The last pipe in this section leads to coin room A. If you approach this pipe from the left side, your plumber will plummet. Instead, jump from the right.
part 3

- Don't miss the Power-Up opportunity in the last "?" block below the pipe.
World 1-2
part 1

- If you're in need of a Power-Up Mushroom, you can find one in the ceiling above the first staircase. Chase it to the break in the ceiling. However, if it's a Fire Flower, it will be much tougher to get.
- A hidden block after the second pipe can provide a stepping stone to revealing the vine hidden in the ceiling. If you climb up the vine, you will discover the first warp zone which leads to World 3.
- The conventional route in this passage leads to a host of dangerous obstacles. You can avoid these hazards by running on the roof.
- If you choose to take the lower level, you may find two Power-Ups and two 1-Ups. But if you try to knock either 1-Up back, you will reveal a Power-Up which will remove the 1-Up. Follow it to the end of the ceiling, or if you are big, break a hole in the bricks to the right of the right most power-up block and catch the 1-ups one at a time through the hole.
part 2

- After the first pipe in this section, be sure to grab the invincibility Star. While it will protect you from the green piranha plants that you can't stand next to, you'll still have to time your jumps carefully.
- The 10-coin block at the end of this section is probably only worth the trouble if you have fire Mario.
part 3

- If you take the first pipe that you encounter in this section, you will arrive at the standard level end that you will find at the end of every level with you must rise out of a pipe to complete.
- However, if you make it to the ceiling over this pipe, you will continue on to an alternate end of the World. Climb the stairs and run beyond to find another Warp Zone that leads to World 2.
- One more surprise can be uncovered by dropping down the lower pipe before the Warp Zone, which leads to part 4.
part 4

- When you reach the lower over-hang near the end, there are two ways to pass it. The easier way is to sacrifice your power-up so that you are small. Then you can run across the gap.
- The harder way is only necessary if you wish to stay large. Then you must slide under the first column of block, and break them so that you can run right up to the second column before ducking. Then get a good running start, and duck at the last possible moment so that you slide across the gap. Duck too soon, and you'll fall right in the water and die.
- There are two hidden Coin Blocks on the edge of the pit. Use them as steps to lead you over the wall to the second warp zone, which leads to World 4.
- If you choose not to use the hidden blocks to reach the warp zone, you can take the very last pipe which leads to coin room B.
World 1-3
part 1

- Hop onto the left platform and let it sink as the right platform rises. Then jump to the right and continue on to higher ground.
- Bloopers can now appear in mid-air. They follow you in an up and down pattern. Lead this one to the left. Then turn around and stomp it when it drops down to attack.
part 2

- There's not much room to run on this high bluff. You'll have to react quickly as another Blooper approaches. Let it drop, then stomp it.
- If your plumber is small, this Power-Up will be a Mushroom that will quickly slide to the right. Pop it up and grab it from the left side.
part 3

- There's no stair case at the end of this level, just two tree tops. Get a good running start and leap to the flagpole.
World 1-4
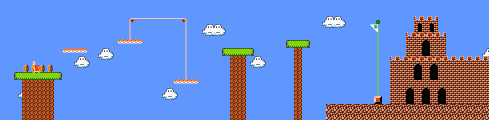
part 1

- The Power-Up at the entrance to Bowser's Dungeon is very high and close to the edge. If your hero is small, pop up the Mushroom then grab it as you jump over the gap to the right. If your hero is super-sized, approach the Fire Flower from the left side to avoid falling in the pit.
- There's not much room to jump in the passage at the end of this section if your hero is super-sized, especially if he is high-jumping Luigi. You'll have more clearance if you duck first, then jump.
part 2

- There are two types of fiery obstacles here; Bowser's Fireballs, and rotating Fire-Bars. If you've got good timing, you can make a spectacular move and jump over a Fireball and Fire-Bar at the same time.
- Bowser's Fireballs never fly higher than the three columns in the middle of this section. Jump on top of these brick barriers and wait for the right moment to continue your journey to the level's end.
- Your expedition through the first of the Lost Level Worlds ends in an encounter with Bowser, King of the Koopas. If you have Fireballs you can finish him off with four blasts. If not, run past him to the right and cut the bridge from under his feet.