*'''Joystick''': Use the 8-way joystick to make Kagekiyo run (if he is in his smaller form) and walk (if he is in his larger form) left and right, crouch, and hold his sword high in the air (if he is in his larger form). On Overhead Mode stages, Kagekiyo will run in whatever direction the joystick is pushed.
*'''Joystick''': Use the 8-way joystick to make Kagekiyo run (if he is in his smaller form) and walk (if he is in his larger form) left and right, crouch, and hold his sword high in the air (if he is in his larger form). On Overhead Mode stages, Kagekiyo will run in whatever direction the joystick is pushed.
*'''Attack Button''': Use this button to make Kagekiyo swing his sword at the enemies. In his larger form, by holding up while attacking, Kagekiyo will perform a downward cut instead of horizontal slash - also, if he collects a Makimono in this form, his right arm will start revolving in a clockwise direction, without the need of pressing button.
*'''Attack Button''': Use this button to make Kagekiyo swing his sword at the enemies. In his larger form, by holding up while attacking, Kagekiyo will perform a downward cut instead of horizontal slash.
*'''Jump Button''': Use this button to make Kagekiyo jump. He can jump to the same height (regardless of whether he is in his smaller or larger form).
*'''Jump Button''': Use this button to make Kagekiyo jump. He can jump to the same height (regardless of whether he is in his smaller or larger form).
*'''1 or 2 Player Buttons''': Push these buttons to begin a 1 or 2 player game.
*'''1 or 2 Player Buttons''': Push these buttons to begin a 1 or 2 player game.
Line 9:
Line 11:
===Taira no Kagekiyo (平景清)===
===Taira no Kagekiyo (平景清)===
[[File:GT Kagekiyo Small.gif|thumb|left|Kagekiyo's appearance in the Small and Overhead Mode stages.]]
[[File:GT Kagekiyo Small.gif|thumb|left|Kagekiyo's appearance in the Small and Overhead Mode stages.]]
[[File:GT Kagekiyo Big.gif|thumb|right|Kagekiyo's appearance in the Big Mode stages.]]
[[File:GT Kagekiyo Big.gif|thumb|left|Kagekiyo's appearance in the Big Mode stages.]]
The protagonist of the game. Having fallen at the battle of Dan-no-ura in 1185, he has now been resurrected over 800 years later and has to make his way over the Imperial Regalia of Japan - fighting other characters who actually existed such as Minamoto no Yoshitsune, Saito Musashibo Benkei, and Minamoto no Yoritomo on his travels. The amount of energy Kagekiyo starts the game with depends on what the arcade operator has set the "Candle" dip switch setting to (40, 50, 60 or 70) and he can increase it by collecting the "Inochi" (blue orbs) that some of the enemies leave behind when killed. However, any kind of contact with enemies will cause injury to Kagekiyo - and if he runs out of energy, he will explode and the game will immediately be over.
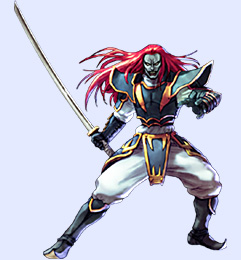
[[File:Taira no Kagekiyo (Namco x Capcom).jpg|thumb|right|Kagekiyo in [[Namco x Capcom]]]]
The protagonist of the game. Having fallen at the battle of Dan-no-ura in 1185, he has now been resurrected by prayer's alms (read: player's credit) and has to make his way over the Imperial Regalia of Japan while fighting enemy characters based on actual people such as [[wp:Minamoto no Yoshitsune|Minamoto no Yoshitsune]], [[wp:Benkei|Saito Musashibo Benkei]], and [[wp:Minamoto no Yoritomo|Minamoto no Yoritomo]] on his travels.
Kagekiyo also starts the game with a sword power of 7 (〇七), and can increase it by collecting "Ken" (purple orbs) that some other enemies leave behind when killed; however, if he strikes something that cannot be destroyed, it will cause his sword power to decrease (unless he's collected the glowing Tsurugi Sword). Finally, he starts the game without any Zeni (green orbs) at all - but he can collect the ones that some other enemies leave behind when killed in order to collect Swords, Tawara, and Candles and increase his sword power and energy.
===Small and Overhead Mode Enemies===
[[File:GT Skull Spider.gif]] '''Skull Spider (骸骨)''' - These cranial arachnoid insects are worth 100 (一〇〇) points, and will leave a Zeni that is worth 1 (一) behind when killed.
{{-}}
[[File:GT Gaki.gif]] '''Gaki (餓鬼)''' - These brats are worth 100 (一〇〇) points and will not leave anything behind - but their generators will leave an Inochi worth 2 (二).
{{-}}
[[File:GT Dokuraku.gif]] '''Dokuraku (独楽)''' - These tops are worth 100 (一〇〇) points and won't leave anything behind - but their generators will leave an Inochi worth 2 (二).
{{-}}
[[File:GT Namazu.gif]] '''Namazu (鯰)''' - These catfish, like those Skull Spiders, are worth 100 (一〇〇) points, and will leave a Zeni that is worth 1 (一) behind when killed.
{{-}}
[[File:GT Jigokusha.gif]] '''Jigokusha (地獄車)''' - These flaming wheel-like skulls are worth 100 (一〇〇) points, and will leave a Zeni that is worth 1 (一) behind, when killed.
{{-}}
[[File:GT Wolf.gif]] '''Wolf (狼)''' - These predatory mammals are worth 100 (一〇〇) points and will, for a sixth time, leave a Zeni that is worth 1 (一) behind when killed.
{{-}}
[[File:GT Yahei.gif]] '''Yahei (矢)''' - These arrowfiring bowmen are worth 100 (一〇〇) points when killed, but will again not leave anything behind for Kagekiyo to collect.
{{-}}
[[File:GT Onihime.gif]] '''Onihime (鬼姫)''' - These demon princesses are worth 100 (一〇〇) points, and for an 8th time leave a Zeni that is worth 1 (一) behind when killed.
{{-}}
[[File:GT Heiankyo.gif]]
'''Heiankyo (平安京)'''
*These extraterrestrial aliens are worth 1000 (一〇〇〇) points and will leave one Zeni that is worth 3 (三) behind when killed.
*They come from another game '''Heiankyo Alien'''.
{{-}}
[[File:GT Fuujin.gif]]
'''Fuujin (風神)'''
*This big green-skinned wind god is worth 500 (五〇〇) points, and will leave a Zeni that is worth 5 (五) behind when killed.
*He will release character '''"風"''' which will push you back. You may attack and destroy the character, but it will only leave a poison mushroom.
{{-}}
[[File:GT Raijin.gif]]
'''Raijin (雷神)'''
*This lightning god, like the Fuujin, is worth 500 (五〇〇) points, and will leave a Zeni that is worth 5 (五) behind when killed.
*He will release some lightning bolts. As by the time you encounter him, you will not have the Mirror, so just dodge or cut the bolts.
{{-}}
[[File:GT Daimajin.gif]] '''Daimajin (魔神)''' - This enormous evil spirit is worth 1000 (一〇〇〇) points, and will leave an Inochi that is worth 7 (七) behind when killed.
{{-}}
[[File:GT Ryu.gif]]
'''Ryu (竜)'''
*This enormous Oriental dragon is worth 1000 (一〇〇〇) points and will leave a Ken that is worth 3 (三) behind when killed.
*He is counted as a boss, with his lifebar shown with 20 life points.
{{-}}
[[File:GT Mitsukubiryu.gif]]
'''Mitsukubiryu (三首竜)'''
*This three-headed Ryu type is worth 1000 (一〇〇〇) points, and will leave a Ken that is worth 5 (五).
*He guards the Kusanagi Sword.
{{-}}
[[File:GT Daidokuraku.gif]] '''Daidokuraku (大独楽)''' - These enormous tops are worth 500 (五〇〇) points, and will leave a Zeni that is worth 10 (十, 一〇) behind when killed.
{{-}}
{{-}}
[[File:GT Shakutorimushi.gif]] '''Shakutorimushi (尺取虫)''' - These enormous inchworms are indestructible, and will decrease Kagekiyo's Ken power by 1 (一) if he hits one.
==Gameplay==
{{-}}
===Stage types===
[[File:GT Mukade.gif]] '''Mukade (大百足)''' - These enormous caterpillars are worth 1000 (一〇〇〇) points, and will leave just a Doku Kinoko behind.
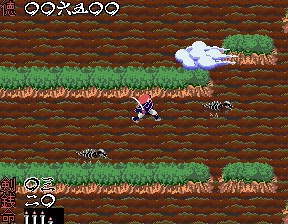
[[File:Genpei Toma Den gameplay.png|thumb|left|Small Mode stages in arcade version]]
{{-}}
[[File:Genpei Toma Den gameplay PCE.png|thumb|left|Small Mode stages in PC-Engine version]]
[[File:GT Yari Gaikotsu.gif]] '''Yari Gaikotsu (槍骸骨)''' - These spear-wielding skeletons are worth 100 (一〇〇) points and will leave a Zeni that worth 1 (一) behind when killed.
[[File:Genpei Toma Den gameplay 2.png|thumb|right|Big Mode stages in arcade version]]
{{-}}
[[File:Genpei Toma Den gameplay 3.png|thumb|right|Over Mode stages in arcade version]]
[[File:GT Gaikotsu Bune.gif]] '''Gaikotsu Bune (骸骨船)''' - These boat-rowing skeletions are worth 100 (一〇〇) points, and will leave a Ken worth 1 (一) behind when killed.
Kagekiyo will be travelling through ancient Japan consisted by three types of stages.
{{-}}
*'''Small Mode stages''': Kagekiyo will need to pass through obstacles without falling into the pit.
[[File:GT Honeinu.gif]] '''Honeinu (骨犬)''' - These skeletal dogs are worth 100 (一〇〇) points when killed - but will again not leave anything behind, for Kagekiyo to collect.
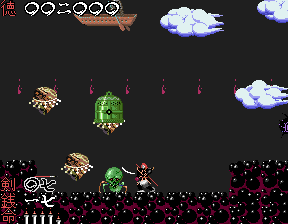
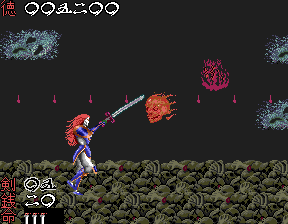
*'''Big Mode stages''': Kagekiyo will encounter strong enemies. As a result, he is able to use more moves during these stages.
{{-}}
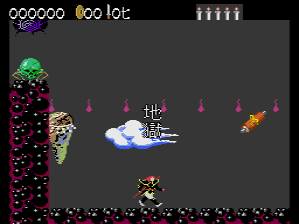
*'''Over Mode stages''': There are only a few of these top view stages, but most of them are very important. In this mode Kagekiyo cannot jump over enemies, but he can jump over certain obstacles or reach some enemies.
[[File:GT Hiushi.gif]] '''Hiushi (火牛)''' - These cattle (or AC adaptors) are worth 100 (一〇〇) points - and will leave an Inochi that is worth 3 (三) behind, when killed.
{{-}}
[[File:GT Chimoguri Kouke.gif]] '''Chimoguri Kouke (地潜り公家)''' - These submerging aristocrats are worth 100 (一〇〇) points, and will leave Zeni worth 5 (五) behind when killed.
{{-}}
[[File:GT Kishokugan.gif]] '''Kishokugan (魂喰眼)''' - Finally, these eye-eating souls are worth 100 (一〇〇) points, and will leave a Zeni that is worth 1 (一) behind, when killed.
{{-}}
[[File:GT Stone Lion.gif]]
'''Stone Lion (狛犬)'''
*These predatory feline mammals are worth 500 (五〇〇) points.
*They have hidden a bonus character behind. You will reveal the item after killing one.
*The hidden character can either be a [[Galaxian]] Flagship ([[File:GT Galaxian Flagship.gif]]), a [[Rally-X]] Special Flag ([[File:GT Special Flag.gif]]), a [[Libble Rabble]] Hoblin ([[File:GT Hoblin.gif]]), or a generic red car ([[File:GT Red Car.gif]]), all four of which are worth 1000 (一〇〇〇) points. Unlike the first three bonus characters, the generic red car was created specifically for this game and had no previous appearances.
*There is exactly one Stone Lion guarding a Magatama, in a hidden stage.
*'''Caution''': Stone Lions are hard enough that, killing them will cause you lose some sword power.
===Big Mode Enemies===
[[File:GT Monkey.gif]] '''Monkey (猿)''' - These long-tailed white primates are worth 100 (一〇〇) points, and will leave a Zeni that is worth 1 (一) behind when killed.
{{-}}
[[File:GT Kaeru.gif]] '''Kaeru (かえる)''' - These green frogs are worth 100 (一〇〇) points, but will only leave a Doku Kinoko (poisonous mushroom) behind when killed.
{{-}}
[[File:GT Moth.gif]] '''Moth (蛾)''' - These butterflylike insects are worth 100 (一〇〇) points when killed but will again not leave anything behind for Kagekiyo to collect.
{{-}}
[[File:GT Dokuro.gif]] '''Dokuro (骸骨)''' - These skulls are worth 100 (一〇〇) points, but will again only leave a Doku Kinoko (poisonous mushroom) behind when killed.
{{-}}
[[File:GT Inazuma.gif]]
'''Inazuma (イナズマ)'''
*These lightning bolts can be destroyed.
*If you have obtained the Mirror, you are immune to the lightning bolts.
{{-}}
[[File:GT Hitodama.gif]] '''Hitodama (人魂)''' - These skull fireballs are worth 100 (一〇〇) points when killed but will again not leave anything behind for Kagekiyo to collect.
{{-}}
[[File:GT Hannya.gif]] '''Hannya (般若)''' - These purple perfectionings of wisdom are worth 100 (一〇〇) points and will leave a Ken that's worth 1 (一) behind when killed.
{{-}}
[[File:GT Tiger.gif]] '''Tiger (虎)''' - These large feline mammals are worth 200 (二〇〇) points, and will leave a Zeni that worth 1 (一) behind when killed.
{{-}}
[[File:GT Ya.gif]] '''Ya (矢)''' - These enormous flaming-tipped arrows are worth 200 (二〇〇) points, and will leave a Zeni that is worth 1 (一) behind when killed.
{{-}}
[[File:GT Gaikotsu.gif]] '''Gaikotsu (骸骨)''' - These enormous sword-wielding skeletons are worth 200 (二〇〇) points - and will leave Inochi worth 2 (二) behind.
{{-}}
[[File:GT Tekyuu.gif]] '''Tekyuu (鉄球)''' - These black spiked balls are indestructible, and will cause Kagekiyo's Ken power to decrease by 1 (一) if he strikes one of them.
{{-}}
[[File:GT Saito Musashibo Benkei.gif]]
'''Saito Musashibo Benkei (西塔武蔵坊弁慶)'''
*This warrior monk is worth 2000 (二〇〇〇) points.
*There are two variations: The early one throws spiked balls, and drops 3 (三) points of sword power. After Kyoto, he will always wield a rod with a spiked ball, and will drop 5 (五) points of sword power instead.
*His weakness point in arcade version is his head. In the PC-Engine version however, his leg shall be your attack target.
{{-}}
[[File:GT Minamoto no Yoshitsune.gif]]
'''Minamoto no Yoshitsune (源義経)'''
*This clan general is worth 2000 (二〇〇〇) points.
*There are two variations: One will throw daggers at you, and will drop 2 (二) points of sword power. The other will use a long sword, may use rolling slash if you are too far away, and will drop 3 (三) points of sword power.
{{-}}
[[File:GT Biwa Houshi.gif]]
'''Biwa Houshi (琵琶法師)'''
*This hovering lute player is normally indestructible, and will always stay ahead of Kagekiyo on the right side of the screen.
*A bug in the PlayStation version allows to kill him.
*He will release below two enemies for a few times before he leaves.
{{-}}
[[File:GT Usagi.gif]] '''Usagi (うさぎ)''' - These outlined rabbits are worth 100 (一〇〇) points, but will only leave a Doku Inoko (poisonous mushroom) behind, when killed.
{{-}}
[[File:GT Kame.gif]] '''Kame (かめ)''' - These outlined turtles are worth 100 (一〇〇) points - but will again leave a Doku Inoko (poisonous mushroom) behind when killed.
{{-}}
[[File:GT Minamoto no Yoritomo.gif]]
'''Minamoto no Yoritomo (源頼朝)'''
*And Kagekiyo must have all three sacred items in his possession in order to defeat his arch-enemy.
*If you waste too much time in a small mode stage, or visiting certain areas, he will appear in the background and try to smash you. In this case he is invincible.
{{-}}
{{-}}
[[File:GT Bird.gif]]
===Game interface===
'''Bird (鳥)'''
*Numbers: The numbers used in game's score display, along with sword and Zeni counters, are in Kanji numerals instead of Arabic ones, which were later reused in [[Mirai Ninja]] for the eponymous protagonist's life meter. For those who cannot read these, here is what they mean: 〇 = 0, 一 = 1, 二 = 2, 三 = 3, 四 = 4, 五 = 5, 六 = 6, 七 = 7, 八 = 8, 九 = 9. (You should remember it).
*If Kagekiyo takes too long over any Big Mode or Over Mode stage, one of these egg-laying mammals will slowly appear in that top-left corner of the screen and start flying around above him.
*Sword power "'''Ken'''": This value shows Kagekiyo's attack power and sword durability. Kagekiyo starts with seven points, and can increase by collecting purple orbs or buyable swords, up to a value of 99. However, if he cuts anything too hard, his sword point may decrease, unless he has the Kusanagi Sword. If his sword power drops to zero, his attack power will decrease, and his sword will be shown as broken in Big Mode.
*They are worth 100 (一〇〇) points and will leave a Zeni worth 1 (一) behind when killed, but a maximum of nineteen more will slowly appear in the top-left corner of the screen and start flying around above Kagekiyo as he kills them and collects their left Zeni.
*Money "'''Zeni'''": Kagekiyo will need to buy some items, or escape from the pit via blood pool, with Zeni. Collect this from enemies, up to 99.
*In Over Mode stages, Kagekiyo must jump in order to attack them.
*Life candles "'''Inochi'''": Kagekiyo's life bar is shown as candles, each representing up to 10 life points depending on length. If Kagekiyo loses all life points, it is game over. Kagekiyo starts with 50 life points (can be changed between 40 to 70 with hidden switches), can recover with blue orbs and tawara, and can extend life capacity with candle or brown orbs pickup, up to 100. When Kagekiyo enters a torii, he will recover to 40 life points if lower than the value. However, if Kagekiyo falls into the Pit, he will lose all life extends and start the stage with less than 20 life points. During a boss fight, the lifebar of the boss will be shown as purple candles.
*[[wp:Imperial Regalia of Japan|Sacred items]]: Kagekiyo must collect all three items in order to defeat Yoritomo. Items collected will be shown on screen.
When Kagekiyo collects one of these scrolls in a Small Mode stage, he will gain the ability to fire beams across the screen with a swing of his sword for a short period of time - however, when he collects one in a Big Mode stage, his right arm will start revolving in a clockwise direction.
{{-}}
===Tsuzura (つづら)===
[[File:GT Tsuzura.gif|left]]
When Kagekiyo strikes these boxes with his sword to open them, the contents will either increase his sword power (if they contain a statue), his treasure (if they contain a mushroom), or his energy (if they contain a crystal ball) - eight of them also surround the head of Emma-O at the end of the "Pit Stage", and he'll decide the fate of Kagekiyo when he strikes one of them with his sword to open it. The result of Emma-O's decisions usually means an instant death for Kagekiyo - but he will sometimes choose to warp him (forward or back) to the standard thirteenth stage of the game instead.
{{-}}
===Ken (紫)===
[[File:GT Ken Small.gif|left]]
[[File:GT Ken Big.gif|right]]
When Kagekiyo collects these purple orbs that some of the enemies leave behind when killed, they will increase his sword power, up to a maximum of 99 (九九); but as mentioned above, if he strikes something that cannot be destroyed, his sword power will decrease by 1 (一).
{{-}}
===Zeni (緑)===
[[File:GT Zeni Small.gif|left]]
[[File:GT Zeni Big.gif|right]]
When Kagekiyo collects these green orbs that some of the other enemies leave behind when killed, they will increase his treasure, up to a maximum of 99 (九九); they can be used for the collection of the Swords and Tawara and the entering of the pool of lava in the "Pit Stage".
{{-}}
===Inochi (青)===
[[File:GT Inochi Small.gif|left]]
[[File:GT Inochi Big.gif|right]]
When Kagekiyo collects these blue orbs that some of the other enemies leave behind when killed, they will increase his energy; also, when he enters a torii at the end of a stage, and dematerializes with an energy of 39 or lower, he will rematerialize with his energy restored to 40.
{{-}}
===Chairo (茶色)===
[[File:GT Chairo.gif|left]]
These brown orbs are only present in the non-standard Small Mode stage known as the "Bonus Stage", in which the Sun Goddess Amaterasu flies around at the top of the screen, dropping powerups on Kagekiyo; his only goal in this stage is to collect as many of them as he can before the song he is hearing of from the Yamaha YM-2151 fades out, at which point he will automatically dematerialize and proceed to the next stage. When he collects one of these brown orbs, it will increase his energy capacity by 1 (up to a maximum of 3-6) - however, if he falls down a hole in a later Small Mode stage and ends up in that "Pit Stage", then enters the pool of lava with the maximum amount of Zeni, his energy capacity will be restored to its original amount.
{{-}}
===Sword (剣)===
[[File:GT Sword.gif|left]]
When Kagekiyo collects this large version of his weapon in a Small Mode stage, it will increase his sword power by 3 (三), at a cost of 10 (一〇) Zeni; but if he has less than the required amount of Zeni, he will just run through it as if it was not there (like many items in [[The Return of Ishtar]]).
{{-}}
===Tawara (俵)===
[[File:GT Tawara.gif|left]]
When Kagekiyo collects one of these bales in a Small Mode stage, it will recover his energy by 10, at a cost of 10 (一〇) Zeni; again, if he has less than the required amount of Zeni, he will just run through it as if it was not there (which is bad news, if you have the energy of 10 or lower).
{{-}}
===Candle (蝋燭)===
[[File:GT Candle.gif|left]]
When Kagekiyo collects one of these representations of his energy in a Small Mode stage, it will increase his energy capacity by 10, and restore his energy to full, without costing anything.
{{-}}
===Doku Kinoko (毒キノコ)===
[[File:GT Doku Kinoko.gif|left]]
When Kagekiyo collects one of these poisonous mushrooms that some of the other enemies leave behind when killed, his energy will decrease by 1; it is therefore advisable to either wait until they have disappeared or jump over them, before continuing to the right, as they could cost you.
{{-}}
===Magatama Jewel (八坂瓊曲玉)===
[[File:GT Magatama Jewel.gif|left]]
When Kagekiyo collects the first of the game's three sacred items on the tenth stage, it will be displayed in the bottom-right corner of the screen and make him invulnerable to the Doku Kinoko that some of the enemies leave behind when killed; however, if he falls down a hole on the ninth stage (or the tenth stage before he collects it), and ends up in the "Pit Stage", he cannot collect it and will be doomed to fail due to the warp to Stage 13.
{{-}}
===Kagami Mirror (八咒鏡)===
[[File:GT Kagami Mirror.gif|left]]
When Kagekiyo collects the second of the game's three sacred items on the sixteenth stage, it will be displayed in the bottom-right corner of the screen and make him invulnerable to the Inazuma; Yoritomo fires them at Kagekiyo as he tries to stay ahead of him during the final game stage.
{{-}}
===Tsurugi Sword (草薙剣)===
[[File:GT Tsurugi Sword.gif|left]]
When Kagekiyo collects the third and last of the game's sacred items on the seventeenth stage, it will be displayed in the bottom-right corner of the screen, and start glowing when he is in his larger form; it will also prevent his sword power from going down when he strikes something that cannot be destroyed. Collecting all three of the game's sacred items is the only way to defeat Yoritomo when you meet up with him upon the final stage.
Joystick: Use the 8-way joystick to make Kagekiyo run (if he is in his smaller form) and walk (if he is in his larger form) left and right, crouch, and hold his sword high in the air (if he is in his larger form). On Overhead Mode stages, Kagekiyo will run in whatever direction the joystick is pushed.
Attack Button: Use this button to make Kagekiyo swing his sword at the enemies. In his larger form, by holding up while attacking, Kagekiyo will perform a downward cut instead of horizontal slash.
Jump Button: Use this button to make Kagekiyo jump. He can jump to the same height (regardless of whether he is in his smaller or larger form).
1 or 2 Player Buttons: Push these buttons to begin a 1 or 2 player game.
Kagekiyo's appearance in the Small and Overhead Mode stages.Kagekiyo's appearance in the Big Mode stages.Kagekiyo in Namco x Capcom
The protagonist of the game. Having fallen at the battle of Dan-no-ura in 1185, he has now been resurrected by prayer's alms (read: player's credit) and has to make his way over the Imperial Regalia of Japan while fighting enemy characters based on actual people such as Minamoto no Yoshitsune, Saito Musashibo Benkei, and Minamoto no Yoritomo on his travels.
Small Mode stages in arcade versionSmall Mode stages in PC-Engine versionBig Mode stages in arcade versionOver Mode stages in arcade version
Kagekiyo will be travelling through ancient Japan consisted by three types of stages.
Small Mode stages: Kagekiyo will need to pass through obstacles without falling into the pit.
Big Mode stages: Kagekiyo will encounter strong enemies. As a result, he is able to use more moves during these stages.
Over Mode stages: There are only a few of these top view stages, but most of them are very important. In this mode Kagekiyo cannot jump over enemies, but he can jump over certain obstacles or reach some enemies.
Numbers: The numbers used in game's score display, along with sword and Zeni counters, are in Kanji numerals instead of Arabic ones, which were later reused in Mirai Ninja for the eponymous protagonist's life meter. For those who cannot read these, here is what they mean: 〇 = 0, 一 = 1, 二 = 2, 三 = 3, 四 = 4, 五 = 5, 六 = 6, 七 = 7, 八 = 8, 九 = 9. (You should remember it).
Sword power "Ken": This value shows Kagekiyo's attack power and sword durability. Kagekiyo starts with seven points, and can increase by collecting purple orbs or buyable swords, up to a value of 99. However, if he cuts anything too hard, his sword point may decrease, unless he has the Kusanagi Sword. If his sword power drops to zero, his attack power will decrease, and his sword will be shown as broken in Big Mode.
Money "Zeni": Kagekiyo will need to buy some items, or escape from the pit via blood pool, with Zeni. Collect this from enemies, up to 99.
Life candles "Inochi": Kagekiyo's life bar is shown as candles, each representing up to 10 life points depending on length. If Kagekiyo loses all life points, it is game over. Kagekiyo starts with 50 life points (can be changed between 40 to 70 with hidden switches), can recover with blue orbs and tawara, and can extend life capacity with candle or brown orbs pickup, up to 100. When Kagekiyo enters a torii, he will recover to 40 life points if lower than the value. However, if Kagekiyo falls into the Pit, he will lose all life extends and start the stage with less than 20 life points. During a boss fight, the lifebar of the boss will be shown as purple candles.
Sacred items: Kagekiyo must collect all three items in order to defeat Yoritomo. Items collected will be shown on screen.


.jpg)


