Jump to navigation
Jump to search


(formatting for Super Mario Bros. Deluxe compatibility) |
(Revert to revision 120950 dated 2007-03-20 20:08:34 by Procyon using popups) |
||
| Line 1: | Line 1: | ||
{{All_Game_Nav|game=Super Mario Bros.}} | |||
__NOTOC__ | |||
{| style="margin:0 auto" id=toc | {| style="margin:0 auto" id=toc | ||
|- | |- | ||
|<big><font color="blue">World 8 isn't just another world</font></big> | |<big><font color="blue">World 8 isn't just another world</font></big> | ||
|- | |- | ||
|For those who have seen the map of this area, the great length must be quite surprising. The time given to clear this area is only 300! The goal feels so far away. | |For those who have seen the map of this area, the great length must be quite surprising. The time given to clear this area is only 300! The goal feels so far away. | ||
| Line 23: | Line 24: | ||
{{Scrolling map|SMB1_Map_8-1_p2.png}} | {{Scrolling map|SMB1_Map_8-1_p2.png}} | ||
* If you reach this section without getting hit, you'll probably find a 1-up inside the third block from the left, between the two pipes. | * If you reach this section without getting hit, you'll probably find a 1-up inside the third block from the left, between the two pipes. | ||
* The pipe just before the two floating coins leads to [[ | * The pipe just before the two floating coins leads to [[Super_Mario_Bros./Coin_Rooms#Coin_Room_B|coin room B]]. | ||
=== part 3 === | === part 3 === | ||
{{Scrolling map|SMB1_Map_8-1_p3.png}} | {{Scrolling map|SMB1_Map_8-1_p3.png}} | ||
| Line 46: | Line 47: | ||
=== part 3 === | === part 3 === | ||
{{Scrolling map|SMB1_Map_8-2_p3.png}} | {{Scrolling map|SMB1_Map_8-2_p3.png}} | ||
* The first pipe in this section leads to [[ | * The first pipe in this section leads to [[Super_Mario_Bros./Coin_Rooms#Coin_Room_E|coin room E]]. | ||
* After two pipes, you can use the accelerate/jump sequence from the right side of the pipe to jump over the cannon and the pit. You can also use {{nes|A}} to jump from the top of the cannon. | * After two pipes, you can use the accelerate/jump sequence from the right side of the pipe to jump over the cannon and the pit. You can also use {{nes|A}} to jump from the top of the cannon. | ||
== World 8-3 == | == World 8-3 == | ||
| Line 98: | Line 99: | ||
* Get on top of the pipe on the right, and take time to observe the movement of the Hammer Brother. If he doesn't throw their hammers while they jump, it's a good time to make your move. Use the accelerate/jump sequence to jump behind him, and quickly jump over the Bog of Flames. | * Get on top of the pipe on the right, and take time to observe the movement of the Hammer Brother. If he doesn't throw their hammers while they jump, it's a good time to make your move. Use the accelerate/jump sequence to jump behind him, and quickly jump over the Bog of Flames. | ||
* The final battle: This Bowser means double trouble. What talent! He can blast you with fire or pull an old Hammer Brothers routine and pound you like a nail. You might try ducking under him, but the situation could get hot fast! Hang on Princess, Mario is coming! | * The final battle: This Bowser means double trouble. What talent! He can blast you with fire or pull an old Hammer Brothers routine and pound you like a nail. You might try ducking under him, but the situation could get hot fast! Hang on Princess, Mario is coming! | ||
{{Footer_Nav|game=Super Mario Bros.|backpage=World 7|nextpage=Coin Rooms|nextname=Coin Rooms, Heavens, & Warp Zones}} | |||
Revision as of 19:21, 19 August 2007
| World 8 isn't just another world |
| For those who have seen the map of this area, the great length must be quite surprising. The time given to clear this area is only 300! The goal feels so far away. |
| In addition, when you die in this area, you return to the beginning of the area--no matter where you die. |
| The obstacles and the enemies are set up to give you lots of trouble. Use the map wisely and don't get too excited when you get the star. If you are careless, you'll fall into the pits along the path. The pits vary in size, so you must use different techniques to clear them. |
| You'll also find that the Koopa tribe has its maximum defenses up. Every known type of enemy is present. And desperate! It is quite a feat to get the power-ups while engaging the various enemy characters in combat, and scoring points. Things get worse in World 8-3 where the Hammer Brothers make their last stand. |
| Power-ups are hard to come by, so save your power! It is preferable to be Fire Mario and use the fireballs before the enemy gets too close for comfort. |
| Four more areas to clear! Are you ready? |
World 8-1
part 1

- Clear the gaps in the middle of this section with the
 button sprint.
part 2

- If you reach this section without getting hit, you'll probably find a 1-up inside the third block from the left, between the two pipes.
- The pipe just before the two floating coins leads to coin room B.
part 3

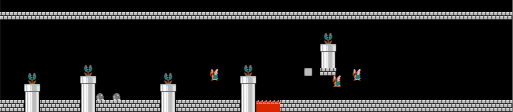
- The very beginning of this section is enclosed by walls and blocks. There is a hidden coin block in the space below the fifth block from the left. Jump on top of that block, and jump to find a 10-coin block.
- The third block in this row is where a particularly speedy star calls home. Bump the block and catch him fast, because you'll need his power in the areas ahead.
- To clear the large pit at the end of this section, you must accelerate before you jump.
part 4

- Be careful not to fall into the pits between the pipes after you clear the large pit. Take it easy and advance steadily.
part 5

- These twin pits are quite difficult to clear. Use to accelerate, and use the middle section to pull another jump. Another tactic is to stand close to the edge, and use
 to jump to the middle part. Jump again in a similar way to get to the other side.
World 8-2
part 1

- There is a 1-up mushroom inside the second block from the left in the block set above. Use the springboard to punch the block. To collect the mushroom when you are small, run to the end of the block to the right and catch it as it falls. Don't forget about the Paratroopas.
part 2

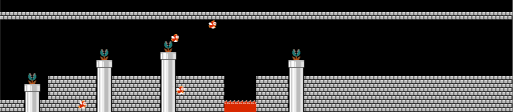
- There is a power-up inside the right block right after the twin cannon.
- The block set with the cannon on top has a 10-coin block in the right.
- There are two ways to clear the pits at the end of this section. The first way is to stand near the left pipe and use the accelerate/jump sequence to clear the second pipe, then jump again on the second tiny flat. Another way is to start at the edge of the first flat and accelerate over the gap to the second flat and jump at the last moment. Either way, timing and the length of your jumps will decide your fate.
part 3

- The first pipe in this section leads to coin room E.
- After two pipes, you can use the accelerate/jump sequence from the right side of the pipe to jump over the cannon and the pit. You can also use to jump from the top of the cannon.
World 8-3
| So close... |
| Finally! You've reached the outer rim of the castle where Princess Toadstool is held captive. The massive walls look like insurmountable barricades. The castle guards (Hammer Brothers) are waiting to destroy you. The |
part 1

- Bullet Bills and Paratroopas are the only enemies at the start. Accelerate and jump over all the obstacles to reach the first pipe quickly.
- You must control Mario precisely to defeat the Hammer Brothers. Advance steadily and wait for your chance. If you see an opening, run and jump to the stairs on the right. If you are lucky, the Hammer Brothers will no long appear. Use this opportunity to go back to the first block set, and punch the second block from the right to collect the power-up.
part 2

- Don't miss your chance to go full tilt and get the last power-up. You won't get another crack at it in the next stage. This is it! All you have to do first is nail those pesky Hammer Brothers.
- When you jump off the pipe, first stomp on the Troopas and kick them to the right. You may be able to kill a few Hammer Brothers this way, too. If this doesn't work out, use to accelerate and jump over them.
part 3

- At the final wall, if you jump at the second block from the right, a 10-coin block will appear.
- This staircase is floating. Extra care must be taken to clear this obstacle. Over-jumping or under-jumping...either way, you will fall!
World 8-4
| This is it! |
| This castle scene is divided into five zones. Three out of the five do not lead to anywhere. To get to the next zone, you'll need to use the pipes. Some of the pipes will take you to the beginning of the area instead of letting you through to the next zone. It's quite a maze. |
part 1

- You'll be welcomed here with the terrifying Bog of Flames. Take careful steps one at a time!
- If you take the wrong pipe, you'll end up back at the first pipe here.
- The second pipe leads back to the one in the beginning of this area.
- The pipe immediately after the floating set of blocks leads to part 2. If Mario continues to the right, he'll end up back at the start of part 1.
part 2

- The third pipe leads to the pipe at the beginning of part 1.
- Wait on top of the pipe just before the lava until all of the Paratroopas can be seen.
- Bump the second block to the left of the pipe and discover a hidden coin block. Jump up onto the blocks and use them as a step to get you into the floating pipe. It will take you to part 3.
part 3

- The third pipe leads to the pipe at the beginning of part 1.
- The pipe immediately after the lava pit leads to part 4.
part 4

- The only enemy in this underwater area is Blooper. If you are not Fire Mario, it's safer to stay close to the bottom.
- The pipe at the end leads to part 5.
part 5

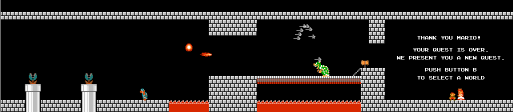
- The second pipe leads to the pipe in the beginning of part 1.
- Get on top of the pipe on the right, and take time to observe the movement of the Hammer Brother. If he doesn't throw their hammers while they jump, it's a good time to make your move. Use the accelerate/jump sequence to jump behind him, and quickly jump over the Bog of Flames.
- The final battle: This Bowser means double trouble. What talent! He can blast you with fire or pull an old Hammer Brothers routine and pound you like a nail. You might try ducking under him, but the situation could get hot fast! Hang on Princess, Mario is coming!