Jump to navigation
Jump to search
(I don't think this is real.) |
Trig Jegman (talk | contribs) mNo edit summary |
||
| (4 intermediate revisions by 4 users not shown) | |||
| Line 3: | Line 3: | ||
=== Part A === | === Part A === | ||
{{Scrolling map|SMB2j_World4-1_A.png}} | {{Scrolling map|SMB2j_World4-1_A.png}} | ||
* New persistent red Piranha Plants and a flying Lakitu welcome you to a very challenging world. | * New persistent red Piranha Plants and a flying Lakitu welcome you to a very challenging world. Be careful! | ||
* From this point to World 5, you can only go forward. Green Piranha Plants are history. | * From this point to World 5, you can only go forward. Green Piranha Plants are history. | ||
* It's not shown in the picture however directly adjacent left above of the blocks with the multi-coin brick in the middle is a hidden coin block. | * It's not shown in the picture however directly adjacent left above of the blocks with the multi-coin brick in the middle is a hidden coin block. | ||
| Line 10: | Line 10: | ||
{{Scrolling map|SMB2j_World4-1_B.png}} | {{Scrolling map|SMB2j_World4-1_B.png}} | ||
* You'll have to hit the spring at the start of this section while running at super speed in order to clear the long gap ahead. | * You'll have to hit the spring at the start of this section while running at super speed in order to clear the long gap ahead. | ||
*It's not shown in the picture however directly adjacent to the staircase is a hidden one-up block. | |||
=== Part C === | === Part C === | ||
{{Scrolling map|SMB2j_World4-1_C.png}} | {{Scrolling map|SMB2j_World4-1_C.png}} | ||
* When you pop up the Power-Up Mushroom, wait for it to slide off the block, then catch it in the air. | * When you pop up the Power-Up Mushroom, wait for it to slide off the block, then catch it in the air. | ||
* The first pipe of this section leads to a challenging, Coin-filled [[Super Mario Bros. 2 (Japan)/Coin Rooms#Swim Area A|swimming area A]]. | * The first pipe of this section leads to a challenging, Coin-filled [[Super Mario Bros. 2 (Japan)/Coin Rooms#Swim Area A|swimming area A]]. Swim at your own risk. | ||
* The last block before the staircase contains a vine which leads to another [[Super Mario Bros. 2 (Japan)/Coin Rooms#Coin Heaven A|coin heaven A]]. | * The last block before the staircase contains a vine which leads to another [[Super Mario Bros. 2 (Japan)/Coin Rooms#Coin Heaven A|coin heaven A]]. | ||
* Immediately to the right of the staircase, make two hidden Coin Blocks appear for extra running room on your leap to the flag. | * Immediately to the right of the staircase, make two hidden Coin Blocks appear for extra running room on your leap to the flag. | ||
| Line 24: | Line 25: | ||
=== Part A === | === Part A === | ||
{{Scrolling map|SMB2j_World4-2_A.png}} | {{Scrolling map|SMB2j_World4-2_A.png}} | ||
* When you pop up the Power-Up Mushroom, move to the right, then wait for it to drop. | * When you pop up the Power-Up Mushroom, move to the right, then wait for it to drop. The Bullet Bills will not hit your hero. | ||
* Grab the Starman in the first brick after the cannons, and dash. | * Grab the Starman in the first brick after the cannons, and dash. You'll flatten all of the Mushroom World enemies in your path with ease. | ||
=== Part B === | === Part B === | ||
{{Scrolling map|SMB2j_World4-2_B.png}} | {{Scrolling map|SMB2j_World4-2_B.png}} | ||
* If you're trying to get a Mushroom, | * If you're trying to get a Mushroom, be sure to collect it before you hit the final "?" Block, or you'll replace it with a Poison Mushroom. | ||
=== Part C === | === Part C === | ||
{{Scrolling map|SMB2j_World4-2_C.png}} | {{Scrolling map|SMB2j_World4-2_C.png}} | ||
| Line 37: | Line 39: | ||
{{Scrolling map|SMB2j_World4-3_A.png}} | {{Scrolling map|SMB2j_World4-3_A.png}} | ||
* The platforms in this area start to drop upon contact. Jump quickly to avoid falling. The 2nd, 5th and 6th lifts<!-- Part B --> move horizontally. | * The platforms in this area start to drop upon contact. Jump quickly to avoid falling. The 2nd, 5th and 6th lifts<!-- Part B --> move horizontally. | ||
* ''In Vs. Super Mario Bros, however there are 2 small platforms to land below the lifts. | * ''In Vs. Super Mario Bros, however there are 2 small platforms to land below the lifts. Also since this is level 6-3 in Vs. Super Mario Bros, the lifts are narrower and it’s night and grey.'' | ||
=== Part B === | === Part B === | ||
{{Scrolling map|SMB2j_World4-3_B.png}} | {{Scrolling map|SMB2j_World4-3_B.png}} | ||
* Bounce off of the back of the Koopa Paratroopa near the right side of the first long gap to | * Bounce off of the back of the Koopa Paratroopa near the right side of the first long gap to guarantee a safe landing. | ||
* A Bullet Bill flies through this area. | * A Bullet Bill flies through this area. Get out of its way and keep moving. | ||
=== Part C === | === Part C === | ||
{{Scrolling map|SMB2j_World4-3_C.png}} | {{Scrolling map|SMB2j_World4-3_C.png}} | ||
* It's difficult to stop on the one-block platforms at the very end of this level. | * It's difficult to stop on the one-block platforms at the very end of this level. You may have more luck with quick hops. | ||
== World 4-4 == | == World 4-4 == | ||
=== Part A === | === Part A === | ||
{{Scrolling map|SMB2j_World4-4_A.png}} | {{Scrolling map|SMB2j_World4-4_A.png}} | ||
* Collect the power-up at the beginning of this world, but don't put yourself at risk of being burned by the fire-bar to get it. | * Collect the power-up at the beginning of this world, but don't put yourself at risk of being burned by the fire-bar to get it. | ||
*If you want to get past the | *If you want to get past the beginning gap, go back and run. | ||
=== Part B === | === Part B === | ||
{{Scrolling map|SMB2j_World4-4_B.png}} | {{Scrolling map|SMB2j_World4-4_B.png}} | ||
* Three Koopas drop into the low-ceiling passage at the start of this section. | * Three Koopas drop into the low-ceiling passage at the start of this section. Duck and jump to stomp them, but watch out for the rebound shell. | ||
* If you're controlling Mario, you'll have to dash and jump to reach the dangerous Fire-Bar block at the beginning of the section. | * If you're controlling Mario, you'll have to dash and jump to reach the dangerous Fire-Bar block at the beginning of the section. Hop on, hop off, and run. | ||
* Be careful when you reach the lowering platform. | * Be careful when you reach the lowering platform. As small Mario, use your super speed dash while pushing Right to reach safety. Super Mario must jump from lower down. | ||
* Run through the middle passage at the end of this section and pop up the Power-Up Mushroom. | * Run through the middle passage at the end of this section and pop up the Power-Up Mushroom. Then drop and run to catch it. | ||
=== Part C === | === Part C === | ||
{{Scrolling map|SMB2j_World4-4_C.png}} | {{Scrolling map|SMB2j_World4-4_C.png}} | ||
* You'll have the most luck in your encounter with the king if you dash under him as he jumps. | * You'll have the most luck in your encounter with the king if you dash under him as he jumps. | ||
{{Footer Nav|game=Super Mario Bros. 2 (Japan)|prevpage=World 3|nextpage=World 5}} | {{Footer Nav|game=Super Mario Bros. 2 (Japan)|prevpage=World 3|nextpage=World 5}} | ||
Latest revision as of 23:03, 16 June 2021
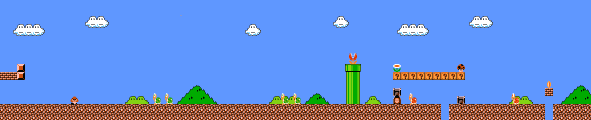
World 4-1[edit]
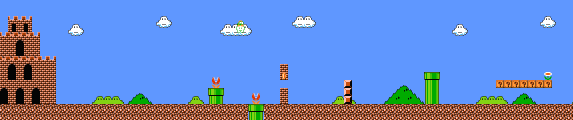
Part A[edit]

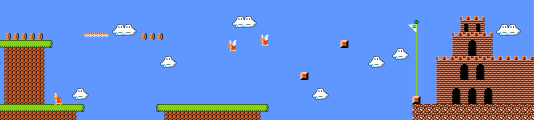
- New persistent red Piranha Plants and a flying Lakitu welcome you to a very challenging world. Be careful!
- From this point to World 5, you can only go forward. Green Piranha Plants are history.
- It's not shown in the picture however directly adjacent left above of the blocks with the multi-coin brick in the middle is a hidden coin block.
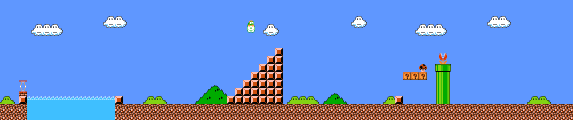
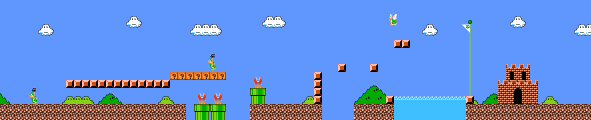
Part B[edit]

- You'll have to hit the spring at the start of this section while running at super speed in order to clear the long gap ahead.
- It's not shown in the picture however directly adjacent to the staircase is a hidden one-up block.
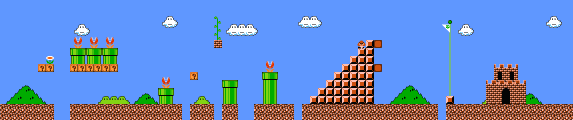
Part C[edit]

- When you pop up the Power-Up Mushroom, wait for it to slide off the block, then catch it in the air.
- The first pipe of this section leads to a challenging, Coin-filled swimming area A. Swim at your own risk.
- The last block before the staircase contains a vine which leads to another coin heaven A.
- Immediately to the right of the staircase, make two hidden Coin Blocks appear for extra running room on your leap to the flag.
- This level is a source of infinite lives because the coin heaven transfers you back to the staircase after the large pool of water. You have the potential to collect 123 coins per loop.
- If you want to try and speed things up, you can try looping with just the coin heaven. You collect only 83 coins per loop, but you might move a little faster this way.
World 4-2[edit]
Part A[edit]

- When you pop up the Power-Up Mushroom, move to the right, then wait for it to drop. The Bullet Bills will not hit your hero.
- Grab the Starman in the first brick after the cannons, and dash. You'll flatten all of the Mushroom World enemies in your path with ease.
Part B[edit]

- If you're trying to get a Mushroom, be sure to collect it before you hit the final "?" Block, or you'll replace it with a Poison Mushroom.
Part C[edit]

- Jump to avoid the Hammer Brother as you blaze through this section.
- The first pipe in this section leads to coin room A.
World 4-3[edit]
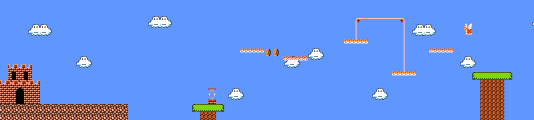
Part A[edit]

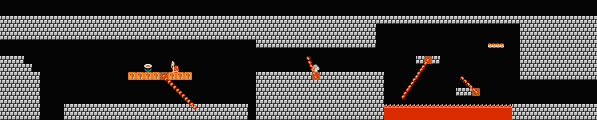
- The platforms in this area start to drop upon contact. Jump quickly to avoid falling. The 2nd, 5th and 6th lifts move horizontally.
- In Vs. Super Mario Bros, however there are 2 small platforms to land below the lifts. Also since this is level 6-3 in Vs. Super Mario Bros, the lifts are narrower and it’s night and grey.
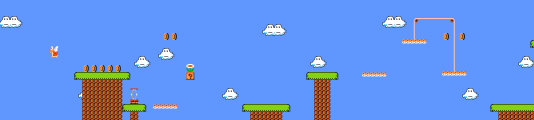
Part B[edit]

- Bounce off of the back of the Koopa Paratroopa near the right side of the first long gap to guarantee a safe landing.
- A Bullet Bill flies through this area. Get out of its way and keep moving.
Part C[edit]

- It's difficult to stop on the one-block platforms at the very end of this level. You may have more luck with quick hops.
World 4-4[edit]
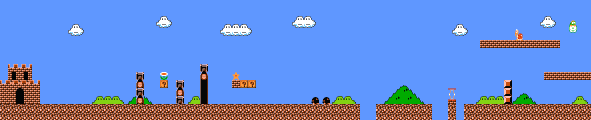
Part A[edit]

- Collect the power-up at the beginning of this world, but don't put yourself at risk of being burned by the fire-bar to get it.
- If you want to get past the beginning gap, go back and run.
Part B[edit]

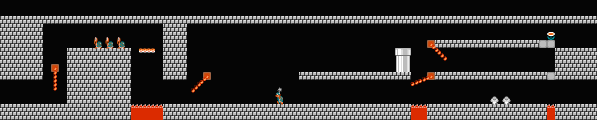
- Three Koopas drop into the low-ceiling passage at the start of this section. Duck and jump to stomp them, but watch out for the rebound shell.
- If you're controlling Mario, you'll have to dash and jump to reach the dangerous Fire-Bar block at the beginning of the section. Hop on, hop off, and run.
- Be careful when you reach the lowering platform. As small Mario, use your super speed dash while pushing Right to reach safety. Super Mario must jump from lower down.
- Run through the middle passage at the end of this section and pop up the Power-Up Mushroom. Then drop and run to catch it.
Part C[edit]

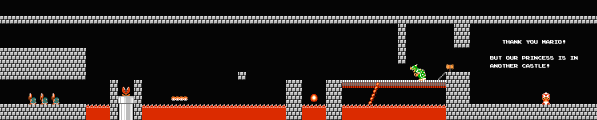
- You'll have the most luck in your encounter with the king if you dash under him as he jumps.