Jump to navigation
Jump to search


Mechamind90 (talk | contribs) (→Part B) |
Mechamind90 (talk | contribs) |
||
| Line 41: | Line 41: | ||
* When your character is in the air and off the screen, move to the right until the target platform is centered, then wait for him to drop. | * When your character is in the air and off the screen, move to the right until the target platform is centered, then wait for him to drop. | ||
* It is possible to collect a Fire Flower from here. You need to crouch, wait for the wind to carry you, then crouch-jump when the time is right. | * It is possible to collect a Fire Flower from here. You need to crouch, wait for the wind to carry you, then crouch-jump when the time is right. | ||
=== Part D === | === Part D === | ||
{{Scrolling map|SMB2j_World7-3_D.png}} | {{Scrolling map|SMB2j_World7-3_D.png}} | ||
* It's important to get a good feel for the plumbers' hang time on this stage so that you don't over estimate how far they can travel, and end up falling to your death. | * It's important to get a good feel for the plumbers' hang time on this stage so that you don't over estimate how far they can travel, and end up falling to your death. | ||
* Landing on the left platform of the pulley could be risky. You might want to scroll far enough to the right of the screen so that you have a safe barrier to the left of you. | |||
=== Part E === | === Part E === | ||
{{Scrolling map|SMB2j_World7-3_E.png}} | {{Scrolling map|SMB2j_World7-3_E.png}} | ||
* There's no need to dash in this section. Leap with accuracy. | * There's no need to dash in this section. Leap with accuracy. | ||
* The wind stops at the platform before the final fire-bar in this area. Your jumps will be much shorter, so you might need to dash to land on the final platform. | |||
== World 7-4 == | == World 7-4 == | ||
=== Part A === | === Part A === | ||
Revision as of 01:06, 3 July 2008
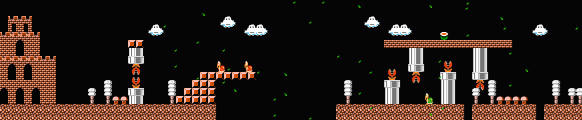
World 7-1
Part A

- Watch the dual Piranha Plants right at the start and run when the pipes are clear.
- A strong gust blows to the right. After you knock out the Koopas, run and ride the wind over the gap.
- You'll have a clear path if you leap to the top platform towards the end of this section. Jump to the left and blow over to the right.
Part B

- Bounce off the backs of the Koopa Paratroopa pair and leap to the top of the very high pipe. This portal will lead you to a chain of three bonus areas, coin room F, followed by a long windy stretch illustrated in part D below, and then finally to coin room E before rising back out of the first pipe in part C.
- If you take the ground route instead, stomp the wandering Koopa in this areas as soon as possible. Then wait for the Hammer Bros. to drop to the ground and send the shell sailing.
- There's an invisible block with a 1 up in it, not depicted in the image above. It's at the end of the series of bricks where where the hammer brothers are.
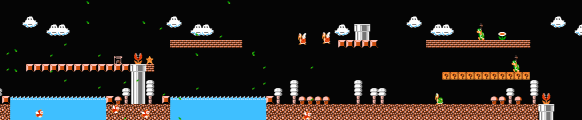
Part C

- Watch out for the Hammer Brother waiting for you on the mini-staircase. Don't go flying into the Buzzy Beetles beyond him.
Part D

- In this long windy stretch, knock the first Koopa Paratroopa down to the ground, and kick the shell to the right for a chance at a 1-Up.
World 7-2
Part A

- Much like World 5-3, this level repeats unless you make it to the pipe in the air. Bounce off the Koopas and climb. Before you progress, you will be treated to coin room D.
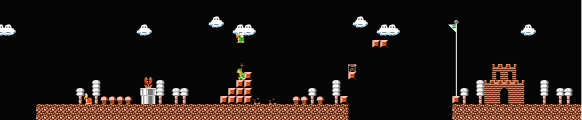
Part B

- It's important that you knock the Lakitu out of the sky before you jump to the on-block Fire-Bar platforms in this area. Negotiating the flames will be challenging enough without a mid-air menace.
- Wanna try and use sprite limits to your advantage? If so, keep the Lakitu in the air. Let the Spinys accumulate and you could make one or possibly both of the Fire-Bars in the beginning disappear! Quite a gamble, but it could help beginners.
Part C

- After you hit the back of the Koopa Paratroopa before the final pipe, jump onto the falling platform and jump again to the relative safety of the pipe. Then you'll be in sight of your goal.
World 7-3
Part A

- This wind-blown stage features wide open spaces and Super Springs. Fly high and Fly long.
Part B

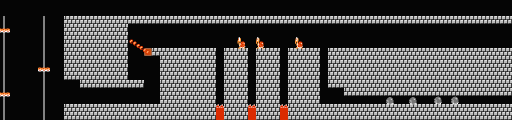
- A flying Koopa hovers over the start of this section. Wait for it to move to one side, then take off.
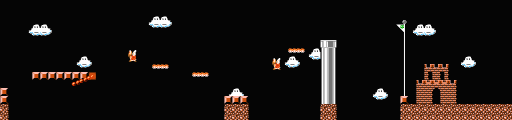
Part C

- When your character is in the air and off the screen, move to the right until the target platform is centered, then wait for him to drop.
- It is possible to collect a Fire Flower from here. You need to crouch, wait for the wind to carry you, then crouch-jump when the time is right.
Part D

- It's important to get a good feel for the plumbers' hang time on this stage so that you don't over estimate how far they can travel, and end up falling to your death.
- Landing on the left platform of the pulley could be risky. You might want to scroll far enough to the right of the screen so that you have a safe barrier to the left of you.
Part E

- There's no need to dash in this section. Leap with accuracy.
- The wind stops at the platform before the final fire-bar in this area. Your jumps will be much shorter, so you might need to dash to land on the final platform.
World 7-4
Part A

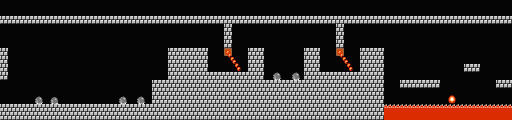
- If you take this short set of stairs one step at a time, you may get burned. Jump to the top in one big leap and keep moving to the next challenge.
- All of the lifts at the end of this section and the start of the next move downward. Jump from the hidden Power-Up Block and aim high. Then continue to cross the gap, making sure that you don't hit bottom.
Part B

- The Fire-Bar will not reach you if you duck in the lower corner of the "S" passage. Wait for it to rotate out of the way, then leap to the top and run.
- Wait for each of the Koopas to move away from you. Then dash across the gap and stomp them.
Part C

- Watch the Fire-Bars from the safety of the corners, then move when the path is clear.
Part D

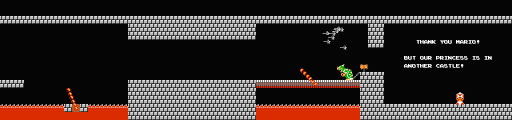
- One last tricky jump to the Fire-Bar island, surrounded by lava, stands between you and the King of the Koopas. Don't forget that he throws hammers by now.