Jump to navigation
Jump to search


Mechamind90 (talk | contribs) (→Part C) |
MrThorax281 (talk | contribs) (→Part D) |
||
| Line 60: | Line 60: | ||
=== Part D === | === Part D === | ||
{{Scrolling map|SMB2j_World_D-4_D.png}} | {{Scrolling map|SMB2j_World_D-4_D.png}} | ||
* Run under Bowser's brick platform here, then jump up and double back to collect the Power-Up. | * Run under the Fake Bowser's brick platform here, then jump up and double back to collect the Power-Up. | ||
* The second pipe in this area will take you back to the strangely placed first pipe in Part A. | * The second pipe in this area will take you back to the strangely placed first pipe in Part A. | ||
=== Part E === | === Part E === | ||
{{Scrolling map|SMB2j_World_D-4_E.png}} | {{Scrolling map|SMB2j_World_D-4_E.png}} | ||
Revision as of 04:21, 7 June 2010
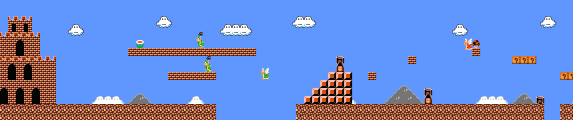
World D-1
Part A

- This level has two challenges. You must first pass a pair of Hammer Bros., then clear a long gap by bouncing off a Koopa.
- Hit the back of a Koopa Paratroopa to launch your hero to the top brick before the first triplet of "?" blocks. Then jump again to reveal a 1-Up Mushroom.
Part B

- Drop down the first pipe that you encounter to find coin room G.
- There's a Power-Up in the floating brick just before the last pipe in this section. Dash left from the right edge of the ground block and jump to pop it out.
Part C

- The wind will pick up by the end of this world. It should pose much of a danger, although it may interfere with your ability to hit the high point on the flagpole.
World D-2
Part A

- Once you flatten the Koopa at the top of the stairs, kick its shell and run with super speed to clear the narrow gap.
Part B

- Upside-down Piranha Plants cause trouble here. Hop across the gaps and avoid the plants.
- When you return from the coin heaven, you'll arrive in front of the tall pipe at the end of this section. Drop down for a visit to the exclusive coin room I.
Part C

- When you bounce off of the Koopa in this section and climb the vine, you'll be on the path to a pair of bonus areas, starting with coin heaven C.
- This level provides a useful opportunity to gain lives, and this will be your last chance to do it.
- Because the coin heaven drops you off at the highest pipe in this section (With both a regular and upside-down Piranha Plant in the same column), you can revisit both the coin room and the coin heaven multiple times. You can collect a potential 80 coins per loop.
- The floating block at the end of this section is a narrow but crucial platform. Carefully jump to the block and hop to the flag.
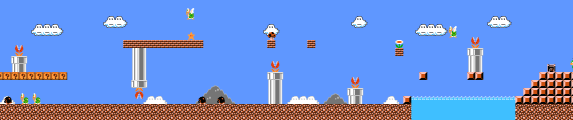
World D-3
Part A

- By standing next to the Bullet Bill Cannon, you can keep it from releasing shots as you wait to collect the Power-Up in the area.
- A Hammer Bros. duo causes trouble towards the end of this section. Dash and jump over the Bros. and between the hammers.
- One useful strategy for this level is to wait by the first group of cannons for a couple Bullet Bills to fire to the right, and then chase after them through the level. Because of sprite limits, they can prevent some of the Hammer Bros. from spawning. They also can provide useful jumping-off points to avoid the Hammer Bros.
- It's not visible in the picture but there is a row of nine bricks at the end of the first wall.
- In Super Mario All-Stars, however, these are replaced with nine hidden coin blocks, meaning that you have to create the safety zone against the Hammer Brothers instead of trying not to destroy it.
Part B

- Wait at the top of the tall stack of blocks for the Hammer Brother to close in. Then jump off of the blocks and stomp or pass.
Part C

- As you leap from one Cannon to the next at the end, make sure that a Bullet Bill isn't launching from the next Cannon up.
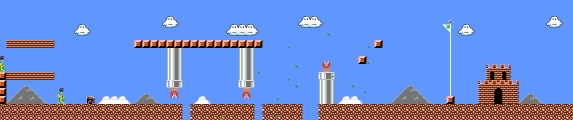
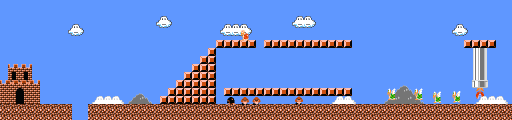
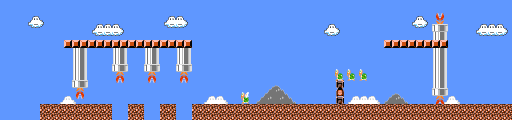
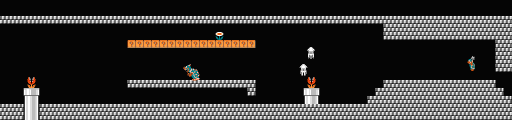
World D-4
Part A

- Why is the first pipe in such a strange place?
- Jump across the first gap as soon as the Fire-Bar clears away. Then hit the ground dashing and run to safety.
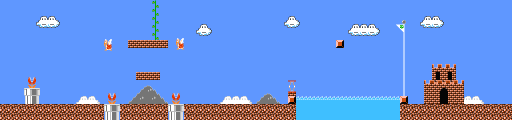
Part B

- Drop down the pipe at the end to continue to the outdoor Part C.
- In Super Mario All-Stars, the ceiling above the last Piranha Plant is open, but there is no real advantage to it.
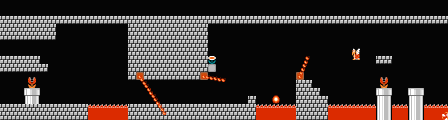
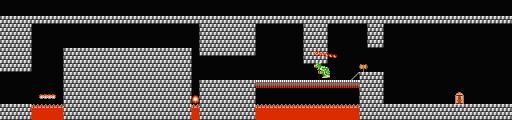
Part C

- Wait for the Hammer Bros. on the left side, then stomp them. Beware of a hidden block with a poisonous mushroom between the third Piranha Plant and the staircase.
- At the end of this section, move to the right until the Piranha Plant comes into view. Then jump when the pipe is clear. You will be treated to Coin Room H before you are sent to the final room.
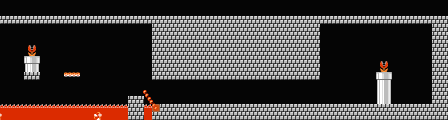
Part D

- Run under the Fake Bowser's brick platform here, then jump up and double back to collect the Power-Up.
- The second pipe in this area will take you back to the strangely placed first pipe in Part A.
Part E

- Just like World 2-4, you need to make the appropriate landing here. However, it is more difficult now because the landing is much higher and Podoboo resides here.
- You've met Bowser many times to get to this point. Now beat him once more to complete the last Lost Level. You can hit him with fireballs or jump over him when he retreats.