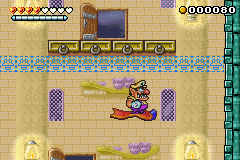
Magic Carpet: You will need this fantastic piece of cloth to explore the stage. While standing on it, it will also raise height with your jump, then fall down slowly toward the direction you are facing. You will not run off a carpet, but it still counts in your running distance. It will disappear in water, but you can exit the room and return, and it will reset.
Normal Version
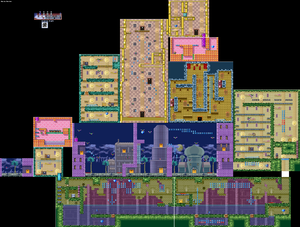
Room 1: Nothing special at the entrance. Enter Door A.
Room A: See the Magic Carpet on the left? Ride on it and have an Arabian feel, and reach Door B above. There is a blue pipe on the right, but ignore it first.
Outdoor: Fall to the ground to find two Magic Carpets, one on the left end and another on the right. There will be Bugs in the air. While their teeth pointing down hurt, a slight bump from other directions will send them away. Use the carpet to reach a pipe at the upper left corner to Bonus Room C, and Door D at upper right corner, with a Heart.
Bonus Room C: First jump over the Black Spinies and reach the right side, while you can stomp the ground a few times to adjust their locations. Then go down the ladder, swim to the left and hit the switch, and those Black Spinies will drown, leaving whopping amount of coins.
Room D: Dodge the Flying Skeletons first, grab the Gems on the right and go downstairs. You will encounter Axe Mummies, which are just palette swap of Axe Killers. Break the crates and keep going down until you reach ground floor and find Door E and the first Stone Chest. Before leaving, return to upper floors, get Zombie Wario, reach ground floor from the left, drop through the platform and into the basement, return to normal and get the Big Diamond inside.
Outdoor (2nd visit): There is nothing to do at the moment. Enter Door F on the right.
Room F: A big room with two Magic Carpet on the ground. The 2nd and 3rd half-block of lower left floor contains a bronze coin, only breakable with super stomp. Collect the gems and two hearts below (not shown in the map, should be below the bottom floor). Move upwards, collect the Gems, and dodge the Bugs. You can find Door G with treasure inside. After that (return to below and ride on carpet again), proceed upwards until you see a third Magic Carpet, and the second Stone Chest on the right. Leave from Door H at top of room.
Room G: There is a pipe to Bonus Room 2 on the right. Use the carpet on the left to go up, then from the upper-rightmost lamp in the background, start running to the left. The carpet will give you enough power before crushing the hard block. Take the Big Diamond inside and leave.
Bonus Room 2: Move to the left and throw the old man to the right, return to entrance, wait for the old man to walk close, then grab him again to break a hole on the right wall, to get the Big Diamond inside.
Outdoor (3rd visit): Drop off the ledge to the right. You will find Door I where you will get the Key Ghost and return outside. To the right is a Magic Carpet. Use this carpet to collect all the Gems in this area, with a Big Diamond at upper left corner. Before entering Door J on the right, use the carpet to super slam the odd wall below, to find a hidden area in Room J with 160 Gems and another Big Diamond.
Room I: Collect the Gems on the right first. In order to obtain the Key Ghost, do the following steps:
Move to the left and jump in the pipe with a Beezely. This will replace the spike balls with Beezelies.
Run to the right end, get Balloon Wario and fly up. Reach the ceiling, return to normal and jump into the pipe with Bat. This will replace the Beezelies with Bats.
Run to the left end and get Bat Wario. Now you can fly all the way up, into the tunnel, reach the Key Ghost, and return for a cleansing bath.
Room J: Get Zombie Wario for 200 Gems below. Climb all the way up, dodge the hazard and reach the top floor. Here, get Zombie Wario again, walk over the spikes, stop at the gap before last cluster of spikes, and fall through the platform. You will collect the Gems before landing. Pick up the third Stone Chest on the right, go down the ladder, and set off the Frog Switch. Hurry up!. Now drop below.
Sewer 3: You can simply swim all the way to the right and leave, without collecting the treasure around. For the treasure, take a carpet ride and grab the Gems above water. Some of the Gems form a downward arrow, and you can super stomp inside to find hidden treasure. The arrow on the right leads to a Big Diamond, and the arrow on the left shows a lot of Gems underwater. You can find the fourth Stone Chest along with a carpet on the left end of room. When it is done, move left.
Sewer 4: Roughly the same as last room, but with Big Diamonds at the ceiling, not one, but two! A third Big Diamond is indicated by an arrow of Gems. Use the carpet to reach upper left corner for the CD Chest. After clearing all treasure, use the leftmost pipe to return to Room A, and escape.
High Score: 21910
Hard Version
Only the differences will be listed.
Outdoor: There are more Bugs.
Room D: The floors are flooded with Axe Mummies. You must enter the basement for first Stone Chest.
Room F: The second Stone Chest is moved to Room G. More Bugs.
Room I: There is one more spiked ball.
Room J: Get in from Outside to find the third Stone Chest. More Axe Mummies and Skeleton Birds.
Sewer 3: You must stomp through the right arrow to find the fourth Stone Chest. There are two more spiked balls in the air, and one more Piranha in the water.
Sewer 4: Two spiked balls are below the Big Diamonds. One more Piranha in the water.
High Score: 19930
Super Hard Version
Only the differences from hard version will be listed.
Outdoor: Even more Bugs.
Room D: Oddly, the upper Skeleton Bird is removed, but even the basement has Axe Mummies.
Room F: Even more Bugs.
Room G: Three Bugs are in the way.
Room J: An Axe Mummy is guarding the Stone Chest, and there are more in the room.
Sewer 3-4: Even more spike balls and Piranhas. You will have to apply Go Through Wall glitch beside the wall next to the blue pipe to enter and sweep out the sewers before you hit the Frog Switch, for 1:30 is too tight for this goal.