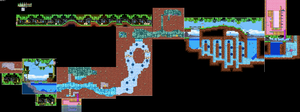
A Sea Monster pops out of his cave at lower left, another hiding in his cave at upper right, and a vacant cave at upper left.
Sea Monsters: They live in underwater caves. If Wario gets close to their cave, they will pop out, trying to catch a meal. They cannot be defeated, so just wait until they return into the cave, and then swim past. While some of the caves are vacant, a cave with a Sea Monster will have his red eyes glowing.
Room A: To the upper right is the return path, so ignore that first, along with the hard block on the left. Fall off the tree to find a yellow Spearman below, but instead of killing him, stun him instead and carry him to the tree to the right, and use him to break a hole and climb in, revealing Room B with some bonus. When it is done, jump into the water and swim to the right, but beware of the Piranha.
Room B: Use the rock to clear the block, then grab the Heart Chest behind.
Room 2: In addition to Piranhas, there are Spiked Clams who lies on the water bed, and pops up when a prey is above. A headbutt from below can make them drop coins. You will notice some blocks below, but ignore them first. Instead, find the shallow-colored roof indicated by Gems, and crush them with your head, revealing the land portion above. Out of water, move to the right for a Big Diamond, then at the pit on the left, make a super stomp a little to the right to break the underwater blocks, revealing two Hearts and a pipe to Bonus Room 3. Continue to the right to find more Piranhas and Spiked Clams, and the first Stone Chest in a small room above.
Bonus Room 3: Super-throw the old man to the left, then use him to break the underwater block, revealing a Big Diamond below. Leave the room and enter again whenever screwed up.
Room 4: Before taking any red Gems, watch carefully since a Sea Monster may be waiting for a meal. You have enough time to grab all Gems while taking out the roaming Piranhas. The path will split up in the middle, and there is a Big Diamond in the right path. Reach the surface and move to the right, but before leaving the room, turn back and make a super charge to the left, jump over the water until making a hole on the left wall, then slam inside for another Big Diamond.
Room 5: You will encounter Malletapes holding a big hammer. Ignore the tunnel above, instead, stand below the Gems and you will find the ceiling right above a bit strange. Let the Malletapes turn you into Spring Wario and charge in, to reach the upper portion with four Bouncers, then leave from the pit on the left. The second Stone Chest is to the right of ground level.
Room 6: A big lake to swim in. In the tunnels below, watch out for the bubbles coming up, and avoid getting caught. If caught in a bubble, you will have to leave through tunnels with Sea Monsters. However, at the fourth tunnel, intend to get caught and turned into Bubble Wario, and float up while keeping on the left, to get through the water flow and reach the surface, revealing a Big Diamond. Now proceed to the right end, and you have to move upwards while taking out Piranhas. Swim to the surface and move to the right.
Room 7: There is nothing to do in the pool now, so swim to the right end to find a pipe to Bonus Room 8, and the Frog Switch. Hurry up! The Frog Switch closes the water pouring statue, resulting in all water flows stopped. Now jump into the pool and swim to the right. Here, dodge the spiked tentacles of Octopus, and reach the Key Ghost above at the statue, then return to the room entrance and run.
Bonus Room 8: Use the right shaft and climb to the top, pick up the Old Man and throw him upward into the water. As soon as he leaves your hand, drop down to the entrance, run to the left, and cling the ladder. Shall you act soon enough, the Old Man will hit the switch at bottom of pool, making platforms to the Big Diamond above appear.
Room 6 (revisited): Now leave from the ground level. Beware of the Apple Ape who may waste your time. You will find the third Stone Chest before the bridge. Keep running to the left.
Room C: Keep running while dodging the spike balls and Apple Ape. You will find the fourth Stone Chest at the far left end. Now, start super-charging to the left.
Room A (revisited): You come back from upper right. Keep charging until breaking the hard block on the left, then break inside to find Room 9 with CD Chest inside. When everything is done, return to Room 1 and escape.
Room A: There are one more Piranha and a Spiked Clam.
Room 2: There are one more Piranha and one more Spiked Clam. The first Stone Chest has exchanged place with the Big Diamond.
Room 4: There are three more Piranhas, and all caves have Sea Monsters. Behind the wall is the second Stone Chest instead.
Room 5: No Bouncers, but the third Stone Chest is at upper floor. A Spear Mask appears at lower floor.
Room 6: All caves have Sea Monsters. The hidden room contains fourth Stone Chest.
Room 7: An extra Octopus appears in the left pool.
Room 6 (revisited): There are two more Apple Apes.
Room C: The Apple Ape moves to after first jump of Gems, and a Spearman takes his place. There are more spike balls, and another Spearman at left end of room. Beware of spike balls coming from both sides.
Room A (revisited): An Apple Ape appears at upper right.