Room 1: When you start the level, you will see the Frog Switch behind a wall. Don't worry about it now, you'll get to that later. Just jump up the platforms on the right wall to advance to the next room.
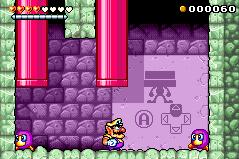
Room 2: This room has two pipes. Follow the instruction and go down the pipe.
Room 3: The room below has two Bouncers and 60 Gems. Defeat the Bouncers, then go up the next pipe, returning to Room 2 and proceed.
Room 4: You will fall down the hole to reach two more Bouncers and the first Stone Chest. Touch the Stone Chest from the side to open it, grab the Stone Piece and the Gold Coin, and move on.
Room 5: A block is in your path. Make a body slam to break it. The next part you need to jump after slamming in order to clear the block. Notice that many big blocks in this stage contain a Bronze Coin. Do not miss them.
Room 6: There are the second Stone Chest, 160 Gems and three Bouncers. If you want a higher score, save the Bouncers first and defeat them later.
Room 7: Green blocks need a super charge to break. Follow the instruction. The second part adds a jumping action.
Room 8: A narrow passage with two Bouncers and a few blocks, the end of which is green. A Big Diamond is hidden in the upper blocks.
Room 9: Pick up the rock, hold for a while and throw straight forward to clear the small passage. You will find a ladder to above floor, and an obvious block on the right. Break the block on the right to discover a room with a Spearman and a Heart Chest. Climb the ladder and you will find a second rock, and another block above. Aim the block from below and break it, then proceed left. There is the third block and another blocks. Clear them and proceed.
Room 10: 160 Gems, two Bouncers, one Spearman, and third Stone Chest. Grab the goods and leave.
Room 11: You will learn the method of rolling down the slope, in order to clear the low tunnel. You will see the Key Ghost in the air. Simply touch him and he will follow you. Now roll down a second slope to proceed.
Room 12: 60 Gems, a Big Diamond, two Bouncers, one Spearman, and fourth Stone Chest. Before opening the chest, step above to collect the Big Diamond. Move on.
Room 13: Now you need to push in the air to stomp the block. You will find two green blocks on the floor, and a ladder upwards to gain enough height to perform a super stomp. There is a Big Diamond above the platform, but before stomping, slam the left wall for a hidden room with two Spearmen and another Big Diamond. Super-Stomp the green blocks to return to Room 1.
Room 1 (revisited): Keep in the center during falling, for 150 Gems. Slam the blocks at the right, then bring the rock from the left to the right. You are now in front of the Frog Switch. Step on it to open the warphole, with timer start to ticking. Now use the rock to clear the small tunnel, crawl through and jump into the warphole.
Highest Possible Score: 11030 (You must save all enemies before collecting the hidden full-power, turn all enemies red before killing them, and keep yourself unharmed.)
Only the differences from hard version will be listed.
Room 3: All three Spearmen are red.
Room 4: What is the tutorial stage of super hard? Start the timer here by entering this room and landing on the Frog Switch! Hurry up! There will also be four red Spearmen.
Room 6: There will be four red Spearmen.
Room 8: Both Bouncers are red.
Room 9: Each rock has a guarding red Spearman, and there are three more in the hidden room with a Big Diamond instead of Heart Chest.
Room 10: There will be four red Spearmen.
Room 12: There will be five red Spearmen.
Room 13: In the hidden room, there are three red Spearmen and a Heart Chest.
Highest Possible Score: 11430 (After taking the Key Ghost, go to claim the Heart Chest first)


 for a while and throw straight forward to clear the small passage. You will find a ladder to above floor, and an obvious block on the right. Break the block on the right to discover a room with a Spearman and a Heart Chest. Climb the ladder and you will find a second rock, and another block above. Aim the block from below and break it, then proceed left. There is the third block and another blocks. Clear them and proceed.
 in the air to stomp the block. You will find two green blocks on the floor, and a ladder upwards to gain enough height to perform a super stomp. There is a Big Diamond above the platform, but before stomping, slam the left wall for a hidden room with two Spearmen and another Big Diamond. Super-Stomp the green blocks to return to Room 1.