[[File:WL4 Map Toy Block Tower.png|thumb|right|Click for a larger map.]]
*Stage: Toy Block Tower
*Location: Topaz Passage, Stage 1
*Time: (Normal/Hard/Super Hard) 4:00/2:30/2:00
Toy Block Tower is set, as its name implies, on a toy block tower. It is a fairly easy level in the [[Wario Land 4/Topaz Passage|Topaz Passage]], but it's not the easiest.
Toy Block Tower is set, as its name implies, on a toy block tower. It is a fairly easy level in the Topaz Passage.
{{-}}
==Stage Specific Gimmicks==
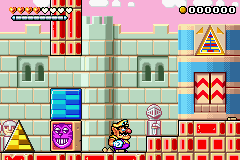
[[File:WL4 Gimmick Toy Block Tower.png|thumb|right|From left to the right: Triangle Block, Square Block, Cat Block, and the Block Gate.]]
*Triangle Block and Block Gate: These will come in pairs. You shall pick up the yellow Triangle Block and try to fit it in the hole above the Block Gate. Doing so will make the gate open.
*Square Block: These blue blocks cannot be destroyed or pushed. They will fall down if nothing is below. Wario will not be damaged by these blocks, but can simply crouch out.
*Round Block: These red Round Blocks cannot be destroyed. Slamming them will push forward by a bit. Mainly used as stepping platforms.
*Cat Block: While they act like common blocks, if you leave the room and come back, they will respawn at the same place. If there was a Square Block above, it will also reset.
{{-}}
==Normal Version==
*Room 1: You will learn the physical spec of the special blocks. Use the Triangle Block to open Door A and enter.
*Room A: Another Triangle Block. Use it to enter Door B. You will return from Door C on the right, then enter Door D above. Do not forget the Gems.
*Room B: Here is the first '''Stone Chest'''. You will see the new enemy, the Mini-Wario in a car with sharp front, just stomp or slam from behind to defeat him. To the right is another Mini-Wario and a Round Block. Push the block into the hole in order to get 550 Gems above. Leave from Door C.
*Room D: More Cat Blocks. Break all of them to reveal Door E on the right, and gain the access to the pipe to Bonus Room 2 on the left. You will return to Door F from basement, with a Mini-Wario. From here, go up, there are two shafts above. You shall take the left one by pushing the Round Block, for another Mini-Wario and 600 Gems, while the right shaft has nothing. There are two more Mini-Warios on the top. Leave from Door G.
*Room E: Collect the Gems, break the floor to the lower portion for the second '''Stone Chest''', then return to Room D via Door F.
*Bonus Room 2: Go below the green switch, quickly headbutt it twice so that the two Square Blocks land on the lower trigger blocks. Then super charge to the left to break in the room with '''Heart Chest'''.
*Room G: In order to claim the 350 Gems above, leave the middle Cat Block and break the other two, then climb from the right. Follow the Gems on the right to fall down, into Room 3.
*Room 3: First, break all wooden blocks so that all Square Blocks are on the ground. Then, from the right end, super charge to the left to break the hard block, revealing a '''Big Diamond'''. Now run all the way to the right in front of Door H, turn around and run again, jump on the platform and run over the Cat Blocks before the Square Blocks close the way. Shall you have succeeded, you will be able to claim 540 Gems and a Heart at the balcony. Now enter Door H.
*Room H: Take out the Mini-Wario and move to the right. Here, face right and catch fire from the Fire Statue, then keep running until you are full burnt, in order to clear the fire block. Now go to the right side and clear the Mini-Warios first, then return to the same Fire Statue, run to the right side and climb the platforms, in order to discover 190 Gems. Use the other Fire Statue on the right to discover the Triangle Block, and bring it to top floor to open Door I. Before leaving, run to the right to discover a hidden pipe to Bonus Room 4.
*Bonus Room 4: Climb up and push the Round Block down the slope, so that you can gain enough height to break the hard block on the left. Then, super charge the hard block on the right, and push the Round Block to the hole below the '''Big Diamond'''. Now grab the goods.
*Room I: Break both Cat Blocks on the left, and the upper one on the right, then climb up, and fall to the left, entering Door J.
*Room J: You will find the third '''Stone Chest'''. Catch the fire and break the block on the left to fall below. There is an odd normal block among some Cat Blocks, so keep the lowest row of Cat Blocks, and break others to reveal Door K. Once you are back, take out the Mini-Wario on the right, and activate the '''Frog Switch'''. '''Hurry up!''' Now climb from the right and return to Room I.
*Room K: A small room with 100 Gems and three Mini-Warios. Collect them all.
*Room I (revisited): Break both Cat Blocks on the left, then climb up, claim the before trapped '''Key Ghost''', and enter the pipe below to fall through Room H, into Room 5.
*Room 5: You will land on the fourth '''Stone Chest'''. Use it to get 330 Gems on the left before opening it. Instead of falling down, go left and crouch-jump into the passage to Room 6.
*Room 6: Jump to the upper platform and break both Cat Blocks to release the Square Block, then use it to reach the '''Big Diamond''' on the left. Now fall off this room or from Room 5, to reach Room 7 below.
*Room 7: If you come from Room 5, clear the extra blocks. You will find Block Door L and a Round Block below. Ignore them first and move left, take out the Mini-Wario, and run through some blocks to find the Triangle Block. Carry it to the right, jump on the Round Block and fit the triangle to open Room L, revealing nothing but the '''CD Chest'''. Before leaving from the leftmost pipe, above the Triangle Block is two more Mini-Warios and some Gems, and a narrow passage to a portion with a '''Big Diamond'''.
*Room E (revisited): You appear at the basement. Now go through Room D, A and Room 1 and escape.
==Normal and Hard Version==
High Score: 12840
When you start the level, you will see a big triangle in front of you. Ignore it and break the brown block and the cat block with the shifty eyes. Then, pick up the pyramid and carry it past the checkered Blue block and through it into the triangle gap to open a door. Inside, do not break all of the brown blocks. Only break the top one in the pile so that you can jump up to the area with the triangle block. Grab the triangle and throw it into the triangle gap. Inside will be the First Treasure Chest and a few enemies. Go up the ladder, break the small brown block, crawl through, hit the red round block right until it falls into the gap on the ground and collect the gems. When finished, go out the door. Head up to the door above you. Inside, you will see a bunch of cat blocks. Break all of them so that the checkered blue blocks are on the ground. Break the small brown block on the left wall and crawl in. Inside will be a bonus pipe. Inside, you must hit the green block twice in a row really fast so that the blue checkered blocks fall on the green blocks below. Then, run across and break the blue block on the wall. Inside will be a heart chest. Back outside, crawl through the hole at the right and break all three of the cat blocks to the right. Do not break any above you for now. Once you climb up, you will see a big gem. break only the first two cat blocks and jump up to receive the gem. Go up farther and roll the round red block to the left, then go up. dodge the enemy and collect the red gems. Keep climbing and go into the door. Outside, break the top cat block and the bottom one. Leave the middle one alone! Walk underneath the middle one, then jump from the small column to the top level and get the gems. Then, jump off the cliff, grabbing the blue gems as you go. at the bottom, break all the brown blocks, then super slam the blue block. Underneath will be a big gem. Break the brown blocks on the bottom at the right all the way to the door. Don't go in yet. Instead, super slam the cat blocks so that you run through them without stopping. At the end will be the Second Treasure Chest. Go back to the door on the right and go inside. In the next room, go past the brown blocks and get caught on fire. Break the fire block and repeat the process, except jump up the platforms so that you reach the highest fire block. Inside will be a triangle. Bring the triangle up to the triangle gap and throw it in. Do not go into the door yet. Instead, run and jump to the right and you will find that it is a fake wall. Inside is a bonus pipe. Inside, jump up and climb the ladder to the top and roll the red ball down the slope. Then, jump on the red ball so that you can ground pound the left blue block from high. Once it breaks, use a super slam into the one on the right. Then, roll the red ball to the right until it land in the indent. Jump up and collect the big gem. Go back outside and go into the triangle door. Inside, break the top cat blocks on both sides so that you can jump up. Then, run across to the other side area and go into the door. Inside, get caught on fire facing left. Go down to the other area and break the top two blocks, leaving the bottom ones. Underneath the brown block will be a secret door. Inside will be the third treasure chest. Go back outside and hit the Frog-Switch. You will have 2 minutes and 30 seconds to return to the entrance. Break both blocks on the left and none on the right to get back up. Outside, go down the pipe. Once you reach the bottom, jump the gap and roll the red circle off the platform and into the left hole. Then crawl through the entrance. On the other side, jump up the platforms and break both cat blocks to make the blue checkered block fall. Jump across the gap to reach the Fourth and Final Treasure Chest. Jump into the hole. At the bottom, break all the brown blocks and head up. Crawl through the gap to reach the triangle. Once you have that, head to the triangle door. You must roll the red ball over so that you can reach the triangle gap. Through it in to open the door. Inside will be the CD Treasure Chest. Go back out, head past the area where you broke the brown blocks, and head up the pipe. Just head the rest of the way back to the warp.
{{-}}
==Hard Version==
Only the differences will be listed.
*Room A: The Triangle Block is above Door B.
*Room D: A '''Big Diamond''' appears above the Square Block on the left. You must break exactly two Cat Blocks below to reach it.
*Room E: No Stone Chest.
*Room 3: The second '''Stone Chest''' is at the balcony.
*Room H: The Triangle Block is along with those 190 Gems.
*Room I: The Square Block on the left of Door I is removed.
*Room J: Instead of Stone Chest, you will find an extra Mini-Wario.
*Room K: No Mini-Warios here, but there is third '''Stone Chest'''.
*Room 5: No Stone Chest or Square Block, but a Round Block is on the left. Use that to claim the Gems, and then push into the pit in order to move left.
*Room 6: The fourth '''Stone Chest''' is on the left.
*Room 7: The Triangle Block is in the small portion. The Round Block has been moved a bit to the right, so that you must push it.
==Very Hard Version==
High Score: 11730
The Very Hard Version is basically the same for this level, except there will be twice as many enemies in the entire level. Also, in the second bonus pipe, you must roll the red circle almost to the gap, but not all the way in or you won't be able to reach the big gem.
{{-}}
==Super Hard Version==
Only the differences from hard version will be listed.
*Room A: Two more Square Blocks are in the way.
*Room B: No Stone Chest or Round Block, but the room is flooded with Mini-Warios.
*Room D: The basement has two Mini-Warios, and there are more above. The Big Diamond in hard version does not appear.
*Bonus Room 2: The left Square Block is removed. Instead of Heart Chest, you will find a '''Big Diamond'''.
*Room G: The first '''Stone Chest''' is at the platform above. However, since there is a Square Block at the right end, you shall simply break all Cat Blocks to reach it.
*Room 3: All Square Blocks on the left are removed, thus, you shall keep enough normal blocks to make a path. A Square Block on the right limits the running distance in order to get the second '''Stone Chest'''.
*Room H: At the place where the Triangle Block was placed in normal mode, there is the third '''Stone Chest'''. More Mini-Warios are roaming.
*Bonus Room 4: The '''Big Diamond''' is one block higher, thus, do not push the Round Block into the hole if you wish to get the diamond.
*Room I: A Mini-Wario is trapped with '''Key Ghost'''. There is an odd Square Block on the right of Door J.
*Room K: For some reason, the layout is same as in normal version.
*Room 5: Two Mini-Warios are roaming.
*Room 6: The Square Block is removed. In order to obtain the fourth '''Stone Chest''', fall down to Room 7 to find a Malletape first.
*Room 7: Two Malletapes and some Mini-Warios are roaming. The Round Block is at left corner and cannot be pushed, so that you must use the Mini-Warios to make Goomba-Jumps to reach Door L.
High Score: 10490 (not enough Hearts to refill to full life)
{{Footer Nav|game=Wario Land 4|prevpage=Cractus|nextpage=The Big Board}}
From left to the right: Triangle Block, Square Block, Cat Block, and the Block Gate.
Triangle Block and Block Gate: These will come in pairs. You shall pick up the yellow Triangle Block and try to fit it in the hole above the Block Gate. Doing so will make the gate open.
Square Block: These blue blocks cannot be destroyed or pushed. They will fall down if nothing is below. Wario will not be damaged by these blocks, but can simply crouch out.
Round Block: These red Round Blocks cannot be destroyed. Slamming them will push forward by a bit. Mainly used as stepping platforms.
Cat Block: While they act like common blocks, if you leave the room and come back, they will respawn at the same place. If there was a Square Block above, it will also reset.
Room 1: You will learn the physical spec of the special blocks. Use the Triangle Block to open Door A and enter.
Room A: Another Triangle Block. Use it to enter Door B. You will return from Door C on the right, then enter Door D above. Do not forget the Gems.
Room B: Here is the first Stone Chest. You will see the new enemy, the Mini-Wario in a car with sharp front, just stomp or slam from behind to defeat him. To the right is another Mini-Wario and a Round Block. Push the block into the hole in order to get 550 Gems above. Leave from Door C.
Room D: More Cat Blocks. Break all of them to reveal Door E on the right, and gain the access to the pipe to Bonus Room 2 on the left. You will return to Door F from basement, with a Mini-Wario. From here, go up, there are two shafts above. You shall take the left one by pushing the Round Block, for another Mini-Wario and 600 Gems, while the right shaft has nothing. There are two more Mini-Warios on the top. Leave from Door G.
Room E: Collect the Gems, break the floor to the lower portion for the second Stone Chest, then return to Room D via Door F.
Bonus Room 2: Go below the green switch, quickly headbutt it twice so that the two Square Blocks land on the lower trigger blocks. Then super charge to the left to break in the room with Heart Chest.
Room G: In order to claim the 350 Gems above, leave the middle Cat Block and break the other two, then climb from the right. Follow the Gems on the right to fall down, into Room 3.
Room 3: First, break all wooden blocks so that all Square Blocks are on the ground. Then, from the right end, super charge to the left to break the hard block, revealing a Big Diamond. Now run all the way to the right in front of Door H, turn around and run again, jump on the platform and run over the Cat Blocks before the Square Blocks close the way. Shall you have succeeded, you will be able to claim 540 Gems and a Heart at the balcony. Now enter Door H.
Room H: Take out the Mini-Wario and move to the right. Here, face right and catch fire from the Fire Statue, then keep running until you are full burnt, in order to clear the fire block. Now go to the right side and clear the Mini-Warios first, then return to the same Fire Statue, run to the right side and climb the platforms, in order to discover 190 Gems. Use the other Fire Statue on the right to discover the Triangle Block, and bring it to top floor to open Door I. Before leaving, run to the right to discover a hidden pipe to Bonus Room 4.
Bonus Room 4: Climb up and push the Round Block down the slope, so that you can gain enough height to break the hard block on the left. Then, super charge the hard block on the right, and push the Round Block to the hole below the Big Diamond. Now grab the goods.
Room I: Break both Cat Blocks on the left, and the upper one on the right, then climb up, and fall to the left, entering Door J.
Room J: You will find the third Stone Chest. Catch the fire and break the block on the left to fall below. There is an odd normal block among some Cat Blocks, so keep the lowest row of Cat Blocks, and break others to reveal Door K. Once you are back, take out the Mini-Wario on the right, and activate the Frog Switch. Hurry up! Now climb from the right and return to Room I.
Room K: A small room with 100 Gems and three Mini-Warios. Collect them all.
Room I (revisited): Break both Cat Blocks on the left, then climb up, claim the before trapped Key Ghost, and enter the pipe below to fall through Room H, into Room 5.
Room 5: You will land on the fourth Stone Chest. Use it to get 330 Gems on the left before opening it. Instead of falling down, go left and crouch-jump into the passage to Room 6.
Room 6: Jump to the upper platform and break both Cat Blocks to release the Square Block, then use it to reach the Big Diamond on the left. Now fall off this room or from Room 5, to reach Room 7 below.
Room 7: If you come from Room 5, clear the extra blocks. You will find Block Door L and a Round Block below. Ignore them first and move left, take out the Mini-Wario, and run through some blocks to find the Triangle Block. Carry it to the right, jump on the Round Block and fit the triangle to open Room L, revealing nothing but the CD Chest. Before leaving from the leftmost pipe, above the Triangle Block is two more Mini-Warios and some Gems, and a narrow passage to a portion with a Big Diamond.
Room E (revisited): You appear at the basement. Now go through Room D, A and Room 1 and escape.
Room D: A Big Diamond appears above the Square Block on the left. You must break exactly two Cat Blocks below to reach it.
Room E: No Stone Chest.
Room 3: The second Stone Chest is at the balcony.
Room H: The Triangle Block is along with those 190 Gems.
Room I: The Square Block on the left of Door I is removed.
Room J: Instead of Stone Chest, you will find an extra Mini-Wario.
Room K: No Mini-Warios here, but there is third Stone Chest.
Room 5: No Stone Chest or Square Block, but a Round Block is on the left. Use that to claim the Gems, and then push into the pit in order to move left.
Room 6: The fourth Stone Chest is on the left.
Room 7: The Triangle Block is in the small portion. The Round Block has been moved a bit to the right, so that you must push it.
Only the differences from hard version will be listed.
Room A: Two more Square Blocks are in the way.
Room B: No Stone Chest or Round Block, but the room is flooded with Mini-Warios.
Room D: The basement has two Mini-Warios, and there are more above. The Big Diamond in hard version does not appear.
Bonus Room 2: The left Square Block is removed. Instead of Heart Chest, you will find a Big Diamond.
Room G: The first Stone Chest is at the platform above. However, since there is a Square Block at the right end, you shall simply break all Cat Blocks to reach it.
Room 3: All Square Blocks on the left are removed, thus, you shall keep enough normal blocks to make a path. A Square Block on the right limits the running distance in order to get the second Stone Chest.
Room H: At the place where the Triangle Block was placed in normal mode, there is the third Stone Chest. More Mini-Warios are roaming.
Bonus Room 4: The Big Diamond is one block higher, thus, do not push the Round Block into the hole if you wish to get the diamond.
Room I: A Mini-Wario is trapped with Key Ghost. There is an odd Square Block on the right of Door J.
Room K: For some reason, the layout is same as in normal version.
Room 5: Two Mini-Warios are roaming.
Room 6: The Square Block is removed. In order to obtain the fourth Stone Chest, fall down to Room 7 to find a Malletape first.
Room 7: Two Malletapes and some Mini-Warios are roaming. The Round Block is at left corner and cannot be pushed, so that you must use the Mini-Warios to make Goomba-Jumps to reach Door L.
High Score: 10490 (not enough Hearts to refill to full life)