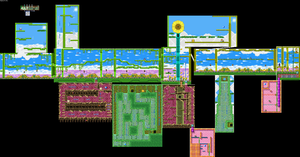
Wildflower Fields, the second level in the Emerald Passage, locates in an area full of flowers... and Beezelies.
Stage Specific Gimmicks
Flowers: There are flowers scattered in Rooms 1, 3 and 8. Alone, they are nothing. But if a nearby Beezely lands on it, it will stay on the flower for a while and leave, then, the flower will wither and start growing fruits. Depend on the timing of bumping the fruit, you can obtain various coins, of 20 (small), 50 (medium), 200 (ripe) or 10 (rotten).
Normal and Hard Version
Room 1: There are two Flowers and two Beezelies. Harvest the flowers for points, then let one Beezely turn you into Balloon Wario, and fly upwards. A big open leads to Room 2.
Room 2: Keep floating up. Move right for 30 Gems, then quickly move left in order to reach the platform with CD Chest. At the right corner there are another 180 Gems and a Heart. Fall down to Room 1.
Room 1 (second visit): You will land at the upper floor. Jump over the spikes on the left for a tasty 300 Gems. While you can move to Room 3 from two paths, the upper floor is a one-way path, so take the ground floor.
Room 3: 10 Flowers and five Beezelies. Happy harvesting. To the right of fourth flower is a hard block on the ground. Use Beezely to turn into Balloon Wario, then go up for a platform, and super stomp to reveal Room 4.
Room 4: Beware of the Drillers in the soil. Stomp the ground to dig them up, then stomp them. This room has 420 Gems, a rock to open the shaft with a Big Diamond, and a Heart. When everything is done, return to Room 3 and move right.
Room 5: 120 Gems, a Heart and two Spearmen. Ignore the grass-growing pipe, climb high, and super stomp to clear the hard block, then go down for Room 6.
Room 6: You can choose to unlock the grass-growing pipe. A Heart is on the right. Make a super stomp when falling down to discover Bonus Room 7. Move left and you will encounter three Drillers. Another heart hangs high that, you must Goomba-Jump on a Driller to obtain that. Enter door A to proceed.
Bonus Room 7: First, get the Old Man to the right of wall. Second, get the Old Man to the right shaft. Third, use the Old Man to Goomba Jump and grab the Big Diamond.
Room A: Jump in the water. Beware of that Piranha Fish, while you can headbutt his belly to finish him. Watch the current and Gems, then move up to the middle. From here, proceed left and follow the current to reach the left shaft, collect 170 Gems, and super stomp into the water for a Big Diamond. Proceed right, follow the current and grab the Gems you will reach door B and first Stone Chest. Use the slope to enter the right shaft for more Gems.
Room B: Defeat or dodge the Piranha Fish, then move upwards for Gems. Leave from door C at the top.
Room C: Look at the sunflower above you. There are Catepillars in this room, grab them and throw into the middle of sunflower will take them out, and cause a Gold Coin to appear. This can be done four times, and there are six Catepillars around. The Big Diamond is out of reach, but there are a Heart, a Heart Chest, a Stone Chest and a Spearman. Fall down the right to return to Room 5, on upper floor.
Room 5 (second visit): The Key Ghost is blocked on the left. Move to the right.
Room 8: Another big room with six Flowers. Let the first Beezely turn you into Balloon Wario, and go upwards, collect 200 Gems and move to upper part of Room C in order to grab the Big Diamond. When you are back, proceed to the right part with more Flowers and Beezelies. If you get turned into Balloon Wario here, watch out for the spikes at upper floor. There are a Heart and two Spear-Masks on the upper floor, and the third Stone Chest on the far end of lower floor. Proceed to the right.
Room 9: Let the Apple Ape feed you into Fat Wario, and destroy the hard block on the right, revealing 240 Gems, two Hearts and a pipe to Bonus Room 10 underground. When it is done, climb up the vine, and super stomp the hard block on the left to reach the Frog Switch. Grab the Heart above the Frog Switch. Hurry up! Now head back to Room 5.
Bonus Room 10: Throw the Old Man upward to hit green switch, then climb up and repeat on the red switch. Now move to upmost floor and use the Old Man to break the block in order to grab the Big Diamond.
Room 5 (third visit): The path is now open. Bring the Key Ghost away.
Room 3 (second visit): Take out the Spear-Mask. Two Hearts are available below. Keep running to the left to find the fourth Stone Chest. Break the small block on the left to clear the path, but before returning to Room 1, break the oddly-colored ground to fall below, and get stinged into Balloon Wario and float up, collecting 200 Gems and move to Room 11.
Room 11: Keep floating up to the top, then fall off the left side. There are 440 Gems and two Hearts to collect in this room. When returning to Room 3, you will obtain another Big Diamond. Move left.
Room 1 (third visit): You are on the upper floor. Jump into the warphole on the ground floor and escape.