m (→Important item locations: gallereyizing) |
m (cleanup) |
||
| (One intermediate revision by one other user not shown) | |||
| Line 1: | Line 1: | ||
{{Header Nav|game=Unreal Tournament 3}} | {{Header Nav|game=Unreal Tournament 3}} | ||
{| | |||
{| {{prettytable|float=right}} | |||
! Type of Map | ! Type of Map | ||
| DM | | DM | ||
| Line 35: | Line 35: | ||
This level takes place in an abandoned munitions factory. It is full of metallic tunnels, ramps, and corridors on multiple levels with a few open areas. There are no environmental hazards or special features to speak of. | This level takes place in an abandoned munitions factory. It is full of metallic tunnels, ramps, and corridors on multiple levels with a few open areas. There are no environmental hazards or special features to speak of. | ||
{{-}} | {{-}} | ||
==Strategies and tactics== | ==Strategies and tactics== | ||
There are three different types of environment you may find yourself in, and a preferred weapon for each: | There are three different types of environment you may find yourself in, and a preferred weapon for each: | ||
| Line 44: | Line 45: | ||
==Important item locations== | ==Important item locations== | ||
<gallery> | <gallery> | ||
File:UT3-ArsenalSH.jpg|'''Superhealth''': On top of a beam in a small open area. Only accessible via jump boots. | |||
File:UT3-ArsenalUD.jpg|'''U-Damage''': In a tiny, secret alcove above the only lift in the map. Accessible by jump boots, or by a timed jump while the lift is going up. | |||
File:UT3-ArsenalSB.jpg|'''Shield Belt''': In an alcove walled in on three sides at the top of a ramp and a scaffolding. The alcove walls have wide slits near the bottom so the belt can be seen from all sides when it appears. | |||
</gallery> | </gallery> | ||
*'''Chest Armor''': In the middle of a short bridge over a pathway where the rocket launcher can be picked up. | |||
*'''Jump Boots''': At the junction of several corridors of different levels. | |||
{{Footer Nav|game=Unreal Tournament 3|prevpage=|nextpage=Biohazard}} | {{Footer Nav|game=Unreal Tournament 3|prevpage=|nextpage=Biohazard}} | ||
Latest revision as of 21:13, 8 July 2022
| Type of Map | DM |
|---|---|
| Size | Medium |
| All Normal Weapons | Yes |
| Redeemer | No |
| Superhealth | Yes |
| U-Damage | Yes |
| Shield Belt | Yes |
| Armor | Chest, Thigh, Helmet |
| Jump Boots | Yes |
| Special Features | No |
This level takes place in an abandoned munitions factory. It is full of metallic tunnels, ramps, and corridors on multiple levels with a few open areas. There are no environmental hazards or special features to speak of.
Strategies and tactics[edit]
There are three different types of environment you may find yourself in, and a preferred weapon for each:
- Open areas: Rocket Launcher
- Tight corridors: Flak Cannon
- Long hallways: Stinger
Try to develop a pattern of movement that takes you past health and armor powerups and the U-Damage and Superhealth. Remember, there is always a tunnel nearby to duck into if you are at a weapon disadvantage.
Important item locations[edit]
-
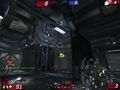
Superhealth: On top of a beam in a small open area. Only accessible via jump boots.
-
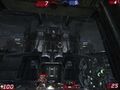
U-Damage: In a tiny, secret alcove above the only lift in the map. Accessible by jump boots, or by a timed jump while the lift is going up.
-
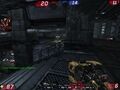
Shield Belt: In an alcove walled in on three sides at the top of a ramp and a scaffolding. The alcove walls have wide slits near the bottom so the belt can be seen from all sides when it appears.


- Chest Armor: In the middle of a short bridge over a pathway where the rocket launcher can be picked up.
- Jump Boots: At the junction of several corridors of different levels.