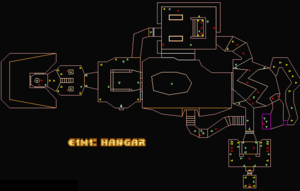
You'll start in a large room with an open section straight ahead. In the corners to your left and right you'll find a health vial. Don't shoot any of the barrels, and go to the room with the staircase to the left. Use your pistol to pick off the shotgun marines, netting you a shotgun and a security vest and some armour bonuses at the top. There's a switch on the right-hand side of the right pillar, which opens a secret door by the windows of the open area you entered the level near. Run through it and you'll be outside. Ignore the opening of the wall on the left and sprint across the slime to grab the combat armour.
You can use your shotgun/pistol to pick off some of the extra enemies around here - some normal marines, some shotgun marines and some Imps will be in the various rooms beyond the openings and you can pick them off from outside. Once you're done, Go down the stairs out here and kill the two shotgun marines. You'll find a medikit and a box of shotgun shells down here. At the end of the tunnel, open the wall and you'll emerge near the end of the level. Finish off any nearby enemies in here and head right, and through the door.
In this room there are two marines on the left for you to kill - blast one of the barrels and the explosion might get rid of them. Clear the room out and grab all the goodies. Before you head through the exit door up ahead, you can backtrack through the level and pick up all the extra items and kill the extra enemies, if you so wish. One secret area that appears when the high platform the Imps were on (in the zig-zag path slime room) lowers has a shotgun marine, a shotgun and a box of shotgun shells in it. Anyway, when you're done, head to the exit door, open it, rip the Imp inside a new one, pick the stuff up and throw the switch to leave the level.
Deathmatch[edit]
- The central courtyard contains additional ammo, and a rocket launcher.
- The start room has a shotgun behind barrels.
- The area left of the start has a beserk pack in the southern part of the room. This is the only instance of the beserk powerup appearing in the first episode.
- A chaingun is at the exit area. Ammo for it is scattered through the map.
Expect the court yard to be the central attraction; players can come in from three directions, but it is possible to prevent them from leaving the area.
Secrets[edit]
- Past the zig-zag area, there is a wall on the right that can be opened. It leads to the central courtyard with the mega armor. While you can access the area by using the switch in the room left of the entrance, the secret door at the nukage pit counts as the secret.
- Near the exit room, walk to where the ceiling changed height, and backtrack to the zig-zag area. A platform has lowered, providing access to a shotgun, medikit and ammo.
- When you cross the start of the zig-zag area, a lift in the prior secret will lower. Step on the lift for the secret. It leads to a secret area containing armour bonuses and ammo, as well as a view of the nukage pit to hide from other players.
Versions[edit]
In the earlier versions of the map, some features were not present.
- The final secret room was only present in v1.2 and later.
- The Ultimate Doom added a switch in the left-most area that opens a door from the entryway to the main courtyard. Walking through this door also opens the wall on the north area.