Map layout[edit]

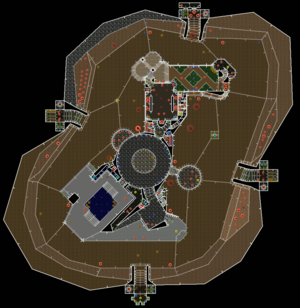
This map is one large building with open terrain surrounding it. The central building may be accessed by various lifts in the corners, as well as a main entrance in the north west corner.
There are two alcoves on the left and right of the map. They are guarded by monsters, but contain additional ammo. More ammo is available depending on the number of players in the map.
The south part of the building has a lift in the south-east corner. You can get a super-shotgun here. When you advance, you may take the left side corridor to reach a plasma gun. There is also a side passage on the right wall leading outside but is otherwise unmarked.

You may head north to the central room. In this room, you need to press the switch on the east wall. This unblocks the exit, but you will have to fight enemies that teleport into the center of the room.
In the southwest corner, you will see a small pool, with some monsters (including a Baron of Hell.) There is also a balcony to the northwest, and a tower to the southeast.
North of the circular room is a junction. It splits in two, but ultimately leads to the same room. In addition, going through the room will likely cause enemies to follow from behind.
The north room, is slightly dark but mainly contains demons and imps. Proceed further north, and you will enter the slime-pit area.
The northern-most tip of the map is the exit. It is unblocked if you pressed the switch in the middle circular area, and is only guarded by a few monsters.
Secrets[edit]
- North of the center ciruclar room is a connecting corridor to the northern part of the building. The right hand may be opened (usually by enemies) to a side room overlooking the outside. In the north of the room is an unmarked panel that may be opened to reveal 5 armor bonuses and a spectre.
- Also found north of the center circular room. The left hand door may also be opened. The north-east wall opens to reveal two medikits and another spectre.
- On approach to the plasma gun, you should see a misaligned wall. Open this to reveal a berserk pack. This secret can also be used to access the secret exit as well: open the side wall and use the teleporter. Turn around then flip the switch to take the secret exit.
- In the southwest corner of the building, there is a blue pool room. The northern wall has a few mislaigned textures that gives access to a secret coordidor containing invisibility and invulnerability. In addition, you can access a teleporter that brings you to a hidden alcove (with is not otherwise useful).
- In the north slime pit, there s a poison warning sign on the south wall. Open it to reveal a backpack.
- There are two ways to access this secret. The first is by a misaligned wall in the junction between the middle circular room and northern rooms, and the other is by flipping a switch in the northern room next to the right staircase, then riding the lift down to enter a opened secret door. Within this northern part of the dark corridor, yo should see a switch on the south wall, before the stairs leading up. This reveals a teleporter in the darkened section of the tunnel. Enter, and you will be teleported onto a platform outside. Turn around, walk around the pillar, and press the switch to lower the invisibility.
- While not marked as a secret, there is also a rocket launcher in a side room of this tunnel. To the south of the lit portion of the zig-zag section, you can find a door on the left hand side.
While not marked as a secret, there are a few other features in this map:
- The southern corridor leading to the circular section has a switch on the left-hand side. Press it, and run directly to the north-west balcony and jump down. Run to the BFG before it raises back up.
- In the northern part of the building, you should see a switch on the left staircase. This opens a door in the exit room, which reveals teleporters between the north, east, south and west tips of the map. It is only useful in co-op play.