m (forgot to add a tag) |
(greatly expanded) |
||
| Line 1: | Line 1: | ||
{{Header Nav|game=Adventures of Lolo 2}} | {{Header Nav|game=Adventures of Lolo 2}} | ||
==Room 1== | ==Room 1== | ||
[[File: AoL2 Stage 2-1.png|thumb|right|Room 1]] | |||
The name of the game is to avoid [[Adventures of Lolo 2/Enemies#Rocky|Rocky]]. He has the ability to trap you every time you go to grab a heart, so watch him. Try to keep him on the opposite side of the board as you. Speed is of the essence here. | The name of the game is to avoid [[Adventures of Lolo 2/Enemies#Rocky|Rocky]]. He has the ability to trap you every time you go to grab a heart, so watch him. Try to keep him on the opposite side of the board as you. Speed is of the essence here. | ||
Walk straight down and grab your first two hearts. Then move back up the first row. Move over and down the middle row, grabbing that heart, then the heart on the left of that. Go around and grab your last heart, then the jewel case. | Walk straight down and grab your first two hearts. Then move back up the first row. Move over and down the middle row, grabbing that heart, then the heart on the left of that. Go around and grab your last heart, then the jewel case. | ||
==Room 2== | |||
[[File: AoL2 Stage 2-2.png|thumb|right|Room 2]] | |||
Start with the Block directly above you. Push it | |||
3 tiles right, 1 tile up, and collect the lower right Heart. Now push this | |||
same Block 1 tile left, 1 tile down, 4 tiles left, 1 tile up, 1 tile left, 1 | |||
tile up, then 1 tile left. This will block the left Medusa's right side. | |||
Now go back to the right side of the screen, and notice the rightmost Block | |||
with free space all around it. Push it 1 tile down, 2 tiles left, 1 tile down, | |||
4 tiles left, 1 tile up, and 3 tiles left. This will block the left Medusa's | |||
bottom, so grab the Heart under her. | |||
Go back to the right side of the room, and notice the rightmost Block. Push it | |||
3 tiles up to block the top Medusa's right side, so grab the Heart to her | |||
right. One Heart remains in the middle of the room, and it has a Block just to | |||
its upper right. Push this Block 3 tiles down, 4 tiles left, 1 tile up, 1 tile | |||
left, then as far up as possible. This will block the top Medusa's left side. | |||
Finally, grab the final Heart in the center of the room. Notice how there is a | |||
Block under the top Medusa - don't touch this one, but there is another Block | |||
2 tiles left of it. Push this one as far left as possible, blocking the left | |||
Medusa's top. It is now safe to grab the Jewel. | |||
==Room 3== | |||
[[File: AoL2 Stage 2-3.png|thumb|right|Room 3]] | |||
Start by collecting the Heart in the middle of the room (between the 2 Blocks). | |||
It will give you 2 shots, so shoot the right Snakey once and push the egg 3 | |||
tiles up, then 1 tile right, trapping the upper right Skull. Now shoot the | |||
left Snakey and push the egg 3 tiles up, then 1 tile left, trapping the upper | |||
left Skull. | |||
Now on to the 2 Blocks in the middle of the room. Push the right one 4 tiles | |||
up then 1 tile right, trapping the middle right Skull. Now push the left one | |||
4 tiles up then 1 tile left, trapping the middle left Skull. | |||
Now get to the Block in the lower right part of the room. Push it 1 tile down, | |||
2 tiles left, and 3 tiles up, trapping the lower right Skull. Now get to the | |||
remaining Block in the lower left part of the room. Push it 1 tile down, 2 | |||
tiles right, and 3 tiles up, trapping the lower left Skull. With all Skulls | |||
secured, grab the remaining 8 Hearts around the room, then the Jewel. | |||
==Room 4== | |||
[[File: AoL2 Stage 2-4.png|thumb|right|Room 4]] | |||
This room is not really mind bending, you just have to collect all of the | |||
Hearts while watching the Rockys. | |||
Make your way to the middle, and grab the Hearts there. The easiest way to do | |||
this is to run around the middle clockwise as fast as possible. Doing this | |||
will eventually get you far enough ahead so that the middle Rocky doesn't | |||
charge you, giving you more time to safely collect each Heart. | |||
Now collect all of the Hearts on the left side of the room as well as the | |||
remaining ones on the right. Alternate between both sides and the middle, | |||
just to make sure you don't get trapped. The important thing is to never stop | |||
moving, so don't be afraid to do several laps around the middle until a big | |||
enough window of opportunity opens to grab a Heart. Remember, the Rockys can | |||
pop a 180 if they feel like it, so stay alert. Eventually you will sneak your | |||
way to all of the Hearts, so grab the Jewel afterwards. | |||
==Room 5== | |||
[[File: AoL2 Stage 2-5.png|thumb|right|Room 5]] | |||
Oh look, this room is arranged to look like a flower. Start by collecting | |||
every single Heart except for the one 2 tiles above the Medusa. Now get to | |||
the Block on the right side of the room and push it as far left as possible, | |||
blocking the Medusa's right side. | |||
Now notice the 3 Blocks lined up vertically under the Medusa. Push the middle | |||
one 1 tile left. Now go around the right side of the room so you reach the | |||
bottom of the screen. There is a Block directly above the Treasure, so push it | |||
1 tile up. After doing this, there should be a Block just to your upper left. | |||
Push it 2 tile up, blocking the Medusa's left side. | |||
Finally, get to the Block on the left side of the room and push it 2 tiles | |||
right, go around to push it 1 tile up, then 2 tiles right. This will block the | |||
Medusa's top, completely trapping her in a cross-like prison. Grab the final | |||
Heart above her, then the Jewel. Touch the Staircase, and you're done with | |||
Floor 2! | |||
{{Footer Nav|game=Adventures of Lolo 2|prevpage=Floor 1|nextpage=Floor 3}} | {{Footer Nav|game=Adventures of Lolo 2|prevpage=Floor 1|nextpage=Floor 3}} | ||
Revision as of 14:31, 21 December 2013
Room 1
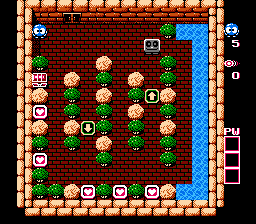
The name of the game is to avoid Rocky. He has the ability to trap you every time you go to grab a heart, so watch him. Try to keep him on the opposite side of the board as you. Speed is of the essence here.
Walk straight down and grab your first two hearts. Then move back up the first row. Move over and down the middle row, grabbing that heart, then the heart on the left of that. Go around and grab your last heart, then the jewel case.
Room 2
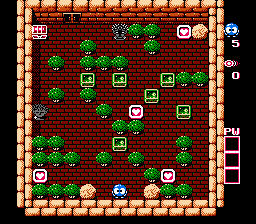
Start with the Block directly above you. Push it 3 tiles right, 1 tile up, and collect the lower right Heart. Now push this same Block 1 tile left, 1 tile down, 4 tiles left, 1 tile up, 1 tile left, 1 tile up, then 1 tile left. This will block the left Medusa's right side.
Now go back to the right side of the screen, and notice the rightmost Block with free space all around it. Push it 1 tile down, 2 tiles left, 1 tile down, 4 tiles left, 1 tile up, and 3 tiles left. This will block the left Medusa's bottom, so grab the Heart under her.
Go back to the right side of the room, and notice the rightmost Block. Push it 3 tiles up to block the top Medusa's right side, so grab the Heart to her right. One Heart remains in the middle of the room, and it has a Block just to its upper right. Push this Block 3 tiles down, 4 tiles left, 1 tile up, 1 tile left, then as far up as possible. This will block the top Medusa's left side.
Finally, grab the final Heart in the center of the room. Notice how there is a Block under the top Medusa - don't touch this one, but there is another Block 2 tiles left of it. Push this one as far left as possible, blocking the left Medusa's top. It is now safe to grab the Jewel.
Room 3
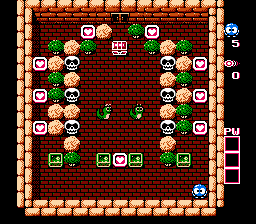
Start by collecting the Heart in the middle of the room (between the 2 Blocks). It will give you 2 shots, so shoot the right Snakey once and push the egg 3 tiles up, then 1 tile right, trapping the upper right Skull. Now shoot the left Snakey and push the egg 3 tiles up, then 1 tile left, trapping the upper left Skull.
Now on to the 2 Blocks in the middle of the room. Push the right one 4 tiles up then 1 tile right, trapping the middle right Skull. Now push the left one 4 tiles up then 1 tile left, trapping the middle left Skull.
Now get to the Block in the lower right part of the room. Push it 1 tile down, 2 tiles left, and 3 tiles up, trapping the lower right Skull. Now get to the remaining Block in the lower left part of the room. Push it 1 tile down, 2 tiles right, and 3 tiles up, trapping the lower left Skull. With all Skulls secured, grab the remaining 8 Hearts around the room, then the Jewel.
Room 4
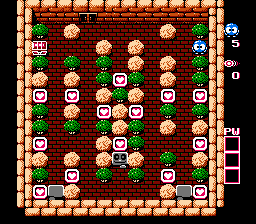
This room is not really mind bending, you just have to collect all of the Hearts while watching the Rockys.
Make your way to the middle, and grab the Hearts there. The easiest way to do this is to run around the middle clockwise as fast as possible. Doing this will eventually get you far enough ahead so that the middle Rocky doesn't charge you, giving you more time to safely collect each Heart.
Now collect all of the Hearts on the left side of the room as well as the remaining ones on the right. Alternate between both sides and the middle, just to make sure you don't get trapped. The important thing is to never stop moving, so don't be afraid to do several laps around the middle until a big enough window of opportunity opens to grab a Heart. Remember, the Rockys can pop a 180 if they feel like it, so stay alert. Eventually you will sneak your way to all of the Hearts, so grab the Jewel afterwards.
Room 5
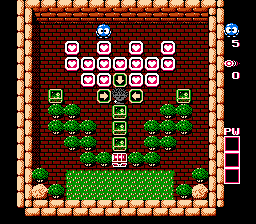
Oh look, this room is arranged to look like a flower. Start by collecting every single Heart except for the one 2 tiles above the Medusa. Now get to the Block on the right side of the room and push it as far left as possible, blocking the Medusa's right side.
Now notice the 3 Blocks lined up vertically under the Medusa. Push the middle one 1 tile left. Now go around the right side of the room so you reach the bottom of the screen. There is a Block directly above the Treasure, so push it 1 tile up. After doing this, there should be a Block just to your upper left. Push it 2 tile up, blocking the Medusa's left side.
Finally, get to the Block on the left side of the room and push it 2 tiles right, go around to push it 1 tile up, then 2 tiles right. This will block the Medusa's top, completely trapping her in a cross-like prison. Grab the final Heart above her, then the Jewel. Touch the Staircase, and you're done with Floor 2!