(dungeon map) |
(added map) |
||
| Line 5: | Line 5: | ||
[[File:LOZWW Forsaken Fortress.png|thumb|Forsaken Fortress]] | [[File:LOZWW Forsaken Fortress.png|thumb|Forsaken Fortress]] | ||
[[File:LOZWW Forsaken Fortress Map F1.jpg|left|Forsaken Fortress Map F1]] | |||
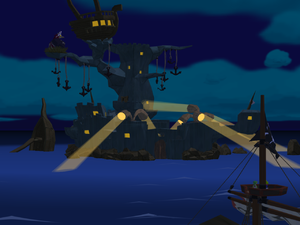
The Forsaken Fortress is located in the far Northwest quadrant of the Great Sea in The Wind Waker. It's an evil-looking island, and most people tend to avoid it. The stone fortress is well-guarded with cannons, searchlights, and hordes of [[../Enemies#Miniblin|Miniblins]] and [[../Enemies#Moblin|Moblins]], who patrol and attack any would-be invaders. The Helmaroc King has made his home on the Forsaken Fortress as a servant to the great evil. It is also the place where Link's sister, Aryll, is held prisoner, along with [[../Characters#Mila|Mila]] and [[../Characters#Maggie|Maggie]]. | The Forsaken Fortress is located in the far Northwest quadrant of the Great Sea in The Wind Waker. It's an evil-looking island, and most people tend to avoid it. The stone fortress is well-guarded with cannons, searchlights, and hordes of [[../Enemies#Miniblin|Miniblins]] and [[../Enemies#Moblin|Moblins]], who patrol and attack any would-be invaders. The Helmaroc King has made his home on the Forsaken Fortress as a servant to the great evil. It is also the place where Link's sister, Aryll, is held prisoner, along with [[../Characters#Mila|Mila]] and [[../Characters#Maggie|Maggie]]. | ||
Revision as of 02:23, 3 June 2010

The Forsaken Fortress is located in the far Northwest quadrant of the Great Sea in The Wind Waker. It's an evil-looking island, and most people tend to avoid it. The stone fortress is well-guarded with cannons, searchlights, and hordes of Miniblins and Moblins, who patrol and attack any would-be invaders. The Helmaroc King has made his home on the Forsaken Fortress as a servant to the great evil. It is also the place where Link's sister, Aryll, is held prisoner, along with Mila and Maggie.
The Legend of Zelda: The Wind Waker/Item
After being launched into the fortress, turn right and you will learn that Tetra has slipped a Pirate's Charm into your pocket that allows you to communicate with her over long distances. When she finishes talking to you, head up the sets of stairs and get caught in a searchlight. You'll be thrown into a jail cell.
Tetra will tell you to try to hide yourself. Whenever you're thrown into this cell, hop up onto the table and run towards the empty shelf. You will climb up on top of it. When you do, throw the pot away and crawl in through the hole in the wall until you get out.

The Legend of Zelda: The Wind Waker/Item
The first time you get out, head down the path and open the treasure chest ahead. Inside is the Dungeon Map for the fortress. After getting the map, hop onto the rope of the hanging lantern and swing across it like you did in on the Pirate Ship for Niko's minigame. Once you get across, enter the door on the left.
Paving Through the Fortress
Outside, turn left and climb the ladder. Fight the Bokoblin here. To kill him, you must use a Boko Stick to whack him with. There is a pot of Boko Stick nearby that you can take from, or you can make him hit your shield and the Boko Stick will fly away from his hand. Either way, defeat him. Hop back down the ladder and go back into the room you came. Enter the other door now, going counter-clockwise around.
Turn left, go up the ramp and defeat the Bokoblin the same way. Go back down the ramp and continue along the counter-clockwise path.
The Legend of Zelda: The Wind Waker/Item
In this room, get the Dungeon Compass, swing across the torch rope to the other side, and go through the door. Turn left again and go up the ramp and up the ladder, and defeat the Bokoblin the same way. Go back down and continue counter-clockwise. Again.
Hop over the gap the same way. If you want around 40-50 rupees, push the block to your left down, grab the rupees below, and push the block under the ladder to get back up. Continue going counter-clockwise again.

This is probably the hardest part of the dungeon if you don't have patience. Find the barrel to your left and pick it up. You will put it over your head. Now head the only way you can that isn't off a ledge. When you get close to a Moblin, it might see you if you're moving, so stay still in the barrel. If you get caught, you'll be thrown in the cell, so just find your way back here again. Head towards the big door and open it (not while you're still in the barrel).
Head up the stairs and do the same thing with this next barrel, avoiding the Moblin. When you are out of his sight, continue up the path. You'll encounter a gap in the floor, but just sidle the wall to cross it. Do this for the next gap too. Continue up the path for a short mini-boss-esque fight.
Grab your sword off the ground and use it to beat this guy. Be mindful that he has a shield, but you can beat him pretty easily without paragraphs of strategy. When you do, the door will open, and you can enter. This will begin the next cutscene.
Words of Warning
If you don't take down all the Bokoblins in all the search lights, once you get caught you'll be thrown in jail and you have to start all over. Also, since you don't have the sword, your barrel is where you hide in. You'll hear a sudden music if Moblin see your barrel move. It's not normal if a Moblin see a barrel move and if it did, same thing would happen!