Coral is multiplayer's sole dark and stormy map, set exclusively at night for all game modes. There are very few islands to hide amongst, so a lot of the fighting will be out on the open seas.
Escort
Yamato against Iowa. The showdown of the super-battleships. The odds will favour the one with the closer air support. Both sides have to sink the enemy flagship before they lose their own.
—Map description
Siege
A crucial encounter is about to begin between major US and Japanese fleets. Both sides have to assist their fleet and sink as many enemy ships as they can.
—Map description


This relatively balanced map is essentially a Cruiser Duel with the addition of AI-controlled battleships. The fleets change in composition, but all the major battleship types appear for both sides: New York, King George V, South Dakota, Iowa, and Renown for the Allies, and Kongō, Fusō, and Yamato for the Japanese.
Each player is given control of a single non-unlockable heavy cruiser of their choice (Northampton and York or Mogami and Takao) to try and sink the opposing battleships. The battleships are worth their relative point costs in Island Capture, with Yamato and Iowa removing the most strength out of the enemy when sunk while Kongō and Renown remove the least. Strength is also deducted upon sinking other players.
How you play hinges a lot on which side you play, as Japanese and Allied cruisers are extremely different. The Japanese have a considerable edge in this battle as their cruisers are considerably more powerful than the Allies, in terms of both artillery and torpedo armament. The Allies should try and avoid letting the Japanese in close to torpedo attacks; they must engage at a distance and try to cover their battleships. In this sense, the mission is more similar to a Siege mission than initially meets the eye: the Allies must protect their battleships against the Japanese torpedo cruisers.
Competitive
An Allied submarine group is harassing hostile ships deep within enemy territory. As a US sub commander, can you claim the biggest share of the prey? You have to take advantage of your submarine's stealth abilities and sink as many enemy ships you can.
—Map description
This map is very balanced and is the perfect place for players to practice submarine hunts. Each player commands a single Narwhal-class submarine against a huge number of hostile warships. They can choose from a east and west spawn; close to both spawns are two huge fleets of troop transports. There are ten ships in each fleet - 20 total. At the mission start, therefore, try to see where your rivals are spawning. If they converge on the east or west spawn, spawn at the one with fewer rivals. Ideally, you want to get all 10 ships to yourself. This alone is usually enough to get you in the lead and keep you there for a while.
None of the cargo ships have artillery, so be sure to stay on the surface; subs travel faster on the surface than submerged, so zoom right amidst the convoy and tear things up with your torpedoes and deck guns.
Once the fleets dwindle, however, the mission truly begins and you'll be forced to fight heavily armed warships - Minekaze-class destroyers hunt for players unwilling to go to crash depth, along with E13A Jakes that are sometimes golden objective targets. Your twin machine guns, although generally considered insignificant, can potentially bring one of these down and earn you a considerable number of points. Just watch out for their quadruple depth charges.
Large groups of cruisers and occasionally a battleship will also appear to the south from the eastern spawn. These are all targets for you and your rivals. Be aware, however, that the points are awarded to whoever lands the final torpedo hit. Try to sink your targets quickly; otherwise they may be stolen from you.
Duel
Island Capture - Small
This dark and stormy map is somewhat awkward in that the Allies have to defend only a single base - a combination airfield and shipyard. The Japanese, meanwhile, must defend their shipyard and a single aircraft carrier. This makes things somewhat more challenging as they must choose whether to bring their carrier into battle (and have their planes make shorter trips) or to keep it back and be forced to fight the Americans without air support.
The Allies have an advantage here as the Japanese are unable to bring their Ohkas to bear. Meanwhile the Allies still have access to their TBM Avengers. Japanese fighter cover is essential to keeping ships afloat.
Click on a Headquarters to see what it can spawn.
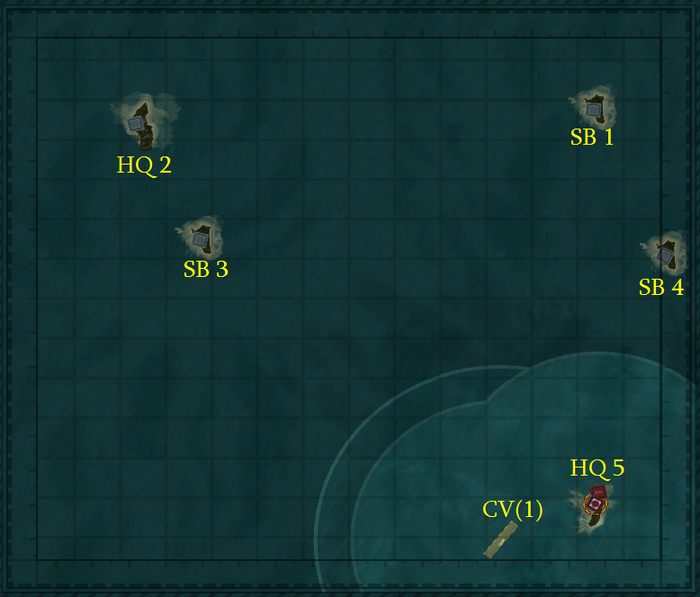
HQ 2 (Allied)
- Elco PT boat
- Fletcher-class DD
- Cleveland-class CL
- Northampton-class CA
- Narwhal-class SS
- LST Mark 2
- Troop Transport AP
- ASW Fletcher-class DD
- Allen M. Sumner-class DD
- Atlanta-class CL
- Alaska-class CA
- Gyoraitei PT boat
- Fubuki-class DD
- Agano-class CL
- Mogami-class CA
- Type B SS
- SB Boat LST
- Troop Transport AP
- Akizuki-class DD
- Shimakaze-class DD
- Kuma-class CL Torpedo Variant
- Tone-class CA
- F4F Wildcat
- SBD Dauntless
- TBF Avenger
- P-51 Mustang
- P-80 Shooting Star
- TBM Avenger
- A6M Zero
- D3A Val
- B5N Kate
- J7W Shinden
- J9Y Kikka
HQ 5 (Japanese)
- Elco PT boat
- Fletcher-class DD
- Cleveland-class CL
- Northampton-class CA
- Narwhal-class SS
- LST Mark 2
- Troop Transport AP
- ASW Fletcher-class DD
- Allen M. Sumner-class DD
- Atlanta-class CL
- Alaska-class CA
- Gyoraitei PT boat
- Fubuki-class DD
- Agano-class CL
- Mogami-class CA
- Type B SS
- SB Boat LST
- Troop Transport AP
- Akizuki-class DD
- Shimakaze-class DD
- Kuma-class CL Torpedo Variant
- Tone-class CA
None
None
CV(1) - Sōryū-class
Japanese planes
- A6M Zero
- D3A Val
- B5N Kate
- J7W Shinden
- J9Y Kikka
Island Capture - Medium
Medium is identical to Small, but adds upgraded submarines and another Japanese carrier into the mix. This puts the Japanese at a slight advantage in terms of mobility, but they still cannot deploy the Ohka Carrier. TBM Avengers are still able to be deployed by the Americans, so air defence is critical to the survival of the carriers. Submarines also love to prey on carriers, so an ASW ship near a carrier can save it from a sneak attack.
Click on a Headquarters to see what it can spawn.
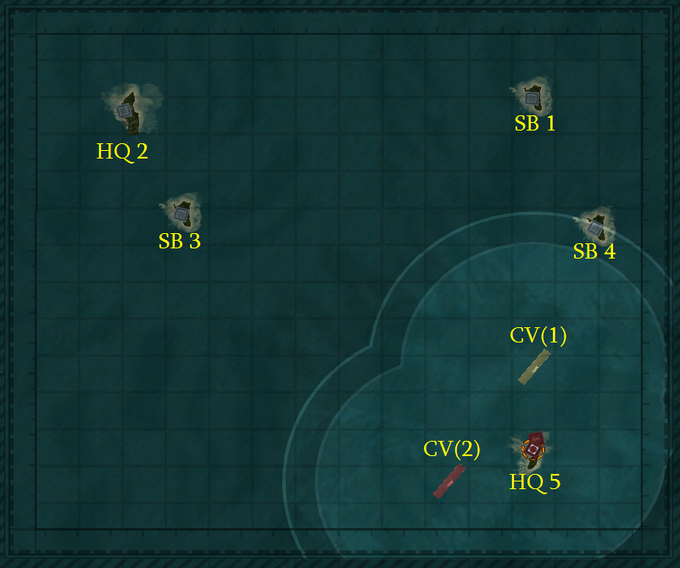
HQ 2 (Allied)
- Elco PT boat
- Fletcher-class DD
- Cleveland-class CL
- Northampton-class CA
- Narwhal-class SS
- LST Mark 2
- Troop Transport AP
- ASW Fletcher-class DD
- Allen M. Sumner-class DD
- Atlanta-class CL
- Alaska-class CA
- Gato-class SS
- Gyoraitei PT boat
- Fubuki-class DD
- Agano-class CL
- Mogami-class CA
- Type B SS
- SB Boat LST
- Troop Transport AP
- Akizuki-class DD
- Shimakaze-class DD
- Kuma-class CL Torpedo Variant
- Tone-class CA
- I-400-class SS
- Kaiten Carrier SS
- F4F Wildcat
- SBD Dauntless
- TBF Avenger
- P-51 Mustang
- P-80 Shooting Star
- TBM Avenger
- A6M Zero
- D3A Val
- B5N Kate
- J7W Shinden
- J9Y Kikka
HQ 5 (Japanese)
- Elco PT boat
- Fletcher-class DD
- Cleveland-class CL
- Northampton-class CA
- Narwhal-class SS
- LST Mark 2
- Troop Transport AP
- ASW Fletcher-class DD
- Allen M. Sumner-class DD
- Atlanta-class CL
- Alaska-class CA
- Gato-class SS
- Gyoraitei PT boat
- Fubuki-class DD
- Agano-class CL
- Mogami-class CA
- Type B SS
- SB Boat LST
- Troop Transport AP
- Akizuki-class DD
- Shimakaze-class DD
- Kuma-class CL Torpedo Variant
- Tone-class CA
- I-400-class SS
- Kaiten Carrier SS
None
None
CV(1) - Sōryū-class
Japanese planes
- A6M Zero
- D3A Val
- B5N Kate
- J7W Shinden
- J9Y Kikka
CV(2) - Sōryū-class
Japanese planes
- A6M Zero
- D3A Val
- B5N Kate
- J7W Shinden
- J9Y Kikka
Island Capture - Large
Large is very similar to Medium, but unlike Dreadnought and Swirl, is extremely asymmetric. The Americans start at the top and should try to use their carriers to capture the two Supply bases nearby whilst protecting them from Japanese airpower. The Japanese sport quite a bit of firepower and mobility on this map, especially in the form of their Tabbies. The Allies have no C-47s, and should rely on troop carriers and LSTs to capture islands instead. While the Allies often get a Command Point advantage early on, they will be hard-pressed to defend both carriers from incessant submarine and air attack.
Click on a Headquarters to see what it can spawn.
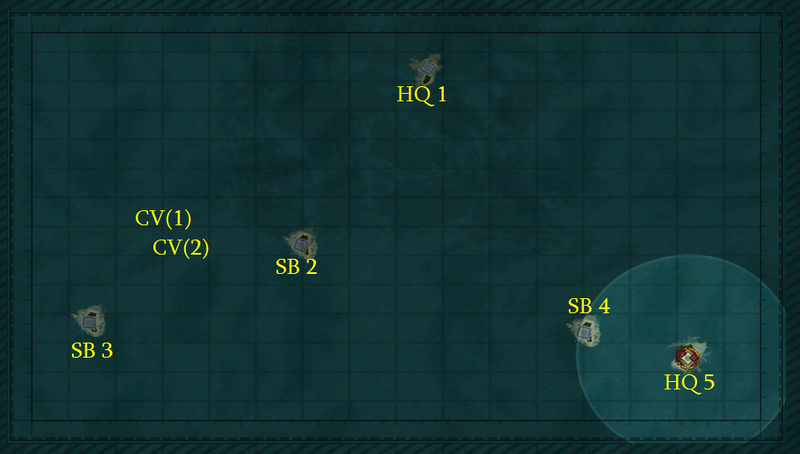
HQ 1 (Allied)
- Elco PT boat
- Fletcher-class DD
- Cleveland-class CL
- Northampton-class CA
- Narwhal-class SS
- LST Mark 2
- Troop Transport AP
- ASW Fletcher-class DD
- Allen M. Sumner-class DD
- Atlanta-class CL
- Alaska-class CA
- Gato-class SS
- Gyoraitei PT boat
- Fubuki-class DD
- Agano-class CL
- Mogami-class CA
- Type B SS
- SB Boat LST
- Troop Transport AP
- Akizuki-class DD
- Shimakaze-class DD
- Kuma-class CL Torpedo Variant
- Tone-class CA
- I-400-class SS
- Kaiten Carrier SS
None
None
HQ 5 (Japanese)
- Elco PT boat
- Fletcher-class DD
- Cleveland-class CL
- Northampton-class CA
- Narwhal-class SS
- LST Mark 2
- Troop Transport AP
- ASW Fletcher-class DD
- Allen M. Sumner-class DD
- Atlanta-class CL
- Alaska-class CA
- Gato-class SS
- Gyoraitei PT boat
- Fubuki-class DD
- Agano-class CL
- Mogami-class CA
- Type B SS
- SB Boat LST
- Troop Transport AP
- Akizuki-class DD
- Shimakaze-class DD
- Kuma-class CL Torpedo Variant
- Tone-class CA
- I-400-class SS
- Kaiten Carrier SS
- F4F Wildcat
- SBD Dauntless
- TBF Avenger
- PBY Catalina
- OS2U Kingfisher
- B-17 Flying Fortress
- C-47 Skytrain
- P-51 Mustang
- P-80 Shooting Star
- TBM Avenger
- A6M Zero
- D3A Val
- B5N Kate
- H6K Mavis
- E13A Jake
- G4M Betty
- L2D Tabby
- J7W Shinden
- J9Y Kikka
CV(1) - Yorktown-class
Allied planes
- F4F Wildcat
- SBD Dauntless
- TBF Avenger
- P-51 Mustang
- P-80 Shooting Star
- TBM Avenger
CV(2) - Yorktown-class
Allied planes
- F4F Wildcat
- SBD Dauntless
- TBF Avenger
- P-51 Mustang
- P-80 Shooting Star
- TBM Avenger