(created) |
(→Droog volcano: added images) |
||
| Line 8: | Line 8: | ||
== Droog volcano == | == Droog volcano == | ||
=== | === Entrance floor === | ||
[[File:BrainLord_dungeon4+0.png|thumb|288px|Map of the first floor ''(Yellow = main path stairs. Red = detours and secrets. Pale grey = rooms that cannot be accessed)''.]] | |||
Cross the bridge to get to the '''save statue'''. The cave of the Silent Stones is a moving maze. There are five entrances to it, and many of the stones change positions at random. Using the X-ray glasses, you can see that there are two exits on the northern side: the one you want is the westmost, the other one requires a key. | Cross the bridge to get to the '''save statue'''. The cave of the Silent Stones is a moving maze. There are five entrances to it, and many of the stones change positions at random. Using the X-ray glasses, you can see that there are two exits on the northern side: the one you want is the westmost, the other one requires a key. | ||
{{-}} | |||
=== First floor === | === First floor === | ||
[[File:BrainLord_dungeon4+1.png|thumb|288px|Map of the first floor ''(Yellow = main path stairs. Red = detours and secrets. Pale grey = rooms that cannot be accessed)''.]] | |||
The Silent Stones maze on the second floor has six exits, counter-clockwise: | The Silent Stones maze on the second floor has six exits, counter-clockwise: | ||
# The stairs where you came from; | # The stairs where you came from; | ||
| Line 36: | Line 39: | ||
This key is used on the locked door on the gound floor. Past that door are the stairs leading to floor -1. | This key is used on the locked door on the gound floor. Past that door are the stairs leading to floor -1. | ||
{{-}} | |||
=== First basement === | === First basement === | ||
[[File:BrainLord_dungeon4-1.png|thumb|288px|Map of the first floor ''(Yellow = main path stairs. Red = detours and secrets. Pale grey = rooms that cannot be accessed)''.]] | |||
==== Sea Dragon key ==== | ==== Sea Dragon key ==== | ||
After the save statue, the adjoining small hall has four exits. The stairs lead to a room with some cheese, the south-west door leads to a series of difficult quicksand pits beyond which lies the '''Sea Dragon key'''. | After the save statue, the adjoining small hall has four exits. The stairs lead to a room with some cheese, the south-west door leads to a series of difficult quicksand pits beyond which lies the '''Sea Dragon key'''. | ||
| Line 51: | Line 56: | ||
Once you have both this and the previous key, you can use the earlier one to unlock the door on this floor and this one to unlock the door on the next floor. | Once you have both this and the previous key, you can use the earlier one to unlock the door on this floor and this one to unlock the door on the next floor. | ||
{{-}} | |||
=== Second basement === | === Second basement === | ||
[[File:BrainLord_dungeon4-2.png|thumb|288px|Map of the first floor ''(Yellow = main path stairs. Red = detours and secrets. Pale grey = rooms that cannot be accessed)''.]] | |||
Save as soon as you get there, then use the Dead Dragon key to open the door. The dying dragon there grants Remeer an upgrade: Power+5, Guard+10. No boss here. After talking to the dragon, backtrack to the surface and to a town. | Save as soon as you get there, then use the Dead Dragon key to open the door. The dying dragon there grants Remeer an upgrade: Power+5, Guard+10. No boss here. After talking to the dragon, backtrack to the surface and to a town. | ||
{{Footer Nav|game=Brain Lord|prevpage=Ice Castle|nextpage=Platinum}} | {{Footer Nav|game=Brain Lord|prevpage=Ice Castle|nextpage=Platinum Shrine}} | ||
Revision as of 10:15, 21 October 2013
Toronto and Arcs
The owner of the arena left his room: now you can open the chest and get a Heart. Visit Reuben at the library: he finished trnslating the silver plaque, and he suggests you to go and talk to Roun in Arcs. He's not in the school anymore, but if you ask at the pub, someone reveals that there is an upper floor in the school building. Just walk behind the colorful pillar in the school. Roun gives you the Droog sapphire. Use the sapphire on the statue south-west of Arcs to access the base of the Droog Volcano.
Droog mountainfoot
Keep on the higher ridges and go west until you get to a sort of vertical pillar. Hug the pillar walk around it and you will eventually get to the entrance of the Droog volcano.
Droog volcano
Entrance floor

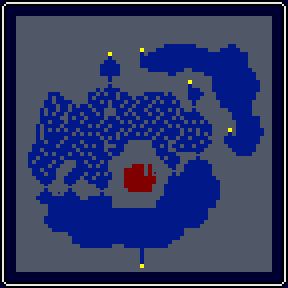
Cross the bridge to get to the save statue. The cave of the Silent Stones is a moving maze. There are five entrances to it, and many of the stones change positions at random. Using the X-ray glasses, you can see that there are two exits on the northern side: the one you want is the westmost, the other one requires a key.
First floor

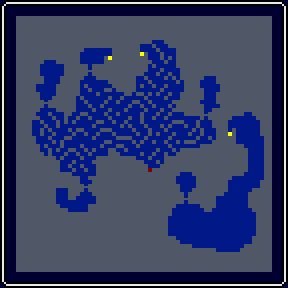
The Silent Stones maze on the second floor has six exits, counter-clockwise:
- The stairs where you came from;
- A room to the nort-west, holding the first dragon key;
- A room to the south, hosting a restoring fountain;
- Stairs to the south, holding a chest;
- A room to the east, holding an axe;
- Stairs to the north-east, leading to the second dragon key;
Land Dragon key
The first key, the Land Dragon key is in the westmost room across the new Silent Stones maze.
- Land Dragon key: Key found at Droog. A stern black dragon is carved into it.
This key is used on the second floor, but you have to go downstairs from a different route, using the stairs in the north-eastern part of the Silent Stones maze. Navigate that hall filled with lava and get upstairs again. You can walk on the lava, and you must do it to go past this room. At the end of this new hall there's a locked door.
In the eastmost room from the 2nd floor Silent Stone maze is the Rock Breaker axe. The southern stairs lead to a room where a chest is vlocked by more Silent Stones: keep going up and down the stairs until a way opens to the Lightning bow.
Sky Dragon key
Use the Land Dragon key to access the room where the Sky Dragon key is kept on the second floor.
- Sky Dragon key: Key found at Droog. A beautiful blue dragon is carved into it.
This key is used on the locked door on the gound floor. Past that door are the stairs leading to floor -1.
First basement

Sea Dragon key
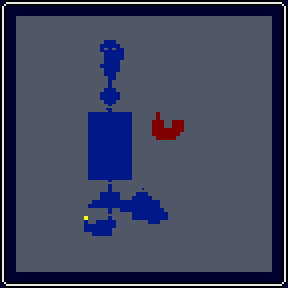
After the save statue, the adjoining small hall has four exits. The stairs lead to a room with some cheese, the south-west door leads to a series of difficult quicksand pits beyond which lies the Sea Dragon key.
- Dead Dragon key: Key found at Droog. A beautiful green dragon is carved onto it.
This key opens the locked door in the small hall, but there's another key to be collected before going in that direction.
Dead Dragon key
The south-east door in the small hall leads to a series of pits beyond which lies the Dead Dragon key.
- Dead Dragon key: Key found at Droog. A skeletal dragon is carved onto it.
Once you have both this and the previous key, you can use the earlier one to unlock the door on this floor and this one to unlock the door on the next floor.
Second basement

Save as soon as you get there, then use the Dead Dragon key to open the door. The dying dragon there grants Remeer an upgrade: Power+5, Guard+10. No boss here. After talking to the dragon, backtrack to the surface and to a town.