Accessing Anemos Sanctum
Before you go charging into Anemos Sanctum, make sure your character levels are 45+, the monsters inside are freakishly strong along with the boss. In order to get into the actual inner sanctum, you need all the 72 djinni along with the psyenergy Teleport. Once you arrive in Contigo, do not head towards the sanctum directly instead use Teleport on the circle in the middle of town. Once you've done that, you'll arrive in the 'true' entrance of the Anemos Sanctum. Ahead the door is sealed and can only be opened if you possess all 72 djinni, look around the room and you'll see some circular tiles with elements depicted on them. Stand on the big tiles and the djinni will light up every smaller tile. Once all the tiles in a certain area is lit, the torches above the door will ignite. Once all four torches are ignited, the door opens.
Inside Anemos Sanctum


In the first room, you'll see an unguarded combo tablet which will offer Charon, the second strongest summon in the game! Move ahead behind where the tablet used to be and you'll head downstairs into the sanctum. Take the left passage that leads upwards and then when you enter the next room, head left again and enter the new room. Here you'll come across a mimic stone that 'mimics' your movements except that it moves left when you move right and vice versa. This mimic puzzle shouldn't be too problematic. If the mimic stone falls into the abyss, you can simply exit and reenter the room to start again.
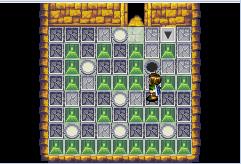
From here, head leftwards and push the stone pillar so that a shortcut is accessible, head upwards from here. In the next room, ignore the path upstairs instead head left and down through a doorway.Here you'll see some round tiles and an arrow tile. Step on all the round tiles until it is all white, once this is done, the arrow tile will shine and you may step on the tile to ascend to the upper floors.
Exit the room and you'll enter another passage with another one of those stone pillars blocking a shortcut. Unblock it and take the downward passage. Follow it and a downstairs passage is revealed. Keep following the passage until you see another downstairs doorway on the right, you may enter the room and obtain a Dark Matter from the chest before you exit this room. Follow the previous passage, turn right and head downwards and another puzzle is revealed.
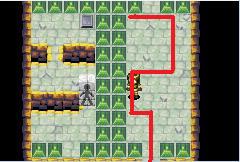
Here, you'll see some the room is filled with cracked tiles and the white tiles you've seen before. There is only one path you can go to reach all the tiles along with the arrow tiles. If you fall from the cracked tiles, you'll end up in the room with the Dark Matter chest again. This honestly shouldn't be too difficult, if you can't solve it then use the screenshot above as your guide. Once you've ascended up to the next floor, follow the passage again and head downstairs. You'll reenter the same room you were in before the puzzle. Open the shortcut by moving the pillar on the left and head right and up through the doorway.
In this room is another puzzle. Your goal here is to push the pillar onto the switch to hold the door open. however the boulder in the room complicates matters. Use lift on the boulder and head downwards. Progress through this room until you reach the second mimic puzzle. This is more complicated than the first one so bear with me. Move up as of normally until you cannot move any further due to the obstacles. Let the mimic stone stand in front of the block and move downwards one space with Felix. Doing this restrains the mimic from following you and now your mimic stone is slightly ahead of you in position. Now move up through the obstacle gap and set the mimic ont he switch to open te door. You'll reenter the boulder room after the puzzle. Here, use move on the pillar towards the right into the holes. Now exit this room via the mimic room and reenter it. Use lift on the boulder again and take the upper passage. Follow throught this room and you'll reenter the same map again. Now this time head downward to the pillar island and move the second pillar across to thr right. Exit and reenter the room again and lift the boulder once again and head towards the pilalr island via the downward path. Move the pillar and cross the island and finally the pillar can be moved towards the switch!
WARNING: There is a glitch where you can run into the pillar whilst it's on the switch. Once you did that, you'll be standing on top of the pillar and will be stuck there! The only way down is to restart your game so DO NOT TRY IT!!!
Enter through the new doorway and follow the passage, ignore the upper route along the way so keep heading left. Once again, another annoying Mimic Puzzle is in your way, this time with more obstacles. Dodge all the obstacles normally until you positioned your mimic stone in front of a square obstacle. Move up one space until you'll be ahead of the mimic stone by one tile. Now position the mimic stone behind the same obstacle and move one space downwards so that the mimic stone is on the same position as you. Move through as you normally would and move the stone onto the switch. Enter through the newly opened door. Here, you may head downstairs and obtain an Orihalcon from the chest. Exit this room and head right through the doorway.
This is a fairly big room that is a semipuzzle. Ahead of you is a broken tile island, head left on the island but make sure you steer clear of the tiles towards the upper and the right path! If you happen to fall from the cracked tiles, you'll fall into the room with the Orihalcon chest. Follow the passage upwards and rightwards. Ignore the downward intersection for now and keep following right. There would be more square obstacles along with a move pillar that is reachable. Push it out of the way and go back to the intersection to head downwards. Once you reach the cracked tile island, head rightwards. Use 'Sand' on the sand path and push the pillar out of the way. Follow the passage upwards and rightwards and open up a shortcut by moving the pillar into the gap..
You're nearly there, just hang on. Up ahead, you'll come across another simple puzzle which when completed, it resembles one of those hover birds from Jupiter Lighthouse. Once you're done' SAVE NOW! The boss battle is going to be soon! Prepare your djinni and use hover on the bird platform to reach Dullahan.