Ghostmanjr (talk | contribs) m (Added Screenshot of where to stand on Dragon Boss) |
(Removed duplicate "the") |
||
| (10 intermediate revisions by 7 users not shown) | |||
| Line 1: | Line 1: | ||
{{Header Nav|game=Mega Man 2}} | {{Header Nav|game=Mega Man 2}} | ||
[[File:Mega Man 2 Dr Wily logo.png|right]] | |||
Just as in the first game, once all of the Robot Masters are defeated, it's time to take the fight to Dr. Wily himself. The number of stages it takes to reach Dr. Wily has been increased to six. Before each stage begins, the game displays an image of the fortress with a map over-layed in front, meant to indicate your progress through the fortress. In the first stage, you'll have to run a good distance to the entrance and scale a tall tower before reaching the first guardian of the fortress: a giant Mecha Dragon. | |||
== Stage == | |||
[[File:Mega Man 2 map Wily Stage 1A.png|left]] | |||
{{-}} | |||
* '''A''': Your first challenge on the way to the fortress entrance is a stream of egg dropping Pipis. But what is meant to be a nuisance can actually be turned into an incredible opportunity. If you hold still and activate the Leaf Shield, you will be completely defended from the hatchlings, and you can stick around until you see extra lives appear. Collect as many as you like, along with any energy you may need, and then advance. | |||
[[File:Mega Man 2 map Wily Stage 1B.png|right]] | |||
{{-}} | |||
* '''B''': Transport Item 3 really shines here. Launch one at the wall and then ride on top to access the other side. Save Item 1 for later, as you'll need it before the stage is over. You'll face a few Scworms on the way to the next wall. You can do the same trick with the Leaf Shield as you did earlier, but you have to stand a bit away from the Scworm launcher, and it's less effective. | |||
{| | |||
| [[File:Mega Man 2 map Wily Stage 1C.png|left]] | |||
| | |||
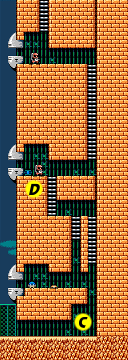
* '''C''': You'll need to use Transport Item 1 or 3 to get high enough to reach the ladder above. The extra live on the ledge is easy to obtain, but then you have the problem of getting back on track and climbing up the ladder. If you can't make the jump from the ledge, simply fall back down to the ground and use another item to reach the ladder. | |||
* '''D''': Your next challenge will come in the form of a few Sniper Joes who have shed their armor and patrol the tower halls. While you could climb all the way up and attack them face-to-face, a safe method is to simply fire at them diagonally with Metal Blades from the safety of the ladder below. Even the Sniper Joe on the next screen can be attacked this way as long as you fire from the bottom of the screen. | |||
* '''E''': A lone Springer greets you as you progress through the final leg of the tower. Climb up the long ladder to the screen above, and you'll reach an empty space with another ladder far to the left and above you. The only way to reach this ladder is by using Transport Item 1. You'll have to be quick if you want to reach the ladder; wait too long to create a new platform and you might rise too high to safely jump over without hitting your head on the ceiling. Once you make it, climb up the next screen, blowing away the two Tellies that try to stop you from reach the top. | |||
| [[File:Mega Man 2 map Wily Stage 1D.png|right]] | |||
|} | |||
{{Scrolling_map|Mega Man 2 map Wily Stage 1E.png}} | |||
* '''F''': Once you leap from this point, there's no turning back. You'll have to hop along a series of single-block platforms until eventually the platforms begin scrolling by themselves, and you simply have to keep up. After enough platforms have scrolled by, the boss of the stage will crash up through the floor and attack. | |||
== Mecha Dragon == | |||
[[File:Mega Man 2 boss Wily Stage 1.png|thumb|left]][[File:Mega Man 2 battle Wily Stage 1.png|right]] | |||
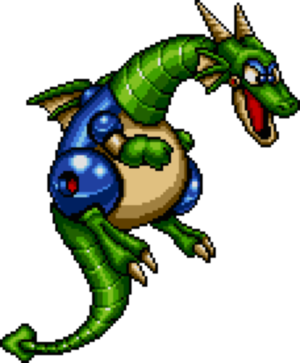
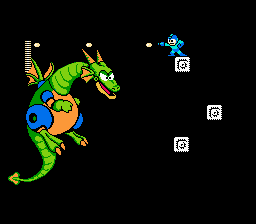
The first guardian of Dr. Wily's fortress is the giant Mecha Dragon. Once he chases you over to the three single block platforms, he stops pursuing you and starts attacking you. He will hover back and forth, but he primarily tries to rise or sink to Mega Man's current height. Whenever he lines up with you, he shoots a blast of fire from his mouth. The Mecha-Dragon is only vulnerable to attacks on its head. Shooting anywhere else won't damage him. For this reason, it's most advantageous to stand on the top block. Even if Mega Man gets hit there, he will likely fall down onto the middle block. From there, you can wait for the dragon to sink a bit, before jumping back up to the top block to resume your attack. The dragon is impervious to all weapons except the Crash, Mega Buster, Atomic Fire, and Quick Boomerang. All others just bounce right off of him. You'll do as much damage with the Mega Buster as you will with the Quick Boomerang. However, the Quick Boomerang gives you a slight edge, not just because of its speed, but because of the sweeping arc that the boomerangs take which increases the likelihood of you striking the dragon in the head, even when he's not perfectly lined up with you. Stand on the top block and launch boomerangs at the head as quickly as possible to defeat the boss and advance to the next stage. | |||
{{Footer Nav|game=Mega Man 2|prevpage=Wood Man|nextpage=Wily Fortress 2}} | |||
{{Footer Nav|game=Mega Man 2|nextpage=Wily Fortress 2}} | |||
Latest revision as of 09:54, 26 May 2022

Just as in the first game, once all of the Robot Masters are defeated, it's time to take the fight to Dr. Wily himself. The number of stages it takes to reach Dr. Wily has been increased to six. Before each stage begins, the game displays an image of the fortress with a map over-layed in front, meant to indicate your progress through the fortress. In the first stage, you'll have to run a good distance to the entrance and scale a tall tower before reaching the first guardian of the fortress: a giant Mecha Dragon.
Stage[edit]

- A: Your first challenge on the way to the fortress entrance is a stream of egg dropping Pipis. But what is meant to be a nuisance can actually be turned into an incredible opportunity. If you hold still and activate the Leaf Shield, you will be completely defended from the hatchlings, and you can stick around until you see extra lives appear. Collect as many as you like, along with any energy you may need, and then advance.

- B: Transport Item 3 really shines here. Launch one at the wall and then ride on top to access the other side. Save Item 1 for later, as you'll need it before the stage is over. You'll face a few Scworms on the way to the next wall. You can do the same trick with the Leaf Shield as you did earlier, but you have to stand a bit away from the Scworm launcher, and it's less effective.
- F: Once you leap from this point, there's no turning back. You'll have to hop along a series of single-block platforms until eventually the platforms begin scrolling by themselves, and you simply have to keep up. After enough platforms have scrolled by, the boss of the stage will crash up through the floor and attack.
Mecha Dragon[edit]


The first guardian of Dr. Wily's fortress is the giant Mecha Dragon. Once he chases you over to the three single block platforms, he stops pursuing you and starts attacking you. He will hover back and forth, but he primarily tries to rise or sink to Mega Man's current height. Whenever he lines up with you, he shoots a blast of fire from his mouth. The Mecha-Dragon is only vulnerable to attacks on its head. Shooting anywhere else won't damage him. For this reason, it's most advantageous to stand on the top block. Even if Mega Man gets hit there, he will likely fall down onto the middle block. From there, you can wait for the dragon to sink a bit, before jumping back up to the top block to resume your attack. The dragon is impervious to all weapons except the Crash, Mega Buster, Atomic Fire, and Quick Boomerang. All others just bounce right off of him. You'll do as much damage with the Mega Buster as you will with the Quick Boomerang. However, the Quick Boomerang gives you a slight edge, not just because of its speed, but because of the sweeping arc that the boomerangs take which increases the likelihood of you striking the dragon in the head, even when he's not perfectly lined up with you. Stand on the top block and launch boomerangs at the head as quickly as possible to defeat the boss and advance to the next stage.


