Trig Jegman (talk | contribs) mNo edit summary |
|||
| (11 intermediate revisions by 4 users not shown) | |||
| Line 1: | Line 1: | ||
{{Header Nav|game=Solomon | {{Header Nav|game=Solomon's Key}} | ||
== Stage 1 == | == Stage 1 == | ||
[[ | [[File:Solomon's Key Stage1.png|left]][[File:Solomon's Key Hidden1.png|right]] | ||
Take out block in front of you then wait for | Take out the block in front of you then wait for the goblin to walk on top of the next block. Take out this block to drop and kill the goblin. | ||
Collect all items (and fairy). | Collect all items (and fairy). | ||
Build blocks up to the door level. Wait for ghost to pass then | Build blocks up to the door level. Wait for the ghost to pass then exit (but don't forget to get the secret timer just above the door). | ||
{{-}} | {{-}} | ||
== Stage 2 == | == Stage 2 == | ||
[[ | [[File:Solomon's Key Stage2.png|left]][[File:Solomon's Key Hidden2.png|right]] | ||
Quickly jump up so that you are standing on the third row of brown blocks. | Quickly jump up so that you are standing on the third row of brown blocks. Take out the middle block of that third row and the block to the right of it and then jump up onto the white block to the right of that. Demonheads will appear, move to the right and then fall down and get directed to the left, leaving you to explore the right side of the level in safety. Get the key and the bell (and fairy). | ||
There's treasure down below, but its not worth going for (especially with all the | There's treasure down below, but its not worth going for (especially with all the demonheads down below). So just get out. | ||
{{-}} | {{-}} | ||
== Stage 3 == | == Stage 3 == | ||
[[ | [[File:Solomon's Key Stage3.png|left]][[File:Solomon's Key Hidden3.png|right]] | ||
Make a block in the bottom right of the starting area. The | Make a block in the bottom right of the starting area. The panel monster will shoot a fireball so wait for this to pass. Jump on top of the block you created then get rid of the first of the blocks and jump into the created gap. Clear the other two blocks. Alternatively, fireball the panel monster to buy you time, particularly if you want to get the secret bell in this room. | ||
Go through the passage to the next room and fall down. Walk towards the two spark balls but not too close! When they are both going away from you horizontally, then jump up and destroy the block. Both orbs should continue right, go up and head back towards the first room. When they have gone through the passage put a block there to stop them coming back. Get the bell then drop into the gap. Collect the items hidden behind the blocks and drop again (timing it so that you avoid the wyvern). | |||
Clear the blocks to the next | Clear the blocks to the next spark ball and release it. Go back to the wyvern room, jump up and get the key (timing it, of course) and then avoid the spark ball. Re-enter the passage putting a block behind you to keep the spark ball from coming back. Kneel down and fireball the goblin and then remove the block from under the gargoyle to kill it. Make your way to the passage to the centre room and let the fairies come to you. | ||
It is worth fireballing the green dragons as they can give you cool stuff (e.g. scrolls and super fireballs). Try to time it so that one fireball takes them both out, and see what you get. Then exit. | |||
{{-}} | {{-}} | ||
| Line 35: | Line 35: | ||
<center><big><big>[[Solomon's Key/Arcade Bonus|Bonus Stage]]</big></big></center> | <center><big><big>[[Solomon's Key/Arcade Bonus|Bonus Stage]]</big></big></center> | ||
{{Footer Nav|game=Solomon | {{Footer Nav|game=Solomon's Key|prevpage=Walkthrough|nextpage=Arcade 5 - 12}} | ||
Latest revision as of 16:58, 16 June 2022
Stage 1[edit]
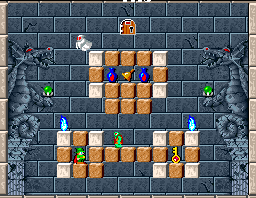
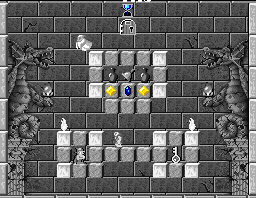
Take out the block in front of you then wait for the goblin to walk on top of the next block. Take out this block to drop and kill the goblin.
Collect all items (and fairy).
Build blocks up to the door level. Wait for the ghost to pass then exit (but don't forget to get the secret timer just above the door).
Stage 2[edit]
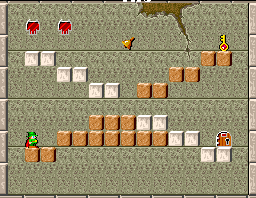
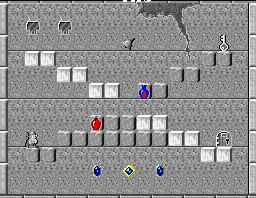
Quickly jump up so that you are standing on the third row of brown blocks. Take out the middle block of that third row and the block to the right of it and then jump up onto the white block to the right of that. Demonheads will appear, move to the right and then fall down and get directed to the left, leaving you to explore the right side of the level in safety. Get the key and the bell (and fairy).
There's treasure down below, but its not worth going for (especially with all the demonheads down below). So just get out.
Stage 3[edit]
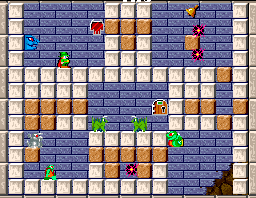
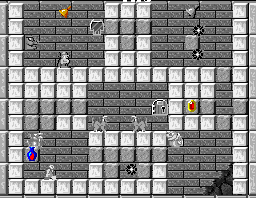
Make a block in the bottom right of the starting area. The panel monster will shoot a fireball so wait for this to pass. Jump on top of the block you created then get rid of the first of the blocks and jump into the created gap. Clear the other two blocks. Alternatively, fireball the panel monster to buy you time, particularly if you want to get the secret bell in this room.
Go through the passage to the next room and fall down. Walk towards the two spark balls but not too close! When they are both going away from you horizontally, then jump up and destroy the block. Both orbs should continue right, go up and head back towards the first room. When they have gone through the passage put a block there to stop them coming back. Get the bell then drop into the gap. Collect the items hidden behind the blocks and drop again (timing it so that you avoid the wyvern).
Clear the blocks to the next spark ball and release it. Go back to the wyvern room, jump up and get the key (timing it, of course) and then avoid the spark ball. Re-enter the passage putting a block behind you to keep the spark ball from coming back. Kneel down and fireball the goblin and then remove the block from under the gargoyle to kill it. Make your way to the passage to the centre room and let the fairies come to you.
It is worth fireballing the green dragons as they can give you cool stuff (e.g. scrolls and super fireballs). Try to time it so that one fireball takes them both out, and see what you get. Then exit.