From StrategyWiki, the video game walkthrough and strategy guide wiki
Jump to navigation
Jump to search
World 7-1
| Defeat the Hammer Brothers
|
| As you get closer to World 8, the Hammer Brothers become more troublesome. If you can't beat them, here are some tips. Try to avoid them. They usually first appear on top of a large block set. So wait for them to come down, then jump to the highest block set to stay out of their way. If you're in the flatlands, accelerating and jumping should work well.
|
| Either way, the trick is not to wait around. Act! If you let them get close, they'll nail you with flying hammers.
|
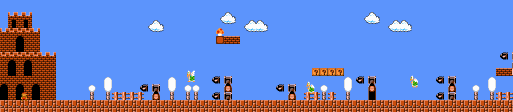
Part 1
- The far left block above the twin cannons contains a power-up. Get on top of the twin cannons and punch from below. Be careful not to get hit by Bullet Bill right after the power boost. It's best to land to the right with the "down" button pressed.
- It's quite tricky to deal with the Paratroopas with the "?" blocks above you. Play it safe. Ignore them, and keep on going above the "?" blocks.
- When you stomp and kick a Paratroopa, it will bounce back and forth between the cannons. Keep this in mind before you attack.
Part 2
- There is a 10-coin block inside the second block from the right in the overhead block set.
- When the Hammer Brothers move up, run under them quickly.
- Before using the second pipe to enter coin room A, jump up to release the 1-up mushroom. Then go down and to the right to catch it, and return to enter the coin room.
Part 3
- The highest block contains a power-up, but the springboard is difficult to use, so don't try it when Bullet Bill is in your way.
- To avoid the Buzzies descending the right staircase, wait on top of the left staircase, and jump to the right when they reach the bottom.
| Unveil secrets of the 1-up mushroom
|
| Actually, there are two 1-up mushrooms. The ones inside the visible blocks always appear. The ones inside the mid-air invisible blocks don't always appear. It all depends on whether or not you have collected the coins in the preceding world (missing just a few is usually okay). The type of 1-up mushroom also depends on whether you already passed one by or whether you've been hit before you reached the block. Go for all of them!
|
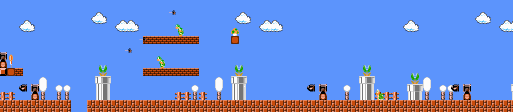
World 7-2
Part 1
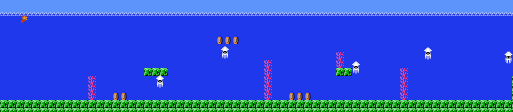
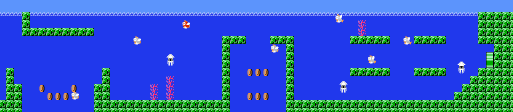
- This underwater scene is just like World 2-2. You can use fireballs underwater, so try to get all the enemies as they appear. If they get away, they might sneak up behind you without warning.
Part 2
- Proceed and collect coins with caution.
Part 3
- If you go on top of the L shaped blocks above the drain, you'll see that Mario trembles from the force of the rushing water as if he fears his enemies. Try it out when you have plenty of time.
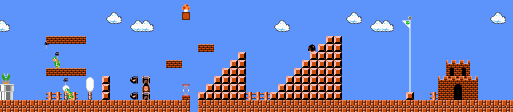
World 7-3
Part 1
- Use the Troopas to blow away the Cheep-Cheeps.
Part 2
- First, get the power-up inside of the "?" on top of the right bridge. Step back a little, and accelerate to jump over to the island. Collect all of the floating coins during your jump. Avoid the Troopas and Cheep-Cheeps at all costs.
- The Paratroopas towards the end of this section never touch the ground. If you are small, you can run right by them. If you are powered, just kneel down to dodge them.
Part 3
- Precise control and rhythm are necessary to clear these three bridge sections. Try to collect all the coins in the process. Don't get bumped by a Cheep-Cheep from the bottom! If this happens, your landing position changes.
World 7-4
| Clever advice for World 7-4
|
You can see that the trap in this level is quit complicated. A small mistake will throw you into a trap zone, and you will have to try again. Special care should be taken in clearing this trap zone. When you jump to the blocks above the Bog, be careful not to use too much speed. You can easily fall into the small openings on the right. Use  to accelerate through to the area near the fire-bar. to accelerate through to the area near the fire-bar.
|
Part 1
- These lifts drop with your weight! Watch for the Podoboos and jump across quickly. Proper rhythm and timing will save you from falling into the Bog of Flames.
- The rest of this area is the same as the trap area in World 4-4. To clear it, you must follow a certain path. One mistake is all you need to get trapped!
- The correct sequence for this section of the map is to take the bottom path, followed by the middle path, and finally the top path.
Part 2
- If you see a fire-bar suspended by some blocks, you've made it to trap zone 2.
- To make it through this tricky zone, you must pass above the fire-bar, the at least through the middle of the long block sets, and then finally back through the top pathway.
Part 3
- If you reach this low spot, you have cleared the trap zone!
- When the evil Bowser throws his hammers, get inside the arc of the flight path to avoid them. When he jumps, run underneath him to clear the stage.