Jump to navigation
Jump to search


Sirius 128 (talk | contribs) |
Trig Jegman (talk | contribs) mNo edit summary |
||
| Line 4: | Line 4: | ||
{{Scrolling map|SMB2j_Standard_End_Map.png}} | {{Scrolling map|SMB2j_Standard_End_Map.png}} | ||
* This is the standard ending to numerous underground and underwater levels. | * This is the standard ending to numerous underground and underwater levels. | ||
* The hidden blocks near the flagpole will give you a boost. | * The hidden blocks near the flagpole will give you a boost. Jump up to the top block, then grab the pole for some easy 5,000 points. | ||
== Coin Room A == | == Coin Room A == | ||
| Line 20: | Line 20: | ||
== Coin Room D == | == Coin Room D == | ||
{{Scrolling map|SMB2j_Coin_Room_D.png}} | {{Scrolling map|SMB2j_Coin_Room_D.png}} | ||
* It's a real challenge to get coins or a Power-up in this Coin Room. | * It's a real challenge to get coins or a Power-up in this Coin Room. If you are super-sized, you can break through the bricks for a Fire Flower. If you are Luigi, you can jump from the right without dashing for either Power-up. | ||
* But if you are regular-sized Mario, you will need to dash right and jump left from the pipe. | * But if you are regular-sized Mario, you will need to dash right and jump left from the pipe. | ||
* Either way if you are small, it will be a Mushroom and you will need to make it rebound by hitting the right brick. | * Either way if you are small, it will be a Mushroom and you will need to make it rebound by hitting the right brick. | ||
| Line 29: | Line 29: | ||
== Coin Room F == | == Coin Room F == | ||
{{Scrolling map|SMB2j_Coin_Room_F.png}} | {{Scrolling map|SMB2j_Coin_Room_F.png}} | ||
* Collect the coins here by jumping carefully. | * Collect the coins here by jumping carefully. If you aren't careful, you may end up becoming Piranha Plant food. | ||
== Coin Room G == | == Coin Room G == | ||
{{Scrolling map|SMB2j_Coin_Room_G.png}} | {{Scrolling map|SMB2j_Coin_Room_G.png}} | ||
* The Power-Up in this Coin Room is boxed in by bricks. | * The Power-Up in this Coin Room is boxed in by bricks. If your hero is small, it is unreachable, and you can only reach six of the coins. | ||
* Watch out for that Poison Mushroom on the right, although it is boxed in by the same bricks. | * Watch out for that Poison Mushroom on the right, although it is boxed in by the same bricks. | ||
== Coin Room H == | == Coin Room H == | ||
| Line 51: | Line 51: | ||
* Hop on the platform and grab as many coins as possible, then drop down and leap over the clouds while collecting more. | * Hop on the platform and grab as many coins as possible, then drop down and leap over the clouds while collecting more. | ||
* After you're done jumping the cloud-hurdles, hop on the platform and jump more clouds while grabbing coins. | * After you're done jumping the cloud-hurdles, hop on the platform and jump more clouds while grabbing coins. | ||
* You'll encounter a higher row of clouds (there are a few small gaps in the row). | * You'll encounter a higher row of clouds (there are a few small gaps in the row). Run across it. You can run right over the gaps. | ||
* This Heaven has a 77 coin potential, but Mario won't be able to reach all of them. | * This Heaven has a 77 coin potential, but Mario won't be able to reach all of them. | ||
== Coin Heaven C == | == Coin Heaven C == | ||
| Line 61: | Line 61: | ||
== Swim Area A == | == Swim Area A == | ||
{{Scrolling map|SMB2j_Swim_Area_A.png}} | {{Scrolling map|SMB2j_Swim_Area_A.png}} | ||
* Swim around and grab the coins, but try not to get cornered by the Bloopers or the Buzzy Beetles. | * Swim around and grab the coins, but try not to get cornered by the Bloopers or the Buzzy Beetles. If you are Fire Mario, you can blast the Bloopers away. | ||
* You can not jump on or even use fireballs against the Buzzy Beetles. You can only swim over them. | * You can not jump on or even use fireballs against the Buzzy Beetles. You can only swim over them. | ||
* Make sure the Blooper guarding the exit pipe doesn't chase you into the pit. | * Make sure the Blooper guarding the exit pipe doesn't chase you into the pit. | ||
| Line 73: | Line 73: | ||
|} | |} | ||
{{Scrolling map|SMB2j_Swim_Area_B.png}} | {{Scrolling map|SMB2j_Swim_Area_B.png}} | ||
* Be careful around the Koopa and the Bloopers. | * Be careful around the Koopa and the Bloopers. Once again, avoid being cornered or chased into a pit, and if you have a Fire Flower, use it. | ||
* When you reach the exit, wait for the Koopa Paratroopa to float down toward the pit, or blast it with fireballs. | * When you reach the exit, wait for the Koopa Paratroopa to float down toward the pit, or blast it with fireballs. | ||
== Warp Zone A == | == Warp Zone A == | ||
{{Scrolling map|SMB2j_Warp_Zone_A.png}} | {{Scrolling map|SMB2j_Warp_Zone_A.png}} | ||
* Don't fall, or you will lose a life. | * Don't fall, or you will lose a life. Stock up on all 17 coins. If the Warp Zone backtracks to an earlier level, there is no suicide pit. Just wait for the time to run out. | ||
== Warp Zone B == | == Warp Zone B == | ||
{{Scrolling map|SMB2j_Warp_Zone_B.png}} | {{Scrolling map|SMB2j_Warp_Zone_B.png}} | ||
Latest revision as of 23:01, 16 June 2021
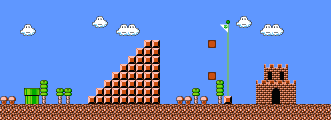
Standard Ending[edit]

- This is the standard ending to numerous underground and underwater levels.
- The hidden blocks near the flagpole will give you a boost. Jump up to the top block, then grab the pole for some easy 5,000 points.
Coin Room A[edit]

- A Poison Mushroom is easily accessible, and should be avoided.
- Create a platform to the real Power-Up in the ceiling by revealing two hidden Coin Blocks. For a Mushroom, you need to make it rebound by hitting the right brick.
Coin Room B[edit]

- The coin line is a total of 16 coins in length. You have plenty of room to dash and crouch to reach them, but watch out for Bullet Bill!
- If you are big, you can reach the 10-Coin Block from the middle of the three high blocks just before the pipe.
Coin Room C[edit]

- It's a tight squeeze in this room if you're super-sized. You will need to dash and crouch to reach the four coins underneath.
- You need to be super-sized to be able to reach the 10-coin Block.
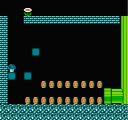
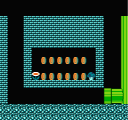
Coin Room D[edit]

- It's a real challenge to get coins or a Power-up in this Coin Room. If you are super-sized, you can break through the bricks for a Fire Flower. If you are Luigi, you can jump from the right without dashing for either Power-up.
- But if you are regular-sized Mario, you will need to dash right and jump left from the pipe.
- Either way if you are small, it will be a Mushroom and you will need to make it rebound by hitting the right brick.
Coin Room E[edit]

- The coin line is a total of 16 coins in length.
- If you are big, you can break the bricks closest to the exit and unveil a 10 coin block.
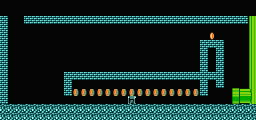
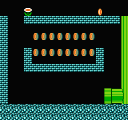
Coin Room F[edit]

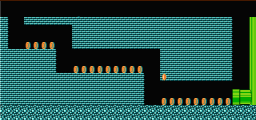
- Collect the coins here by jumping carefully. If you aren't careful, you may end up becoming Piranha Plant food.
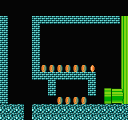
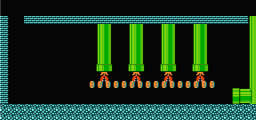
Coin Room G[edit]

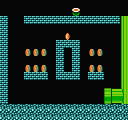
- The Power-Up in this Coin Room is boxed in by bricks. If your hero is small, it is unreachable, and you can only reach six of the coins.
- Watch out for that Poison Mushroom on the right, although it is boxed in by the same bricks.
Coin Room H[edit]

- Hit the lowest brick to the left quickly and try to knock all ten coins out of the block.
Coin Room I[edit]

- After your pint-sized plumber pops the Power-Up, hit the brick to the right so that he can collect it.
- Once you're bigger, smash one side (not the bottom middle brick) of the block cluster and hit the top middle block to reveal a 10 coin block.
Coin Heaven A[edit]

- The brick wall is too long to jump over it. You'll have to hop off the platform in order to continue on with the platform on the other side.
- Though, there is a glitch that allows to walk through the brick wall by holding
 while the moving platform is passing by the wall. This can also be done in the cloudy platform amidst the level.
- Though, there is a glitch that allows to walk through the brick wall by holding
- This Heaven has a 73 coin potential and is generally found in Worlds 1, 2, 3 and 4.
Coin Heaven B[edit]

- Hop on the platform and grab as many coins as possible, then drop down and leap over the clouds while collecting more.
- After you're done jumping the cloud-hurdles, hop on the platform and jump more clouds while grabbing coins.
- You'll encounter a higher row of clouds (there are a few small gaps in the row). Run across it. You can run right over the gaps.
- This Heaven has a 77 coin potential, but Mario won't be able to reach all of them.
Coin Heaven C[edit]

- Hop on the platform, grab coins, drop down, then grab more coins, and repeat the process until the level ends.
- This Heaven has a 55 coin potential, but Mario won't be able to reach all of them.
- In the exclusive Worlds A, B, C and D, this is the only type of Coin Heaven seen.
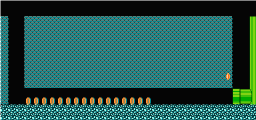
Swim Area A[edit]

- Swim around and grab the coins, but try not to get cornered by the Bloopers or the Buzzy Beetles. If you are Fire Mario, you can blast the Bloopers away.
- You can not jump on or even use fireballs against the Buzzy Beetles. You can only swim over them.
- Make sure the Blooper guarding the exit pipe doesn't chase you into the pit.
- This Swim Area has 40 coins total.
Swim Area B[edit]
| Note to All-Stars players |
| In the original game, this area has a 50 coin potential. However, in All-Stars - The Lost Levels, the last 16 coins are missing. Fortunately, there is actually ground underneath instead of a whirlpool drain. |

- Be careful around the Koopa and the Bloopers. Once again, avoid being cornered or chased into a pit, and if you have a Fire Flower, use it.
- When you reach the exit, wait for the Koopa Paratroopa to float down toward the pit, or blast it with fireballs.
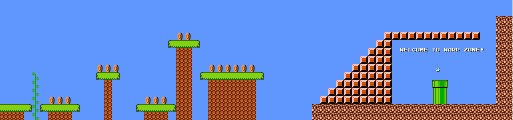
Warp Zone A[edit]

- Don't fall, or you will lose a life. Stock up on all 17 coins. If the Warp Zone backtracks to an earlier level, there is no suicide pit. Just wait for the time to run out.
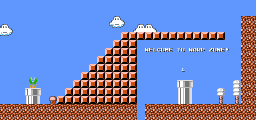
Warp Zone B[edit]

- This type of Warp Zone is very convenient, because if the pipe leads to a previous World, you can jump into the pit to the left to avoid being sent back.
Warp Zone C[edit]
