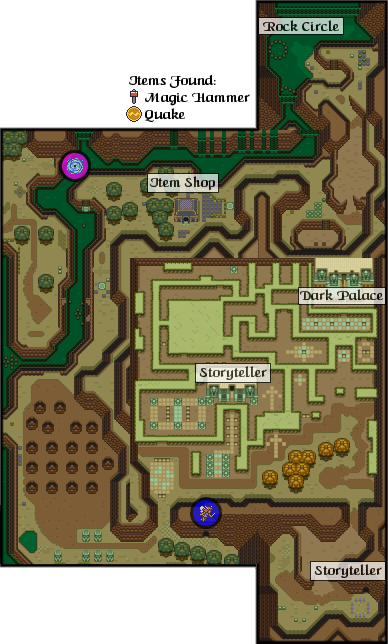
The palace in this region was said to have been the residence of the King of the Golden Land. After Ganon took over, the Hylian King moved out and the Helmasaur King moved in. With no upkeep, the garden maze has become overgrown and the halls of the palace have deteriorated.
Points of interest

The area near the Dark Palace features many points of interest. In the north is a circle of rocks home to a grumpy fish who likes his privacy. On the river shore is an opening where adventurers grapple across the water. There are also two caves, inhabited by a storyteller and a Faerie respectively.
Rock Circle
There is a curious rock circle surrounding calm waters in the river that flow north of the Dark Palace. A sign on the land near this formation reads "Curses to anyone who throws something into my circle of stones." If you are curious, throw the sign into the rock circle; a troubled fish will appear from below and give you a magic medallion, asking to be left in peace.
Item Shop
The shop to the north of the Dark Palace shares the same space with a Magic Shop in the Light World. While the Magic Shop offers three different kinds of Magic Potions, this shop sells only one kind of Potion plus a small Shield and clusters of Bombs. The Potion and Bombs are more expensive than those same items at specialty shops and the Shield was inferior quality. Several shops of this kind, all offering the same inferior wares for the same inflated price, are scattered throughout the Dark World.
Storytellers
Two hermit-like storytellers inhabit the area surrounding the Dark Palace. One of them lives in a structure near the palace. He warns visitors of Ganon's power and explains the legend of the Triforce. Another hermit, hiding in a cave south of the palace, tells a story about the circle of rocks in the north.
Faerie Fountain
A friendly Faerie offers visitors a chance to rejuvenate in a cave just south of the Dark Palace garden. It is a saving grace for many warriors who are wounded on their way through the palace grounds. With their energy restored to normal, these brace adventurers can continue their journey across the land.
Dark Palace Grounds
The overgrown garden maze of the Dark Palace befuddles many explorers who attempt in vain to reach the palace entrance. Those who make their way through the foliage say that the trick is to look for openings in the thorn bushes and to try various paths. A monkey named KiKi is said to live in a particularly thick section of brush. Adventurers who make friends with KiKi and give him the Rupees that he asks for are helped when they attempt to enter the palace. KiKi is a very shy monkey who runs when he senses danger.
The Dark Palace
The struggle to reach the Dark Palace
The Dark Palace, your first goal in the Dark World, is surrounded by a baffling maze of thorny bushes. The first part is easy; just follow the arrows. After that, it gets tricky. Look for small holes in the canopy of thorns that indicate a path. In the large central maze, enter from the top, and go down, left, down, right, up, and right. And monkey will guide you to the final stage for a price. The only way to open the Dark Palace entrance is to flip the switch on the roof.
Inside the Dark Palace
The passages inside the Dark Palace can confuse explorers even more than the maze on the grounds. Many adventurers get confused by the switches which open doors and move blocks up and down. In a room on the first floor, there is a Crystal Switch which can only be triggered by an Arrow, the Master Sword's beam, a Boomerang, or a Bomb. In another room, there is a door which stays open only when there is constant pressure on a switch on the floor. By moving a statue, explorers are able to venture into the next room.
Floor 1

- 1A
- This room does not look unlike the entrance to the Eastern Palace. It has one central entrance and two side passages. Upon your first visit to the Dark Palace, you will want to take the left passage. Stand on the tile on the left side of the room and pass through the open door. You will revisit this room a few more times. The next time you will go right, and the next time, through the center.
- 1B
- This room is a continuation of the last room. When you enter the left chamber, you'll need to avoid the helmeted enemy known as a Helmasaurs, and run through to the stairwell behind it, to room 2A. The next time through, your will repeat the same action in the right chamber in order to reach room 2B. Finally, when you run through the center, you should be equipped with a key so that you can open the locked center door.
- 1C
- 1D
- 1E
- 1F
- 1G
- 1H
- 1J
- When you arrive from room 2G, you will be at the bottom of the room. Three red Ball enemies will be floating around a treasure chest. Open the chest when it's safe and obtain the
 Map. When you're done, you will notice that the left and right walls are weak. Bomb or dash both of them. The hole to the left leads to a fairy pong in room 1K. When you pass though the left hole, you will be on an isolated platform in the lower right corner of room 1D, where you can obtain a
  Small Key. At this time, you should use the Magic Mirror again to return to room 1A and take the center pathway.
 - 1K
- In this room, you can take a small reprieve at a fairy pond. You will want to regain any lost health, or restock any empty bottles that you have with fairies, courtesy of your Bug-Catching Net.
- 1L
- 1M
Basement 1A

- 2A
- When you arrive in this room, two statues will be shooting fireballs at you. Do your best to avoid them. There is a switch hidden underneath one of the skulls. Find it and step on it to make a treasure chest appear. Run over to open it and find the first
 Small Key out of many found in this Palace. When you are finished, you need to return to room 1A and pass through the right door, so use your Magic Mirror.
 - 2B
- This room is occupied by two torches and a Bubble. There are three warp tiles on the floor, one that transports you away, and two that arrive in this room. Stand on the active warp tile to be whisked away to room 2C.
- 2C
- 2D
- You may first arrive here after teleporting over from room 2B. There are two bubbles, an arrival warp tile and an active warp tile surrounded by a set of blocks. The active warp tile in the center takes you back to room 2B. You must push the block beneath the warp tile to the side to reach it. There is also a telepathy stone that allows you to contact Sahasrahla. You will notice that the wall to the south is damaged. Bomb or Dash Bash it to open a hole in the wall and pass through it to room 2E.
- 2E
- This fairly straight forward room introduces the Ball enemies. Balls hover in the air, and are generally safe to attack except for when they emit electricity. They do this periodically, and if you swing your sword when they are electrified, you will be damaged instead of them. When you reach the left side of the room, both parts of the north wall will looked damaged. In addition, so will the floor on the left. If you place a bomb here, you can discover which part of the wall is weaker, but you may also create a hole in the ground. It's safe to dash bash this wall as well. Proceed north to room 2F.
- 2F
- Meet the Goriyas. They are a big different from Goryias that you may have encountered in the earlier Legends of Zelda. These Goriyas like to play mind games. They will always and only move in the opposite direction as you. If you move left, they move right. If you move up, they move down. This can work to your advantage since you can situate them right in front of you, stop, and attack. The two green Goriyas are pretty easy to take down, but the red one can only be defeated with arrows. Line up vertically with him, and fire away. The door to room 2G above will open when they are all defeated.
- 2G
- From the bottom of the room, you must make your way along the conveyor belt to the stairs up above. Along the way, you must avoid the spike traps that slide back and forth as well as two floating blue Ball enemies, and one stronger red Ball enemy. Avoid their electrical attacks as you attack them. Don't get so caught up in combat that the conveyor belt pulls you into a spike trap. Climb the staircase at the top of the room and you will arrive at room 1J.
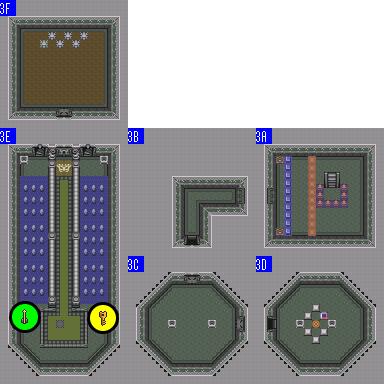
Basement 1B

- 3A
- 3B
- 3C
- 3D
- 3E
- 3F
