(improved walkthrough, followed with my GBA game) |
(we don't need to number the dungeons, especially if we're counting from 0, cleanup) |
||
| (46 intermediate revisions by 19 users not shown) | |||
| Line 1: | Line 1: | ||
{{ | {{Header Nav|game=The Legend of Zelda: A Link to the Past}} | ||
{{Control selector|Super Nintendo, Game Boy Advance, Wii Classic Controller, GameCube Controller, New 3DS, Switch}} | |||
'''''A broad bridge spans the river in front of Hyrule Castle and leads to the main entrance. The bridge connects the royal fortress to the forest area, Link's house, and regions farther south.''''' | |||
==Points of Interest== | |||
[[File:LoZLttP Hyrule Castle.png|right]] | |||
===Link's House=== | |||
Like the other homes in Hyrule, the house where Link and his uncle live is simple. It is furnished with a bed and table, both hand-crafted from logs bought from the lumberjacks in the north. The only unusual furnishing is a finely carved chest that sits in one corner of the room. The home is south of Hyrule Castle, just at the edge of a thick forest where Link and his uncle hunt for their food. | |||
When | ===The Castle=== | ||
Hyrule Castle once welcomed all Hyruleans. It was the home to several generations of royalty who were worshiped by their people. Inside the castle, royal red carpets are rolled out over the stone floors, and rich tapestries from faraway lands adorn its walls. Many fierce battles were waged just outside the castle walls against attackers, but the Hyruleans prevailed—until Agahnim appeared with his sinister strategy. | |||
===Sanctuary=== | |||
It is supposed to be a place of peace, but history shows that the Hylian Sanctuary was once the site of a brutal battle. One of the oldest structures in the land, it is where Zelda goes for help when she first escapes from Agahnim, and the Sage there offers her shelter. He is a kind man who will guide Link on the first steps of his legendary journey. | |||
===Sacred Ground=== | |||
The great Hyrulean Cemetery lies just east of the Sanctuary. Buried there are some of the most famous people in Hyrulean history. It is an eerie and mysterious place, and ghosts seem to always hover nearby. It is said that some of the tombstones there hide not bodies, but buried treasure. | |||
{{-}} | |||
==Leaving Home== | |||
[[File:Zelda ALttP Lamp chest.png|thumb|right|Link finds a Lamp.]] | |||
You hear words in the darkness; a plea from Zelda who is being held captive. You awaken suddenly and notice your uncle sheathing his sword. The old warrior looked grim. When your uncle is gone, hop out of bed (push any direction on {{control|{{snes|Neutral|Dpad}}|{{gb|neutral|dpad}}|{{wii-cc|neutral|dpad}}|{{gc|neutral|dpad}}|{{3ds|neutral|dpad}}|{{Switch|neutral|Dpad}}}}) and open the chest in the corner and take out the [[File:Zelda ALttP item Lamp.png]] '''Lamp''' . | |||
{{-}} | |||
==The Castle Gates== | |||
[[File:Zelda ALttP garden secret.png|thumb|left|The secret passage is revealed.]] | |||
The castle itself dates back to early Hylian times, but its surrounding wall and gate were constructed in later years. Once long ago, people came from all over the kingdom to pass through them when they were completed. Now, however, one of Agahnim's spellbound guards refuses entry to anyone who arrives. | |||
Outside in the driving storm, you hear another telepathic message alerting you to a secret entrance outside the castle walls. Cross the moat, then follow a path of stones until it leads to a bush. Pull the bush out of the ground, revealing a secret entrance. | |||
{{-}} | |||
==Secret Passage== | |||
[[File:LoZLttP Secret Passage.png|thumb|240px|right|Secret Passage ([[:File:LoZLttP Secret Passage 2.png|enlarge]])]] | |||
After falling through the hole, you will land in a puddle of water. You will stumble upon your Uncle, fatally wounded. With his dying breath he gives his [[File:Zelda ALttP item L-1 Sword.png]] '''Fighter's Sword''' and [[File:Zelda ALttP item Small Shield.png]] '''Small Shield''' to you, and teaches you the secret Spin Attack technique, passed down among the Hyrulean Knights (press and {{mod|Hold}} {{control|{{snes|B}}|{{gb|B}}|{{wii-cc|B}}|{{gc|B}}|{{3ds|B}}|{{Switch|B}}}}, until the magic sparks reach the tip of the sword, then {{mod|Release}}). Enter the door on the left. | |||
The guards in the next room don't actively attack you but you will take damage if they touch you. The chest will contain a [[File:Zelda ALttP item Lamp.png]] '''Lamp''' if you did not collect one back in your house. Otherwise, it will contain a blue rupee. After collecting magic potions from the pottery, you can use the now-powered lamp to light the room; this does nothing here, but lighting these floor lamps in other rooms can often reveal a secret or open a door. When you're finished, head for the stairs to the left. | |||
{{-}} | |||
==The Castle Garden== | |||
Plants from the far reaches of the kingdom were transplanted in the garden courtyard at the front of Hyrule Castle. Fine marble tiles from the mountains line the walk, and colorful Rosehedge and Orangecap bushes dot the carpet of grass. Guards observe the garden from the catwalks on the castle walls. | |||
Badly outnumbered, you have to battle your way past the enchanted palace guards that patrol the castle grounds. Hyrulean soldiers are heavily armed. Their shields bear warriors' crests and their swords are specially forged to withstand fierce blows. You must safely make your way to the double doors that serve as the Castle's entrance. | |||
{{-}} | {{-}} | ||
==Hyrule Castle== | ==Hyrule Castle== | ||
[[ | Inside Hyrule Castle, fires burn brightly in many torches. A central staircase leads up to the throne room, and labyrinth-like hallways lead to other areas of the castle. All rooms – except for the dungeon below – are elegantly furnished. | ||
===Floor 1=== | |||
[[File:LoZLttP Hyrule Castle F1.png|thumb|400px|right|Floor 1 ([[:File:LoZLttP Hyrule Castle F1 2.png|enlarge]])]] | |||
You enter the grand hall of the Castle. Immediately, you have some choices to make. You can run straight ahead, but that way leads to the throne room, and you probably won't find Zelda there. If anything, she is locked in the dungeon below. You can take the left exit or the right exit, and in fact both ways will take you to the stairwell in the back that leads to the dungeon. Along the way, you'll have to battle past more possessed knights, but if you break the pottery that you find along the way, you may discover some rupees, or a life-refilling heart. | |||
While exploring the castle, two doors lead to the outer wall exterior of the castle. You will have to return to this portion of the castle later in the game. Back inside, and you will come across the stairs you are looking for. It is located towards the back of the castle. Head downstairs. | |||
{{-}} | |||
===Basement 1=== | |||
[[File:LoZLttP Hyrule Castle B1.png|thumb|400px|right|Basement 1 ([[:File:LoZLttP Hyrule Castle B1 2.png|enlarge]])]] | |||
When you arrive in the dungeon, you are immediately greeted by a guard. You must duel the guard in order to grab the [[File:Zelda ALttP item Small Key.png]] '''Small Key''' he is holding in order to open the door below. Also open the chest in the middle of the room to discover a [[File:Zelda ALttP item Map.png]] '''Map''' inside. Now you can view the map at any time. ({{control|{{snes|X}}|{{gb|L}}|{{wii-cc|X}}|{{gc|X}}|{{3ds|L}}|{{Switch|L}}}}). | |||
Open the southern door to discover a room whose floor is erected over a deep chasm. If you are not careful with your footing, you could fall to your doom losing one of your hearts. However, the same is true for the guards that patrol the area. In some cases, it is easier for you to knock the guards into the chasm then to fight them to the death. | |||
Follow the pathway around until you encounter a door next to the left wall. As you pass through it, the doors slam shut behind you. You must defeat the guard in order to reopen the shutter doors. Since the north door is locked, go east. Inside, you will encounter another angry guard who's holding a [[File:Zelda ALttP item Small Key.png]] '''Small Key'''. Once you defeat the guard, open the treasure chest to discover your first alternate weapon: the [[File:Zelda ALttP item Boomerang.png]] '''Boomerang'''. This item can stun many enemies for a short time (such as the soldiers), and it injures or even kills very small enemies. Return to the previous room, and use the key to advance to the next stairwell down. | |||
{{-}} | |||
[[File:Zelda ALttP ballchain miniboss.png|thumb|left|Link faces an angry guard.]] | |||
[[File:Zelda ALttP Boomerang get.png|thumb|right|Obtaining the Boomerang]] | |||
{{-}} | |||
===Basement 2 & 3=== | |||
[[ | [[File:LoZLttP Hyrule Castle B2 B3.png|thumb|right|Basement 2 & 3 ([[:File:LoZLttP Hyrule Castle B2 B3 2.png|enlarge]])]] | ||
Head down the stairs to a very small second floor basement, and go immediately down the next staircase to the lowest level of the dungeon. First, you will find Princess Zelda safe but stuck inside of a cell. Then you will notice the gruesome guard wielding a morningstar. You can try to stun him with your new-found Boomerang, but it has little effect. If you take some damage during the fight, the pottery nearby contains hearts, just in case you run low on life. Better yet, you can throw the pottery at the guard, killing him even faster than with a sword. The guard slumps to the ground with a final groan, dropping the [[File:Zelda ALttP item Big Key.png]] '''Big Key''' that keeps Zelda imprisoned. | |||
Use the key to free Princess Zelda, who will update you with all of the information she has. She informs you that the destination she would like to reach is the throne room. You must guard and escort her there. There also happens to be a chest in the cell with the Princess. If by some odd chance, you had not obtained a [[File:Zelda ALttP item Lamp.png]] '''Lamp''' from the house ''or'' from the secret passage, this is yet another opportunity for you to collect one. Otherwise, the chest will contain a blue rupee. On the way back through Basement 1, you may take the upper pathway which serves as a shortcut back to the stairs to the first floor. Keep running south until you reach the ladder that leads to the upper path. | |||
{{-}} | |||
== | ===Floor 2=== | ||
[[ | [[File:LoZLttP Hyrule Castle F2.png|thumb|right|Floor 2 ([[:File:LoZLttP Hyrule Castle F2 2.png|enlarge]])]] | ||
[[File:Zelda ALttP throneroom secret.png|thumb|left|Sanctuary secret entrance revealed.]] | |||
With the Princess in tow, fight past all of the guards who have returned to the first basement, and along the first floor hallways, and return to the grand hall of the Castle. This time, follow the Princess's instruction and make your way to the doorway at the top that leads to the throne room above. Even in the throne room, you will be attacked by guards. Once you defeat them, lead the Princess to the thrones where she will tell you the next part of her plan. | |||
The Princess recalls a secret door that can be revealed by pushing a mantle aside. She asks you to push the mantle from the left, but she politely assists. The mantle slides to the side revealing a hidden stairwell... | |||
{{-}} | |||
==Sewers== | |||
The castle basement is a maze of dark tunnels that eventually lead to a secret exit. Snakes slither in the darkness, and huge rats scurry about, making the halls a treacherous trip. Only people who are very desperate dare to use this route. | |||
===Floor 2 & 1=== | |||
[[File:LoZLttP Sewer F2.png|thumb|right|Floor 2 ([[:File:LoZLttP Sewer F2 2.png|enlarge]])]] | |||
[[File:LoZLttP Sewer F1.png|thumb|right|Floor 1 ([[:File:LoZLttP Sewer F1 2.png|enlarge]])]] | |||
Upon entering the sewers, you'll notice that it's very dark. Mice run rampant in this room. They typically run in a straight line and turn at right angles. They tend to occupy the very edges of the room, but they occasionally run into pots or across the central areas so be aware of their position, or better yet, dispatch them with your sword. | |||
At this point, making use of your Lamp, while not necessary, has more obvious benefits. There are several torches in the dark halls and rooms below. You can use your Lamp and light fires to brighten the rooms and light the way ahead. Of course, you need to have Magic Power in order to use the Lamp. The more immediate benefit of holding the Lamp is the glow of light that surrounds you. It sheds enough light to help you make your way through the sewer even if you're completely out of magic. | |||
Find the door in the upper right to head down to the next level. It's a very small floor with another staircase leading to the basement level... and a lot of snakes. Snakes are a little more fearless than the timid rats. When they sense an intruder in the midst, they approach rapidly and bite the legs of the unwary. Strike them down with your sword, as they frequently drop valuable rupees that they unwittingly ingested. Head down below with Princess Zelda behind you for even more challenges. | |||
{{-}} | |||
===Basement=== | |||
[[File:LoZLttP Sewer B1.png|thumb|400px|right|Basement]] | |||
You start in the basement at the bottom of the map. If you make your way to the center of the first room, you can light the torches to see the {{zw|Keese}} bats that flap around the room, and the snakes that slither across the floor. Keese are a little less direct than snakes, but no less dangerous. They will flap around randomly. Remove both threats as quickly as you are able, and be sure to grab the key from the chest on the right in order to escape the room through the north. | |||
You will end up in a watery room filled with rats. All but one occupies the stretch of floor along the north wall. The remaining rat sits alone on an "island". They can't cross the water, so you can safely attack them from a distance with your Boomerang. One hit from the Boomerang will destroy them, and they are likely to leave Rupees behind. The door to the west is your only choice. | |||
The next room is large and expansive, but doesn't contain much of interest to you. There are many Rats running about, but they are isolated enough that they won't pose a threat to you. There are two Keese guarding the exit to the north, and they can take you by surprise in the darkness, so light a torch if you are concerned about your health. Some of the pots in the room also contain hearts. | |||
It is important to be thorough in the room to the north. One of the rats (it starts out on the left side of the room) has swallowed a [[File:Zelda ALttP item Small Key.png]] '''Small Key'''. You must kill the rat to claim the key, which is necessary to open the door on the right side of the room. You may have to deal with the remaining rats and the two Keese before you make your way out of the room. | |||
You're almost out of the sewers, just one more room to go. The next room is large and it has a bit of a rodent problem. In addition to all of the rats, there are two Keese bats as well. If you examine the two alcoves along the left wall, you will notice cracks in the wall. These cracks indicate that a bomb can be used to blow a hole in the wall. In this room, the cracks are surrounded by a circle, which indicates that you can break the wall by dashing into it with the {{zw|Pegasus Boots}} (which you will get after the [[../Eastern Palace/]] quest) as well as with a bomb. On the other side, you will find a few useful treasures (including more bombs), but nothing vital. You can return once you have bombs or Pegasus Boots to claim them. In the meantime, you still need to escape from the sewers. You will notice a set of blocks in front of the northern exit. You will need to move one of the blocks to create a path to the door. The center block moves easily. Push it north, and make your escape. | |||
As you escape the darkness of the sewers, you will find that the Sanctuary shares the same rodent infestation. Take the time to remove any rats that get close to you, and approach the door to the south. | |||
The last room before the Sanctuary presents a puzzle. There are two switches on the wall. One opens the door to the Sanctuary, while the other... brings disaster. In order to continue through the door, you must decide which switch is safe. If you pull the left-hand switch, seven snakes will rain from the ceiling. They aren't too much of a problem, but if you're low on health, you'd probably prefer not to deal with them at this time. Instead, pull the right switch and open the door to your destination. | |||
{{-}} | |||
===Sanctuary=== | |||
[[File:LoZLttP Sanctuary F1.png|frame|right|Sanctuary]] | |||
The Sage is relieved to see Princess Zelda safe from harm. He had hoped that someone wise and courageous would be able to challenge Agahnim and learn the fate of the other missing girls. He thinks he may have found that someone in you. He will mark a place on your map where he wants you to proceed in order to speak with one who might know where to turn next. The location that he marks on your map is in Kakariko Village, and he tells you to find {{zw|Sahasrahla}}, the village elder. He informs you that he will keep Zelda safe from harm in the protection of the Sanctuary. Before you leave, the Sage offers you the contents in the ornate chest near the altar. Open it to discover a [[File:Zelda ALttP item Heart Container.png]] '''Heart Container''', which adds one heart to your life stock. | |||
Exit the Sanctuary and prepare to journey westward, to [[../Kakariko Village/]]. Before we arrive, we will take a short detour on the way through [[../The Lost Woods/]]. | |||
[[File:Zelda ALttP first heart.png|thumb|left|The first heart container]] | |||
{{ | {{Footer Nav|game=The Legend of Zelda: A Link to the Past|prevpage=Light World|nextpage=The Lost Woods}} | ||
Latest revision as of 23:26, 7 March 2024
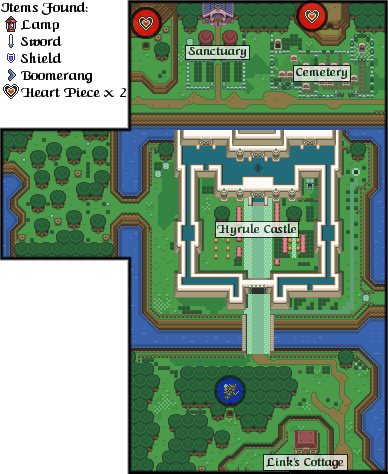
A broad bridge spans the river in front of Hyrule Castle and leads to the main entrance. The bridge connects the royal fortress to the forest area, Link's house, and regions farther south.
Points of Interest[edit]
Link's House[edit]
Like the other homes in Hyrule, the house where Link and his uncle live is simple. It is furnished with a bed and table, both hand-crafted from logs bought from the lumberjacks in the north. The only unusual furnishing is a finely carved chest that sits in one corner of the room. The home is south of Hyrule Castle, just at the edge of a thick forest where Link and his uncle hunt for their food.
The Castle[edit]
Hyrule Castle once welcomed all Hyruleans. It was the home to several generations of royalty who were worshiped by their people. Inside the castle, royal red carpets are rolled out over the stone floors, and rich tapestries from faraway lands adorn its walls. Many fierce battles were waged just outside the castle walls against attackers, but the Hyruleans prevailed—until Agahnim appeared with his sinister strategy.
Sanctuary[edit]
It is supposed to be a place of peace, but history shows that the Hylian Sanctuary was once the site of a brutal battle. One of the oldest structures in the land, it is where Zelda goes for help when she first escapes from Agahnim, and the Sage there offers her shelter. He is a kind man who will guide Link on the first steps of his legendary journey.
Sacred Ground[edit]
The great Hyrulean Cemetery lies just east of the Sanctuary. Buried there are some of the most famous people in Hyrulean history. It is an eerie and mysterious place, and ghosts seem to always hover nearby. It is said that some of the tombstones there hide not bodies, but buried treasure.
Leaving Home[edit]
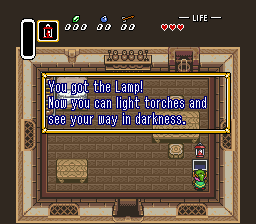
You hear words in the darkness; a plea from Zelda who is being held captive. You awaken suddenly and notice your uncle sheathing his sword. The old warrior looked grim. When your uncle is gone, hop out of bed (push any direction on ![]() ) and open the chest in the corner and take out the
) and open the chest in the corner and take out the ![]() Lamp .
Lamp .
The Castle Gates[edit]
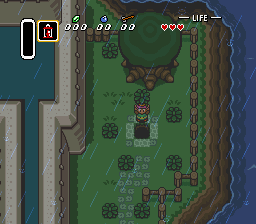
The castle itself dates back to early Hylian times, but its surrounding wall and gate were constructed in later years. Once long ago, people came from all over the kingdom to pass through them when they were completed. Now, however, one of Agahnim's spellbound guards refuses entry to anyone who arrives.
Outside in the driving storm, you hear another telepathic message alerting you to a secret entrance outside the castle walls. Cross the moat, then follow a path of stones until it leads to a bush. Pull the bush out of the ground, revealing a secret entrance.
Secret Passage[edit]
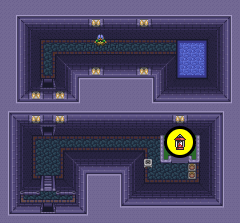
After falling through the hole, you will land in a puddle of water. You will stumble upon your Uncle, fatally wounded. With his dying breath he gives his ![]() Fighter's Sword and
Fighter's Sword and ![]() Small Shield to you, and teaches you the secret Spin Attack technique, passed down among the Hyrulean Knights (press and
Small Shield to you, and teaches you the secret Spin Attack technique, passed down among the Hyrulean Knights (press and ![]()
![]() , until the magic sparks reach the tip of the sword, then
, until the magic sparks reach the tip of the sword, then ![]() ). Enter the door on the left.
). Enter the door on the left.
The guards in the next room don't actively attack you but you will take damage if they touch you. The chest will contain a ![]() Lamp if you did not collect one back in your house. Otherwise, it will contain a blue rupee. After collecting magic potions from the pottery, you can use the now-powered lamp to light the room; this does nothing here, but lighting these floor lamps in other rooms can often reveal a secret or open a door. When you're finished, head for the stairs to the left.
Lamp if you did not collect one back in your house. Otherwise, it will contain a blue rupee. After collecting magic potions from the pottery, you can use the now-powered lamp to light the room; this does nothing here, but lighting these floor lamps in other rooms can often reveal a secret or open a door. When you're finished, head for the stairs to the left.
The Castle Garden[edit]
Plants from the far reaches of the kingdom were transplanted in the garden courtyard at the front of Hyrule Castle. Fine marble tiles from the mountains line the walk, and colorful Rosehedge and Orangecap bushes dot the carpet of grass. Guards observe the garden from the catwalks on the castle walls.
Badly outnumbered, you have to battle your way past the enchanted palace guards that patrol the castle grounds. Hyrulean soldiers are heavily armed. Their shields bear warriors' crests and their swords are specially forged to withstand fierce blows. You must safely make your way to the double doors that serve as the Castle's entrance.
Hyrule Castle[edit]
Inside Hyrule Castle, fires burn brightly in many torches. A central staircase leads up to the throne room, and labyrinth-like hallways lead to other areas of the castle. All rooms – except for the dungeon below – are elegantly furnished.
Floor 1[edit]
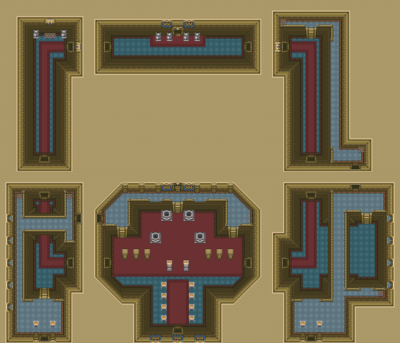
You enter the grand hall of the Castle. Immediately, you have some choices to make. You can run straight ahead, but that way leads to the throne room, and you probably won't find Zelda there. If anything, she is locked in the dungeon below. You can take the left exit or the right exit, and in fact both ways will take you to the stairwell in the back that leads to the dungeon. Along the way, you'll have to battle past more possessed knights, but if you break the pottery that you find along the way, you may discover some rupees, or a life-refilling heart.
While exploring the castle, two doors lead to the outer wall exterior of the castle. You will have to return to this portion of the castle later in the game. Back inside, and you will come across the stairs you are looking for. It is located towards the back of the castle. Head downstairs.
Basement 1[edit]
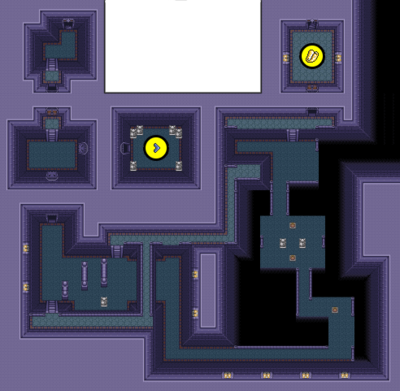
When you arrive in the dungeon, you are immediately greeted by a guard. You must duel the guard in order to grab the ![]() Small Key he is holding in order to open the door below. Also open the chest in the middle of the room to discover a
Small Key he is holding in order to open the door below. Also open the chest in the middle of the room to discover a ![]() Map inside. Now you can view the map at any time. (
Map inside. Now you can view the map at any time. (![]() ).
).
Open the southern door to discover a room whose floor is erected over a deep chasm. If you are not careful with your footing, you could fall to your doom losing one of your hearts. However, the same is true for the guards that patrol the area. In some cases, it is easier for you to knock the guards into the chasm then to fight them to the death.
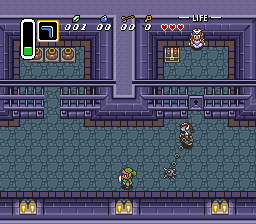
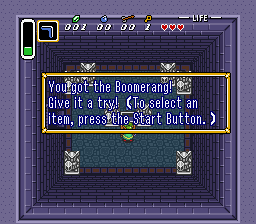
Follow the pathway around until you encounter a door next to the left wall. As you pass through it, the doors slam shut behind you. You must defeat the guard in order to reopen the shutter doors. Since the north door is locked, go east. Inside, you will encounter another angry guard who's holding a ![]() Small Key. Once you defeat the guard, open the treasure chest to discover your first alternate weapon: the
Small Key. Once you defeat the guard, open the treasure chest to discover your first alternate weapon: the ![]() Boomerang. This item can stun many enemies for a short time (such as the soldiers), and it injures or even kills very small enemies. Return to the previous room, and use the key to advance to the next stairwell down.
Boomerang. This item can stun many enemies for a short time (such as the soldiers), and it injures or even kills very small enemies. Return to the previous room, and use the key to advance to the next stairwell down.
Basement 2 & 3[edit]

Head down the stairs to a very small second floor basement, and go immediately down the next staircase to the lowest level of the dungeon. First, you will find Princess Zelda safe but stuck inside of a cell. Then you will notice the gruesome guard wielding a morningstar. You can try to stun him with your new-found Boomerang, but it has little effect. If you take some damage during the fight, the pottery nearby contains hearts, just in case you run low on life. Better yet, you can throw the pottery at the guard, killing him even faster than with a sword. The guard slumps to the ground with a final groan, dropping the ![]() Big Key that keeps Zelda imprisoned.
Big Key that keeps Zelda imprisoned.
Use the key to free Princess Zelda, who will update you with all of the information she has. She informs you that the destination she would like to reach is the throne room. You must guard and escort her there. There also happens to be a chest in the cell with the Princess. If by some odd chance, you had not obtained a ![]() Lamp from the house or from the secret passage, this is yet another opportunity for you to collect one. Otherwise, the chest will contain a blue rupee. On the way back through Basement 1, you may take the upper pathway which serves as a shortcut back to the stairs to the first floor. Keep running south until you reach the ladder that leads to the upper path.
Lamp from the house or from the secret passage, this is yet another opportunity for you to collect one. Otherwise, the chest will contain a blue rupee. On the way back through Basement 1, you may take the upper pathway which serves as a shortcut back to the stairs to the first floor. Keep running south until you reach the ladder that leads to the upper path.
Floor 2[edit]
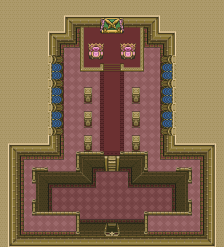
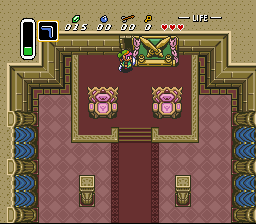
With the Princess in tow, fight past all of the guards who have returned to the first basement, and along the first floor hallways, and return to the grand hall of the Castle. This time, follow the Princess's instruction and make your way to the doorway at the top that leads to the throne room above. Even in the throne room, you will be attacked by guards. Once you defeat them, lead the Princess to the thrones where she will tell you the next part of her plan.
The Princess recalls a secret door that can be revealed by pushing a mantle aside. She asks you to push the mantle from the left, but she politely assists. The mantle slides to the side revealing a hidden stairwell...
Sewers[edit]
The castle basement is a maze of dark tunnels that eventually lead to a secret exit. Snakes slither in the darkness, and huge rats scurry about, making the halls a treacherous trip. Only people who are very desperate dare to use this route.
Floor 2 & 1[edit]
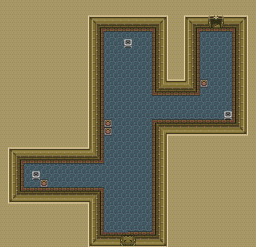

Upon entering the sewers, you'll notice that it's very dark. Mice run rampant in this room. They typically run in a straight line and turn at right angles. They tend to occupy the very edges of the room, but they occasionally run into pots or across the central areas so be aware of their position, or better yet, dispatch them with your sword.
At this point, making use of your Lamp, while not necessary, has more obvious benefits. There are several torches in the dark halls and rooms below. You can use your Lamp and light fires to brighten the rooms and light the way ahead. Of course, you need to have Magic Power in order to use the Lamp. The more immediate benefit of holding the Lamp is the glow of light that surrounds you. It sheds enough light to help you make your way through the sewer even if you're completely out of magic.
Find the door in the upper right to head down to the next level. It's a very small floor with another staircase leading to the basement level... and a lot of snakes. Snakes are a little more fearless than the timid rats. When they sense an intruder in the midst, they approach rapidly and bite the legs of the unwary. Strike them down with your sword, as they frequently drop valuable rupees that they unwittingly ingested. Head down below with Princess Zelda behind you for even more challenges.
Basement[edit]
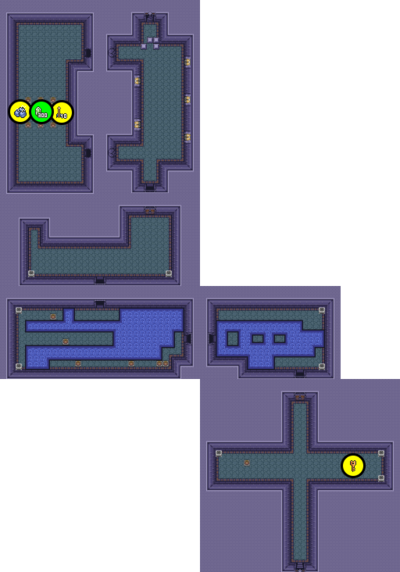
You start in the basement at the bottom of the map. If you make your way to the center of the first room, you can light the torches to see the Keese bats that flap around the room, and the snakes that slither across the floor. Keese are a little less direct than snakes, but no less dangerous. They will flap around randomly. Remove both threats as quickly as you are able, and be sure to grab the key from the chest on the right in order to escape the room through the north.
You will end up in a watery room filled with rats. All but one occupies the stretch of floor along the north wall. The remaining rat sits alone on an "island". They can't cross the water, so you can safely attack them from a distance with your Boomerang. One hit from the Boomerang will destroy them, and they are likely to leave Rupees behind. The door to the west is your only choice.
The next room is large and expansive, but doesn't contain much of interest to you. There are many Rats running about, but they are isolated enough that they won't pose a threat to you. There are two Keese guarding the exit to the north, and they can take you by surprise in the darkness, so light a torch if you are concerned about your health. Some of the pots in the room also contain hearts.
It is important to be thorough in the room to the north. One of the rats (it starts out on the left side of the room) has swallowed a ![]() Small Key. You must kill the rat to claim the key, which is necessary to open the door on the right side of the room. You may have to deal with the remaining rats and the two Keese before you make your way out of the room.
Small Key. You must kill the rat to claim the key, which is necessary to open the door on the right side of the room. You may have to deal with the remaining rats and the two Keese before you make your way out of the room.
You're almost out of the sewers, just one more room to go. The next room is large and it has a bit of a rodent problem. In addition to all of the rats, there are two Keese bats as well. If you examine the two alcoves along the left wall, you will notice cracks in the wall. These cracks indicate that a bomb can be used to blow a hole in the wall. In this room, the cracks are surrounded by a circle, which indicates that you can break the wall by dashing into it with the Pegasus Boots (which you will get after the Eastern Palace quest) as well as with a bomb. On the other side, you will find a few useful treasures (including more bombs), but nothing vital. You can return once you have bombs or Pegasus Boots to claim them. In the meantime, you still need to escape from the sewers. You will notice a set of blocks in front of the northern exit. You will need to move one of the blocks to create a path to the door. The center block moves easily. Push it north, and make your escape.
As you escape the darkness of the sewers, you will find that the Sanctuary shares the same rodent infestation. Take the time to remove any rats that get close to you, and approach the door to the south.
The last room before the Sanctuary presents a puzzle. There are two switches on the wall. One opens the door to the Sanctuary, while the other... brings disaster. In order to continue through the door, you must decide which switch is safe. If you pull the left-hand switch, seven snakes will rain from the ceiling. They aren't too much of a problem, but if you're low on health, you'd probably prefer not to deal with them at this time. Instead, pull the right switch and open the door to your destination.
Sanctuary[edit]
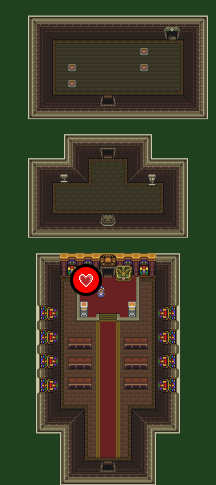
The Sage is relieved to see Princess Zelda safe from harm. He had hoped that someone wise and courageous would be able to challenge Agahnim and learn the fate of the other missing girls. He thinks he may have found that someone in you. He will mark a place on your map where he wants you to proceed in order to speak with one who might know where to turn next. The location that he marks on your map is in Kakariko Village, and he tells you to find Sahasrahla, the village elder. He informs you that he will keep Zelda safe from harm in the protection of the Sanctuary. Before you leave, the Sage offers you the contents in the ornate chest near the altar. Open it to discover a ![]() Heart Container, which adds one heart to your life stock.
Heart Container, which adds one heart to your life stock.
Exit the Sanctuary and prepare to journey westward, to Kakariko Village. Before we arrive, we will take a short detour on the way through The Lost Woods.

