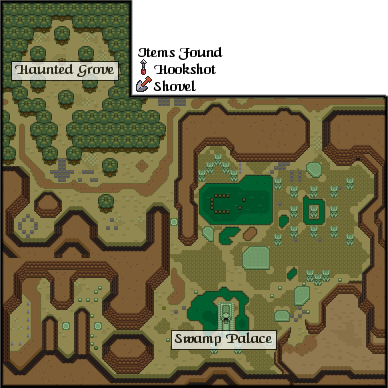
Many areas near the Swamp Palace are closely tied to areas in the Light World. By warping from the Dark World while standing within the stake boundaries in the southwest or in the circle of bushes south of the Haunted Grove, adventurers can explore high elevations in the Light World.
Points of interest

The Plains of Ruin and the marshes surrounding the Swamp Palace are populated with several kinds of evil creatures. Adventurers report sightings of bomb-flinging Zirros, Rupee-snatching Pikits and other swamp-dwellers. They are mean spirited but weak. Most explorers can defend themselves with a standard sword and shield.
Haunted Grove
The legendary Flute Boy of the Haunted Grove often played music near his Light World home. The Flute Boy is said to have been able to communicate with animals by using his Flute. He could even call a feathered friend and hitch a ride to anywhere in the land. When the Golden Power of the Triforce attracted the Flute Boy to the Dark World, though, Ganon transformed him into an animal so that he could never play the Flute again. Upon telling his story to you, the Flute Boy gives you a ![]() Shovel so that you can find and use the Flute Boy's buried Flute.
Shovel so that you can find and use the Flute Boy's buried Flute.
The Flute and the Duck
In the Haunted Grove of the Dark World, you meet a creature who gives you a shovel and tells you how the boy had been placed under a spell. The Flute, says the monster, must be found if the spell is to be broken. You must dig around the Light World's Haunted Grove in order to find the ![]() Flute. (It can be found in the upper-left corner of the Grove). Once you collect it, head to Kakariko Village and visit the weathercock near the center of time. Use the Flute, and the once lost per duck will return to life. The Duck, when summoned by the Flute can carry Link to one of eight sites around the Light World. Each site is numbered on your Overworld Map. The area near the desert can only be reach by Duck-transport, and the other areas become more easily accessible.
Flute. (It can be found in the upper-left corner of the Grove). Once you collect it, head to Kakariko Village and visit the weathercock near the center of time. Use the Flute, and the once lost per duck will return to life. The Duck, when summoned by the Flute can carry Link to one of eight sites around the Light World. Each site is numbered on your Overworld Map. The area near the desert can only be reach by Duck-transport, and the other areas become more easily accessible.
The truth about Bombos
The spell of Bombos has no special purpose in Link's quest such as opening a dungeon, but it is useful in battle. Obtaining the spell, however, isn't easy. You must warp from a patch of ground at the east end of the Dark World canyon using the Magic Mirror. In the Light World, that patch of ground is on top of a cliff. Once on top of the cliff, you can reach the Mudoran monolith that holds the spell.
The warp for life
South of the Haunted Grove in the Dark World, you will find a circle of bushes. If you stand in the center of them and use the Magic Mirror to warp back to the Light World, you will find yourself high on a ledge that was previously unreachable. There is a cave perched on the ledge that you can now enter. Inside, you will find a ![]() Piece of Heart.
Piece of Heart.
The Swamp Palace
When explorers enter the Swamp Palace, they are unable to cross the empty indoor canal because of its steep, shear sides. The key to getting to the other side is understanding the connection between the Light and Dark Worlds. Standing just outside of the place, you can warp to the Light World Watergate and pull the switch inside, allowing the water to flow. Then return to the Swamp Palace in the Dark World and swim across the water-filled canal.
Part 1

- 1A
- Provided that you've pulled the switch inside the Watergate, you should be able to swim across the canal to the cropped ladder on the left that would be otherwise unreachable since it doesn't drop all the way down to the floor. The buoyancy of the water will help you climb up and out of the water. On the other side, you'll enter a shallow pond with water-skating bugs known as Hobas. They are easy to defeat, but they dart quickly across the surface of the water. A chest in the water contains a
 Small Key with which you can open the door at the far end and descend down the steps to room 1B.
 - 1B
- Most of this room is water logged except for an island and two alcoves. Exploring the island is especially important since a
 Small Key is hidden underneath the very bottom skull. Be sure to collect it. More Hobas float around the water, as well as a type of bubble enemy known as Kyamerons. They bounce around the water at a fast pace, but can be stopped with one swing of the sword. Notice that the wall at the end of the top alcove looks damaged. If you drop a bomb there, you can break a hole in the wall and proceed to the right side of room 1C in order to collect the map. Then return to room 1B and unlock the door in the bottom alcove and enter room 1D
 - 1C
- If you entered this room from room 1B, you can collect the map. You must pass two red gelatinous Zols. Open the chest to received the
 Map. If you entered the room through the bottom level of room 1D, all you need to do is run up to the skull and collect a
  Small Key and return to 1D. Then you will come back through the unlocked door at the top. You must deal with two Stalfos before utilizing your hammer to knock down the bobbing pegs into the floor. Once you create a pathway to the lever, stand to the right of it, and push it left. The lever should move and water will flow into the canal in the center of the room, and flow into 1D as well. You can bomb the left side of the wall of this room to enter the upper-right corner of room 1E, but all you will find are Rupees and Bombs.
 - 1D
- When you enter the room, there will be a few enemies assembled, including a red Stalfos, a red Ball, a blue Ball, and fire chain known as a Winder. You can't defeat the Winder, nor can you defeat the fallball shooting trap in the center of the floor. Climb down the into the canal and enter room 1C through the open door to collect a key. Return back here, and climb up the ladder on the opposite side to unlock the door and enter the high part of room 1C where you will be able to throw the level which allows water to flow through the canal. Once you have the water flowing, return here and jump in the water. You will noe be able to reach the cropped ladder on the left side leading to the exit on the left. Pass through to reach room 1E.
- 1E
- This pivotal room not only leads to every other section of the Swamp Palace, it also contains the large treasure chest. Since you are not equipped with the large key when you first arrive, you'll have to hunt it down before you can reveal its contents. To get around, you'll have to explore the lower canal. In addition to groups of Hobas and Kyamerons, there is a diving water monster called Pelogoose that drops out pipes in the walls and swims in a straight direction through the water. You'll want to pass through the bottom door first to room 1F in order to collect the compass. When you return, pass through the door on the lower left to room 1H. When you collect a key, you'll need to return here and enter through the locked door in the upper left to room 1L.
- 1F & 1G
- There is a Kyameron and a stream of Pelogoose. Going left won't get you very far, so head right, and pass through the door to room 1G. It is a vertical mirror image of the previous room except you can continue all the way around to the left door, through which you can reenter 1F. Now that you're on the left side, you can finally reach that treasure chest. Open it to obtain the
 Compass. Now you can push the lower block to the right and exit through the top door back to room 1E.
Part 2

