
After claiming the Gift of Time, you'll be warped out of the dungeon once more, and be contacted by the Maku Tree. The Gift of Time has restored more of his strength, and he has dreamt of Spool Swamp. Something strange is happening there, but exactly what could it be...?
Before the next quest[edit]
After the second dungeon, you can access the Hall of Secrets under the Maku Tree.

In the northeast part of the Woods of Winter resides Holly, but only during winter. After clearing the 2nd dungeon, Holly will have a guest. The girl in blue will ask you to tell a secret to the twin girls in Labrynna. Switch back to Oracle of Ages, go to Symmetry City, travel back in time and talk to any of the twins in the central building. They will give you a
If Link owned a L-1 ring box in one game, the secret upgrades it to L-2; a later upgrade in the same game will turn it into a L-3 box. If Link owned a L-2 ring box already (i.e. through the non-secret upgrade), the secret upgrades it to L-3.
With Snake's Remains completed, you now have the Power Bracelet. With it, you'll be able to pick up the heavy rocks and Stone Mushrooms in Holodrum you'll find.
Woods of Winter[edit]

Remember the Heart Piece that was blocked off in the Woods of Winter? Make the season winter and re-enter the woods. This time, you can lift the rock out of the way with the Power Bracelet and get your next ![]() Piece of Heart.
Piece of Heart.
With this Heart Piece, you're now ready to return to Horon Village.
Horon Village[edit]

Next to the fountain in Horon village there is a lady in red. She will ask you to tell a secret to the forest fairies in Labrynna. Switch back to Oracle of Ages, go to the Fairy Forest and talk to the fairy in the north-west corner. She will give you an extra
If you pay a visit to the Maku Tree, you'll notice he's grown a little bit from the essences you've recovered. Not just that, but an entrance has appeared. If you go inside, you'll meet Farore, Oracle of Secrets. She is able to decode secrets, allowing you to obtain new powers. Her Book of Secrets will list the ones you've learned, and the ones you have yet to find.

In the southwestern corner of Horon Village there is a chest. Exit and re-enter the village until it is autumn. Then, go to the chest, pick the mushrooms and claim 20 Rupees.
North Horon[edit]
You can catch up on your trade quest. Head north of Horon Village to the path to Gnarled Root Dungeon. However, you'll want to go east before heading further north. The path will take you to Talon and Malon's house.
Malon is a bit preoccupied caring for the Cuccos while her dad is away at Mt. Cucco. She's having a lot of trouble figuring out what to do. Fortunately, your Cuccodex (obtained in Horon village) is full of all the information she needs. She gives you a ![]() Lon Lon Egg in return. Wait a minute: didn't Maple mention she needed a Lon Lon Egg?
Lon Lon Egg in return. Wait a minute: didn't Maple mention she needed a Lon Lon Egg?
Now, you'll need to make Maple appear. Defeat the required number of enemies (30 or 15 if you equip Maple's ring) and go to a place where she'll appear. When you bump into her, she'll want your Lon Lon Egg. If you give it to her, she'll give you a ![]() Ghastly Doll, which is very frightening to some people.
Ghastly Doll, which is very frightening to some people.
Now, it's time to head into Holodrum Plain and explore.
HOLODRUM: Spool Swamp[edit]
In a linked game Princess Zelda will come to Holodrum, but she will be attacked by the Great Moblin's henchmen on the way to Holodrum Plains. Link has to protect Zelda and defeat the Moblins. The Princess will reward Link with the
Holodrum plain[edit]
Head north just a little ways until the path branches off to the west. From there, just follow the path. When it leads to a second path that branches north, go there.
- Ricky, the boxing kangaroo
You'll find a kangaroo is up here. His name is Ricky, but he's upset about losing his gloves in a boxing match to a guy named Blaino, his rival.
Blaino doesn't live that far away. Go back east and take the path north. However, you'll run into a new type of Mystical Seed first.
- The scent seed tree
This particular Mystical Tree holds ![]() Scent Seeds, seeds that attract monsters when cracked open. They have no real purpose now, but these seeds could be useful ammo for a weapon someday.
Scent Seeds, seeds that attract monsters when cracked open. They have no real purpose now, but these seeds could be useful ammo for a weapon someday.
Go one screen east, then one screen south from here and you'll find Blaino's Gym. Be careful, because a Spiny Beetle dwells nearby.
- Blaino's gym
Inside the gym is Blaino, a legendary boxer. He's willing to face you in a boxing match if you bet 10 Rupees. It's a boxing match where you face off against Blaino until somebody gets knocked out of the ring. However, Blaino wants a fair match and doesn't want you cheating with any items or rings. Make sure you don't break his rules or he'll charge 20 Rupees for the next match.
When you face off against Blaino, he will try smack you with his gloves as many times as possible. The key to defeating him is to punch fast and furiously. Namely, jam the ![]() button!
button!
If you push Blaino back far enough with your punches, he'll be knocked out of the ring. He'll crown you the new champ and reward you with ![]() Ricky's Gloves. Ricky will be happy to get these back!
Ricky's Gloves. Ricky will be happy to get these back!
- Ricky's flute
After you return to Ricky his gloves, he'll see that you must be strong and wishes to help you. He gives you ![]() Ricky's Flute, which you can use to call him whenever.
Ricky's Flute, which you can use to call him whenever.
However, if you don't want Ricky as your companion, buy a Strange Flute from Horon Shop (if you want Moosh) or win one at the Subrosian Dance Hall (if you want Dimitri).
Now that Ricky has his gloves back, he's willing to take you to his backyard, Spool Swamp, allowing you to hop in his pouch. You'll now be able to control Ricky, and get a few special powers from the kangaroo.
Ricky then tells you how to control him. You can move him with ![]() just as you would with Link. Press
just as you would with Link. Press ![]() to punch or save power. Doing this will allow Ricky to shoot a tornado. He can also jump small gaps. Press
to punch or save power. Doing this will allow Ricky to shoot a tornado. He can also jump small gaps. Press ![]() to dismount him.
to dismount him.
- Secret sage
Before you head off to Spool Swamp, there is a sage you can reach if you have Ricky's Flute. Call him after going back across the bridge and narrow pass and down one screen, or he won't come. You can take Ricky up to a jumpable ledge, but beware the River Zora. Dismount and use an Ember Seed on the right tree to find a sage who'll give you a super payday: 200 Rupees!
- To Spool Swamp!
The path to Spool Swamp begins south of where you met Ricky, but it's blocked holes. Fortunately, Ricky can jump right over them.
Head further south and you'll run into Blue Octoroks and Buzz Blobs. Ricky can take these out with a single punch. There are a few small trees close by, but one only hides a sage who'll take your money to fix his door: 100 Rupees worth!
- The iron pot
Go west, and you'll find Mrs. Ruul's House. Mrs. Ruul, wife of Mayor Ruul has a problem she needs help with. It's too hot, and she needs something to cool down with. One glance at the Ghastly Doll gives her shivers. As a reward for helping her, she exchanges the doll with an ![]() Iron Pot.
Iron Pot.
Spool swamp[edit]

After Link opens the flood gate in Spool Swamp, visit the gatekeeper again. His wife will ask you to tell a secret to the their daughter Mamamu in Labrynna. Switch back to Oracle of Ages, go to Lynna City and talk to Mamamu Yan. She will thank you for the message, but then she will ask you to find her dog, who got lost in town. When you find the dog, grab it with the power glove. As a reward, Mamamu Yan will give you the
If Link didn't have any strange flute yet, Ricky will give him Ricky's flute. As soon as Ricky leaves, the entrance to the swamp is to the west. A tree gives Pegasus seeds in autumn.
The Pegasus seeds are essential to get a ![]() Piece of Heart from Maple.
Piece of Heart from Maple.
Follow the only path to the gatekeeper's house. Inside, operate the switch and get the floodgate key. The gatekeeper tells you that the corresponding keyhole is beyond the tunnel outside his home. It actually leads to the other side of the basin. A Deku Scrub offers a shield for 50 Rupees: it is a bad deal as a shield can be purchased in Horon City for 30 Rupees. Open the floodgate, then go a bit north and jump in the emptied basin.
If Link won the Strange Flute at the Subrosian Dance Contest, he'll meet Dimitri the Dodongo in the swamp and receive Dimitri's flute. If he purchased a strange flute in Horon village, he'll meet Moosh the winged bear and receive Moosh's flute. If Link owns Ricky's flute, he has to summon him in order to proceed. A Subrosian gate is found at the end of the path, to the south-west.
(Optional: if Link turns the season to winter, he can access a small cave in the south-east corner of Spool Swamp. There, he can obtain an item required in chapter 6.)
Subrosian seaside[edit]
The gate in the swamp leads to an area of Subrosia dominated by two features: the market and the seaside. On the shore you can meet Rosa, the Subrosian star, again; she lost her ribbon. The market sells a new one, as well as some useful items: a Heart piece, a bomb bag upgrade and a cheap wooden shield. Go to the beach and dig with the shovel until you collect 70 ore chunks and a star-shaped ore. Now you can head back to the market and buy everything you need.
| List of wares in Subrosia market | |||
|---|---|---|---|
| Tile | 1st item | 2nd item | Final item |
| 1 | Ribbon (trade for star-shaped ore) | Gasha seed (trade for 100 ore chunks plus 20 scent seeds) | |
| 2 | 4 Ember seeds (trade for 5 ore chunks) | ||
| 3 | - | 10 Pegasus seeds (trade for 25 ore chunks) | |
| 4 | - | - | 3 Hearts (trade for 10 ore chunks) |
| 5 | Member's card (trade for 5 ore chunks) | - | 10 Ore chunks (trade for 20 gale seeds) |
- Shopping suggestions:
- The ribbon is necessary to progress in the game.
- The Wooden shield is far more cheap here than anywhere else in the game.
- The four magic rings belong to the rarity tiers 1-2
- The Member's card allows to access the back shop in Horon Village; it will become available later, after you obtained five Essences of Nature.
Bring the ribbon to Rosa, and she'll invite Link to explore the Temple of Seasons with her. The key she carries can open any door.
Tower of Summer[edit]

From the Subrosian seaside, travel all the way north. Open the doors with Rosa's key, then proceed east to the temple. The north-west tower has another locked door that now can be opened. Open a path using the power bracelet, climb to the top and obtain the Power of Summer.
You can now head back to the magic gate and to Spool Swamp. Travel all the way north with the help of either Ricky, Dimitri or Moosh. Get on the stump and change the season to summer. Before entering the dungeon, Link can go back towards the entrance of the swamp. Climb the summer vines, dig near the signpost and get a magic ring (random, from tiers 1-2).
Now Link can enter the dungeon, just one screen north from the stump.
DUNGEON: Poison Moth's Lair[edit]


Poison Moth's Lair is a very uninviting dungeon, filled with a melee of traps and many narrow corridors. You won't want to let your guard down, even for a second.
The ![]() Quicksand ring (n.36) will be very useful in this dungeon. If that ring is in your collection, visit Vasu the jeweler before you enter Poison Moth's Lair.
Quicksand ring (n.36) will be very useful in this dungeon. If that ring is in your collection, visit Vasu the jeweler before you enter Poison Moth's Lair.
The moth-like carving outside the dungeon foretells the worst danger dwelling here: keep that in mind.
Map[edit]

As you head into the dungeon, you'll face monsters right away. Three Spiked Beetles roam the first room. You can consult an owl statue for hints if you explore the area to the west before going on. When they charge at you, make contact with your shield, and they'll flip over. Upside down, they can easily be slain. When they're all gone, the door here will open.
The next room has a Mini-Moldorm patrolling the floor.
To your left is a big pit. A platform is passing across it, but it never comes to you, so you can't reach it yet. You'll need to come back later. For now, continue around the corner.
Some more Spiked Beetles await. You'll also see a blue trampoline across the room: it holds no purpose right now.
Along the way, there is a second platform that doesn't come all the way over, so it's out of reach.


At the end of the path, you'll be attacked by Floormasters. Defeat them, and smash through the first few pots here. You'll see a switch that opens the door, but only when held down. Go around the switch to the lower-right corner of the room to find two pots. Smash the one on the right and carefully push the one on the left down until you get it placed on the switch. You won't need the Power Bracelet to push it.
The following room contains Arm-Mimics, which will imitate your movements. A few sword slashes will defeat them, but they can be hard to corner. An Anti-Fairy is also present: strike it with the boomerang to defeat it; this is the only effective weapon on an Anti-Fairy.
With all the enemies gone, you have a clear path to the staircase, but you'll need a key first. Go west to find it.

You'll see another path branches off to the south. If you try heading further west, you'll press a switch that causes all the brown-paneled floor to crumble.


The room at the end of the southern path has a few rollers you can push out of the way, but a few cracks in the floor. Carefully head forward until you reach the chest in here. Open it for a ![]() Small Key. You can get out through a shortcut if you push a small block up. It's located at the end of the path past the chest. Now, go back and climb the staircase.
Small Key. You can get out through a shortcut if you push a small block up. It's located at the end of the path past the chest. Now, go back and climb the staircase.

Two Pols Voices are here. You can use bombs, but they have a secret weakness: if you play a flute, the loud music will overwhelm them. Pols Voices despise anything loud and will flee when something noisy bugs them. Why? Their ears are just too big! With the Pols Voices gone, push the block in the upper-right corner to go north.
Defeat the two Mini-Moldorms, and a chest will appear. It has ten bombs inside, which hints on what to do next.
There is a small area marked on the floor, hinting to a hidden room. Bomb the spot in the marked area to uncover the entrance to the room. Inside, you'll find the ![]() Dungeon Map.
Dungeon Map.
 |
 |
 |
Roc's Feather[edit]
After you get the Dungeon Map, go back the way you came. Now, push the block right next to the one you pushed before down. Then, go over to the third block up from the lower-left corner and push it left, then push the one below it down to go west.
As you venture down the hall, you'll find two sets of six statues. One set is aligned perfectly, but the other one isn't. In order to proceed, you must put the statues in the right order.
There are four steps to putting them in the proper order:
-
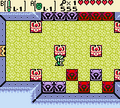
Step 1: Push every statue down except the two out of place.
-
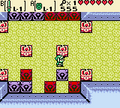
Step 2: Push the red statue 1 space to the left.
-
Step 3: Push the purple statue to its proper place.
-
Step 4: Push the red statue to its proper place.


With the statues realigned, the door will open.
The next few rooms are heavily guarded by enemies: Peahats, Mini-Moldorms, Anti-Fairies, and Green Zols all block your way forward. Fight your way through them, and when you get to the Anti-Fairies, go straight north: the path to the left is a dead end.

The last line of defense is a pair of Hardhat Beetles and Green Zols. They guard a narrow walkway to a locked door. Carefully make your way past without falling, or else you'll end up tumbling down one floor into a room full of enemies and you'll have to climb back up. However, there is a chest with 30 Rupees as well. You can get it now, but you'll get a better chance later.


When you open the locked door, you'll find four Arm-Mimics and a green Blade Trap circling around the room. Unlike most traps, this one won't stop moving. There is also a moving floor that can make defeating the Arm-Mimics a pain. Even if you don't move, the floor can move the Arm-Mimics. Try to bunch them up and carefully defeat them.
When you've defeated them all, you'll be rewarded with a chest. Inside is the ![]() Roc's Feather (L-1). This feather makes you lighter, and allows you to jump one tile at will. Now, you can jump over gaps, deep water, and even enemy attacks. You can also jump without moving, and hop over any traps or monsters in your way.
Roc's Feather (L-1). This feather makes you lighter, and allows you to jump one tile at will. Now, you can jump over gaps, deep water, and even enemy attacks. You can also jump without moving, and hop over any traps or monsters in your way.
Compass[edit]

Before you move on, you can make an optional detour: there is a platform to your left that is now in reach. It leads to a pit that provides a shortcut to the Compass; then, Link will navigate this section backwards, until the location shown below.


Now that Roc's Feather is in your arsenal, go back to the last room. Either head down or fall into the lower floor below.
Now, you can simply jump over the water to claim the 30 Rupees if you haven't already. Go east, and you'll come across the platform that was previously out of reach. With good timing, you can jump onto it, and then jump over to the other side. From here, take the path you used before to the second platform that never came over. Jump onto it when it get close enough, and it will take to the entrance to the basement.


When you enter the basement, you'll be near a Spiked Thwomp. However, you don't want to go all the way down. Jump from the ladder onto the Spiked Thwomp's flat top, and when he comes back up, jump across the two platforms onto the second Thwomp, and jump over to the next room from there.
You'll be swarmed by Keese here. Jump across the moving platforms to reach a ladder headed upstairs. The gap between the second platform and the ladder is larger than one tile, but a good jump from above can land you by the ladder if you hold ![]() .
.


You'll find a blue trampoline is inside this room. There is also a strange-colored tile over by the staircase you came up. Perhaps it marks where the trampoline should go? Push it over onto the tile and jump on it. You'll be launched up a floor, and land into a room with a chest. You have a clear path to another ![]() Small Key.
Small Key.
Now, fall back down to the room below and use the staircase on the other side.


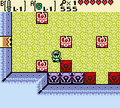
You'll find yourself running into some more rollers, but in exchange for cracked floor tiles, you must now navigate across spikes. This is the first time you will need to use a item combination to move on.
Equip both the Power Bracelet and Roc's Feather, and push the rollers out of your way. Then, jump across the spikes that block your path forward.
After you've completed that puzzle, you'll come to a place where a chest resides, but it can't be reached from the right side of the room. There is only one way to get it: fall down into the room below.
Here, you'll be able to get a helpful hint from an owl statue. Use the trampoline to jump up to the left side of the room and claim the ![]() Compass.
Compass.
Sub-boss: Calamareye trio[edit]


After getting the Compass, drop back down to the lower room and take the staircase down to the basement.
This room will take you back to the one with 30 Rupee chest. You can jump across from above (the tricky way), or ride the platforms down below and jump when they get near a ledge (the easy way). Either path leads to the staircase back. Taking the high road requires a lot of jumping, and fighting off Keese, while the low road requires only three jumps and has fewer Keese.
After you return, it's only a matter of backtracking to the brown-paneled floor.
When you reach it, simply jump over the trap switch and the floor will stay intact. You have a clear shot forward to a locked door, but you can make a quick detour for a Gasha Seed.


There is a small path right by the door you can take. It has a moving floor, which can impede your movement, and a green Spike Trap waiting to skewer you. However, a simple well-timed jump over it will be enough to dodge it. You'll find an owl statue to consult on the path, and at the end, a chest with a ![]() Gasha Seed inside.
Gasha Seed inside.
Now, get your health filled up with the pots outside the locked door: on the other side is the miniboss.
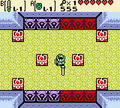
The minibosses are Calamareye, a trio of sharp-tempered squids. They attack anyone who enters their lair. The Calamareye will open their mouths to spit fire each time they emerge from one of eight pools of shallow water. When you try to attack them, they'll dive for cover, and they can't be harmed in the water. However, what about on land?
 |
 |
 |
Equip your Power Bracelet and wait for one of the Calamareye to emerge. Yank it out of the water, and toss it over to dry land. Unable to breathe on land, it will flop around, vulnerable to sword strikes. However, it will soon make a mad dash back to the water, so get as many hits in as you can. Do this to all three and they'll surrender.
After the battle ends, a panel will open in the lower-right corner of the room, revealing a staircase.
Boss key[edit]


The staircase will take you to a long path that winds around over the room where the Peahats lurk. There are two ledges you can jump across. Simply go up to the ledge and you'll jump automatically. It will take you to a hole that leads into a lower room.


Here, a Giant Blade Trap is circling the room. If you wish to avoid it, push the block in the upper corner or the third block from the top. The chest with the Boss Key is blocked off, but the fourth block from the top can be pushed into the pit.
Use Roc's Feather to jump over the gap and retrieve the ![]() Boss Key.
Boss Key.
Path to the boss[edit]


Now, go down to the lower end of the blocks and push the one at the bottom to get back to the first room. Head straight down and use the warp point. Go back up the staircase and jump across the first ledge on the path. Just ignore the Peahats, and head east to reach the boss.
BOSS: Mothula[edit]
The greatest threat here now awaits you: Mothula. Mothula is the boss of the dungeon, which lives up to its name. Mothula is a rather tricky boss, because it has far more different skills than the bosses before it.
 |
 |
 |
 |

Mothula circles around the room, shooting fireballs at you as it flies. It may also spawn baby Mothulas to protect itself. They can be destroyed quickly, but they can also get in the way.
If Mothula flashes blue, it will spawn four spinning fireballs around itself. The fireballs will expand out, making it tough to land an attack on the monster.
If Mothula flashes red, it will release four baby Mothula as a way of preventing you from landing an attack. It can also summon them at anytime at will.
Fortunately, Mothula's powers aren't easy to call on. It takes a lot of energy for the creature to use them. After a while, Mothula will get tired and settle on one of the two platforms in the middle of the room, vulnerable to attack.
Use Roc's Feather to jump across the two platforms and dodge Mothula's attacks. Mothula is easier to defeat from the platforms, but you can still hit it as he circles around. You risk losing health by attacking Mothula head-on or falling down the pit by attacking from the platforms.

If you fall through the gap in the floor, you can use the trampoline to jump back up. However, Mothula will fully recover its energy and the battle will restart.
As Mothula gets near its defeat, it will start spawning greater numbers of baby Mothula and summon a larger shield of six spinning fireballs.

If you are able to best the poison-fanged Mothula, it will perish, unable to recover. In its place will be another ![]() Heart Container.
Heart Container.
A panel will have opened in the room to reveal a staircase. The path to the third essence has been opened. You'll find the ![]() Bright Sun awaits. Young shoots grow quickly under the warm rays of the Bright Sun!
Bright Sun awaits. Young shoots grow quickly under the warm rays of the Bright Sun!