No edit summary |
m (rm {{~}}) |
||
| (One intermediate revision by one other user not shown) | |||
| Line 1: | Line 1: | ||
{{Header Nav|game=Mega Man 2}} | {{Header Nav|game=Mega Man 2}} | ||
[[File:Mega Man 2 Dr Wily logo.png|right]] | |||
Moving onto the third battle, this stage will incorporate some of the underwater features you dealt with in [[../Bubble Man/]]'s stage. It also introduces a new enemy exclusive to the Dr. Wily stages: gigantic metal piranhas that leap out of the water to bite you, as if the mines weren't bad enough. This is a relatively short stage, and you need to make some careful decisions in the beginning about weapon usage and energy replenishment. | |||
In the first | == Stage == | ||
[[File:Mega Man 2 map Wily Stage 3A.png|left]] | |||
<br/><br/><br/><br/><br/><br/> | |||
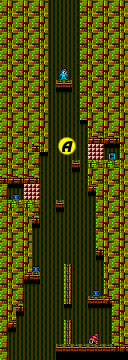
* '''A''': From the start, drop off the right side of the platform to maximize your opportunities. In the screen below, you'll find an E-Tank and a weapon energy capsule packed away behind a pair of crash walls. If you have four E-Tanks, ignore this screen completely and fall down. If you want the E-Tank, it's possible to blast through the pair of walls with a single Crash Bomb, as long as you stand so close to the wall that you deposit the bomb ''inside'' the first wall. The resulting explosion should be big enough to remove the second wall as well. In the screen below, recharge the two weapons or items that need the energy most, and then drop down. | |||
{{-}} | |||
[[File:Mega Man 2 map Wily Stage 3B.png|right]] | |||
{{-}} | |||
[[File:Mega Man 2 map Wily Stage 3C.png|right]] | |||
* '''B''': Guide Mega Man carefully through the water to this first platform. Then prepare to leap through the water from one narrow column to the next, avoiding all of the mines in between. When you reach open spaces between the mines, the threat isn't whether you might fall through the gap. These gaps are actually access ways for the two giant metal piranhas known simply as Big Fish. When you approach the gaps, they leap up from below in an effort to bite you. Let them rise and jump over them when they are falling back down to the bottom. | |||
* '''C''': From here, you must begin to plunge deep into the water. The entire length of the walls on either side of you will be covered in mines. What's more, the walls are not straight. They curve slightly to the left for a while before they open back up. Stay towards the middle of the path as you fall. You're safe when the path begins to widen again. | |||
* '''D''': After you land on the platform, carefully drop down to the levels below, favoring the right side of things. Continue to favor the right side as you drop down to the screen below. | |||
{{-}} | |||
[[File:Mega Man 2 map Wily Stage 3D.png|left]] | |||
{{-}} | |||
* '''E''': The last threat that you will encounter before reaching the boss is a series of three Shotmen. Stand back at a distance (if possible) for a while and wait for them to aim their guns high into the air, and then shoot them and remove them from your path. | |||
== Guts-Dozer == | |||
[[File:Mega Man 2 boss Wily Stage 3.png|thumb|left]][[File:Mega Man 2 battle Wily Stage 3.png|right]] | |||
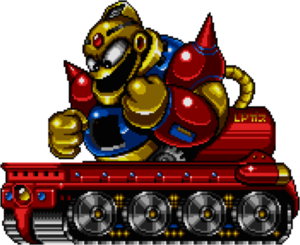
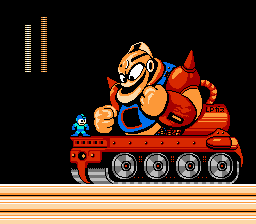
Dr. Wily appears to have drawn heavy inspiration from [[Mega Man/Guts Man|Guts Man]] of the [[Mega Man|original game]] when he designed the boss for the third leg of his fortress. The Guts-Dozer (or Guts Tank as it is also known) rolls onto the screen from the right side. Once it fully appears, it rolls back and forth, attempting to catch Mega Man under its treads. He fires a projectile from his mouth which travels up and down in an arc. He will also occasionally lift his arm, and a Metall will pop out of his chest and fly off to the left. The only spot on his body vulnerable to attack is his head, which is rather high off the ground. Fortunately for Mega Man, the deck in front of his chest is actually available for standing on and launching your attack. Although no weapons are particularly strong against Guts-Dozer, the one weapon that is most effective is the Quick Boomerang. Climb onto the deck in front of him, jump into the air and fire as many boomerangs at his head as you can. If you get knocked off, simply hop back up to resume your attack. Once you defeat him, you'll advance to the next leg of the fortress. | |||
{{Footer Nav|game=Mega Man 2|prevpage=Wily Fortress 2|nextpage=Wily Fortress 4}} | {{Footer Nav|game=Mega Man 2|prevpage=Wily Fortress 2|nextpage=Wily Fortress 4}} | ||
Latest revision as of 05:50, 13 January 2022

Moving onto the third battle, this stage will incorporate some of the underwater features you dealt with in Bubble Man's stage. It also introduces a new enemy exclusive to the Dr. Wily stages: gigantic metal piranhas that leap out of the water to bite you, as if the mines weren't bad enough. This is a relatively short stage, and you need to make some careful decisions in the beginning about weapon usage and energy replenishment.
Stage[edit]

- A: From the start, drop off the right side of the platform to maximize your opportunities. In the screen below, you'll find an E-Tank and a weapon energy capsule packed away behind a pair of crash walls. If you have four E-Tanks, ignore this screen completely and fall down. If you want the E-Tank, it's possible to blast through the pair of walls with a single Crash Bomb, as long as you stand so close to the wall that you deposit the bomb inside the first wall. The resulting explosion should be big enough to remove the second wall as well. In the screen below, recharge the two weapons or items that need the energy most, and then drop down.


- B: Guide Mega Man carefully through the water to this first platform. Then prepare to leap through the water from one narrow column to the next, avoiding all of the mines in between. When you reach open spaces between the mines, the threat isn't whether you might fall through the gap. These gaps are actually access ways for the two giant metal piranhas known simply as Big Fish. When you approach the gaps, they leap up from below in an effort to bite you. Let them rise and jump over them when they are falling back down to the bottom.
- C: From here, you must begin to plunge deep into the water. The entire length of the walls on either side of you will be covered in mines. What's more, the walls are not straight. They curve slightly to the left for a while before they open back up. Stay towards the middle of the path as you fall. You're safe when the path begins to widen again.
- D: After you land on the platform, carefully drop down to the levels below, favoring the right side of things. Continue to favor the right side as you drop down to the screen below.

- E: The last threat that you will encounter before reaching the boss is a series of three Shotmen. Stand back at a distance (if possible) for a while and wait for them to aim their guns high into the air, and then shoot them and remove them from your path.
Guts-Dozer[edit]


Dr. Wily appears to have drawn heavy inspiration from Guts Man of the original game when he designed the boss for the third leg of his fortress. The Guts-Dozer (or Guts Tank as it is also known) rolls onto the screen from the right side. Once it fully appears, it rolls back and forth, attempting to catch Mega Man under its treads. He fires a projectile from his mouth which travels up and down in an arc. He will also occasionally lift his arm, and a Metall will pop out of his chest and fly off to the left. The only spot on his body vulnerable to attack is his head, which is rather high off the ground. Fortunately for Mega Man, the deck in front of his chest is actually available for standing on and launching your attack. Although no weapons are particularly strong against Guts-Dozer, the one weapon that is most effective is the Quick Boomerang. Climb onto the deck in front of him, jump into the air and fire as many boomerangs at his head as you can. If you get knocked off, simply hop back up to resume your attack. Once you defeat him, you'll advance to the next leg of the fortress.