| Map Name | Initial Coordinates |
|---|---|
| jail2 | (0 -1523 116) : -90° (facing east) |
Level objective
The objective for this level is to locate the Red Key Card in the Security Complex.
Beware of numerous Strogg Medics in this level, as they go around reviving dead enemies. You don't know where they'll show up, so it may be best to go a little slower and pulverize the corpses of Strogg enemies with your Blaster before moving on, so the Medics have nothing on which to work. It's particularly troublesome when they revive a tough opponent that cost you a Quad Damage, an Invulnerability or significant armor and ammo to take down.
Strategy
Walkthough
The elevator from the Main Gate deposits you in a room with electronic equipment of some sort stacked against the wall. Passageways on both the right and the left lead back behind you, but each is patrolled by a Gunner. The first order of business, then, is to dispatch them with two blasts each from the Super Shotgun. Your field computer gives your secondary objective as "Locate blue keycard".
The Blue Key
The two passageways meet at the bottom of short ramps in a room where you will find two Enforcers and some ammunition. Don't pick up the bullets unless you are desperately short. The exit from this room leads to an outdoor area where a Tank awaits you. If your style is to rush ahead, equip the Chain Gun. With enough dodging, a hundred bullets will take him down before he can do you any damage. If your style is to snipe from cover, then Grenades are your best bet. Show yourself and then withdraw to cover to make him follow you. Run out, throw a Grenade and then duck back before he can open fire. You can arm the Grenade as you run out and throw without pausing. It will take eight hits to kill the Tank.
Close to where the tank stood, you will find your first Bandolier. Take it to get ten Shells and 50 Bullets, but also the ability to carry 150 Shells and 250 Bullets around with you rather than the previous limits of 100 and 200. Now is the time to go back for that ammunition you passed up earlier. If you approach the heavy door nearby, you will get the message "You need the blue key". So we'll go in the only direction open to us, which is to the left.
Go down the long flight of steps and take out the Enforcer in the tunnel. You can continue through the tunnel and fight a Gladiator and three Flyers, but instead let's come back out and drop down into the water. There is Jacket Armor here if you need it. Equip the Chain Gun and follow the water under the building, then stay to the right as you leave the water, jump up and turn around. The Gladiator will not have seen you. Move closer and give him about 100 bullets, dodging return fire. On the balcony you'll find the Blue Key, some Bullets to replenish your stock and also Shells. So what was that about Flyers? If you look on the back wall, between the tall equipment racks, you'll see an alarm button. If you hadn't gunned him down so quickly, the Gladiator would have pressed this and summoned three Flyers from above the building. If you're not interested in scoring all the enemy kills, you can just move on at this point. Otherwise, switch to the Super Shotgun, press the button yourself, go to the balcony edge and look up.
Go up the steps and return to the area where you killed the Tank. Your field computer has updated your secondary objective to "Use blue keycard to gain access to the detention center". Approach the heavy door again and it will open. Your secondary objective updates again to "Locate red key card in the security complex".
Getting to the Security Complex
Beyond the heavy door is a courtyard with doors to the left and the right and balconies above and opposite. Two Berserkers will greet you but respond well to multiple Super Shotgun blasts. If you approach the door on the right, you will get the message "You need the Red Key". It's actually not a good idea to go into the opening opposite and use the lift platform there. If you want to see what's on the balconies, save the game before you go up so that if things don't go well you can change your mind and leave this until later. Instead, go to the door on the left and shoot the Berserker that emerges. The next piece of advice you're about to read is probably a spoiler and on the edge of cheating, so skip the rest of this paragraph to experience the game the way the designers planned. OK, so, go past the door, turn left along a short corridor, turn right and take a few more steps towards the Bullets there but then turn and retrace your steps to the courtyard. You will find that hidden alcoves have opened and disgorged two Medics. They take some effort to kill, but their return fire is only minimally damaging. The major threat that they pose is that if you leave them to wander around they will revive any dead (but not gibbed) Strogg that they encounter and you'll have to kill them all over again.
Through the door you will hear the moans and pleas of your fellow Marines in the various cells and dungeons. Go to the right, where you will find a grid in the floor with Marines beneath. A Berserker and some Flyers will slow your progress and then a Guard will come down a flight of steps to the left. Go up the steps carefully; there is another Guard on a ledge above and two Enforcers in the area at the top. One approach to this is to run up the steps and around the corner where you will be face-to-face with one of the Enforcers. Kill him at point-blank range with your Super Short gun, then turn quickly to take out the other Enforcer from where you stand, out of sight of the Guard. Then you have just the Guard to deal with. Behind the Guard is a pulsing, glowing button. Shoot it with your Blaster to raise some steps so that you can go up and collect his Bullets (see also Secrets, below).
The area at the top of the steps is a mezzanine which overlooks a room with three cells on either side. There are two Gladiators down there. You can get into that room if you backtrack down the steps and go to the right (on the way, a button on the wall turns off some lasers giving you access to a Quad Damage). So, you can fight the Gladiators from up on the mezzanine or go down to do battle, it's your choice. In either case, avoiding their Rail Gun fire is a priority. Grenades work from above, although you will likely waste many by missing, and the Chain Gun works close in. If you can entice the Gladiators to enter the middle cell under the mezzanine you can use their reduced maneuverability to advantage. You may even be able to drop down and lock the cell, trapping them to deal with later, after you have collected more powerful weapons, or just leave them there if you don't want to score all the enemy kills. An Enforcer might join the fray from the door at the end of the room; otherwise you will meet him later, so be ready.
Open the cells that have force-fields across the doorways using the security panels on the walls. There is ammunition in the cells, including some Rockets, which of course you won't be able to use until you find the Rocket Launcher, and if you put the Marines out of their misery some of them will drop more. Don't take anything you don't need as you'll be coming back this way.
Leave the cell area via the doorway through which you can see a wall button. A short corridor goes right and left to longer passages leading away around a central structure of some sort. You may meet the Enforcer here, otherwise you won't at first see any Strogg. But, you will be able to hear the trudging of a Tank at the far end of the area. Due to his slow movement and the availability of cover, just play cat-and-mouse with the weapon of your choice, perhaps Grenades. As soon as the Tank goes down, however, two Medics come out of hidden alcoves so be sure to take them out before they can revive him. The way is now clear to go around the central structure and take the exit to the Security Complex on the other side. See Secrets, below, for the significance of the central structure, either now or on your return.
Using the Red Key
Second visit
Returning from the Security Complex, enter the north cell block from the yard. Watch out for the Parasites. Make your way to the lift that takes you up to the east balcony overlooking the yard and press the button on the console to deactivate the yellow laser fence there, as well as the yellow laser fences in the Security Complex. Go to the dungeon level below the main jail floor and eliminate all the Enforcers.
Having completed this level, return to the Security Complex.
Secrets
This level has two (2) secrets:
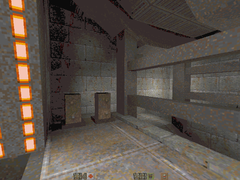
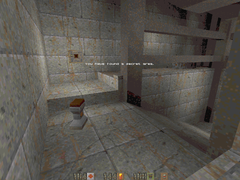
- Shortly after you enter the detention center building using the blue key, you climb a long flight of stairs above which there is a Guard standing on a ledge. Behind him is a pulsing, glowing button which you can shoot to raise some steps to reach his ledge. Instead of going up the steps, quickly run forward to get back to the bottom of the flight before they fully rise. Look back and you will see Combat Armor under the steps. Go in to receive the message "You have found a secret area". If the steps come back down and trap you, just press the wall button. If you can't run down the steps fast enough, you can also drop down from the mezzanine level and run around (there is plenty of time for this), but clear the Strogg away first!
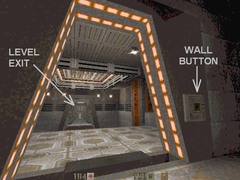
- The level exit that joins the Detention Center to the Security Complex is in an area where you fought a Tank and then two Medics. The structure in the center of this room has two doors outlined in pink lights. Press the wall button to the left of the door closest to the level exit. Step through, turn to the left, press the wall button that you see there on the inside and step back out. The other door will now stand open. Go around and back to the wall button that you passed on the way into this area after killing the two Gladiators guarding the cells. Press that and return to the newly opened door. The bars just inside and on the left will be lowering, so step through and receive the message "You have found a secret area". There is lots of good stuff here, including your first Power Shield, two (yes, two) Adrenalines and some Cells you won't be able to use until you find the HyperBlaster. If the bars go back up, there is a wall button in the secret area to lower them again.
- Gallery : Secrets in the Detention Center.
-
Shoot the glow button and quickly run down the steps.
-
Under the steps is a secret area containing Combat Armor.
-
Press a wall button to open this door, then press the button inside.
-
Press another wall button to lower these bars.
-
Beyond the bars is a secret area with lots of good stuff.


