| Map | Enemy |
|---|---|

|
Date Army |
| Unlock with | |
| Uesugi Army | |
| # of Tamatebako | |
| 15 |
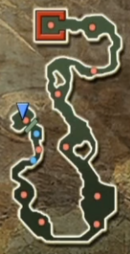
Suriagehara Pursuit (摺上原追撃戦) is the name given to the battle that takes place in the territory of Masamune Date and his army. It is a long piece of land more akin to a racetrack, and Masamune utilizes this by escaping the initial battle against him on horseback. Should you choose to pursue him, it is possible to bring the battle to a quick close. However, even if you choose to forego the pursuit, this battle can move relatively quickly due to the presence of horses around the map. The quick pace of this battle coupled with the high amount of drops available makes it a fitting candidate if you're looking to farm for accessories or weapons.
Strategy[edit]
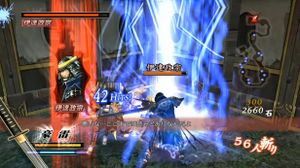
The battle begins with a quick taste of a one-on-one fight with the territory's owner, Masamune Date himself. The fact that Masamune is not surrounded by any soldiers may make this battle a bit difficult the first time around, especially on harder difficulties, as restoring the Basara gauge takes much longer when you only have one person to combo. This is made worse if you plan on pursuing Masamune post-battle on horseback, as you will have to use your Basara while on horseback to catch up to him. However, if in desperate need, you can find health and Basara within the crates by the gate that Masamune is blocking.
Corner Masamune into a wall and he will struggle to recover. When his health is about halfway depleted, he will attempt to use his War Dance skill repeatedly, allowing him use of all six of his swords simultaneously. This makes his combos much deadlier, but fortunately, you can interrupt this skill quite easily, as it takes some time to trigger. Keep interrupting his War Dance before he can attempt an attack to defeat him, and a beaten-down Masamune will escape. As mentioned earlier, you can pursue him by running to the nearby horse and using your Basara to charge ahead, triggering a battle with a fallen Masamune if you do happen to catch and attack him mid-pursuit. If Masamune ends up downed in an area riddled with bomb soldiers or pole-swingers, all the better, as these enemies have the capacity to knock down Masamune as well. If you choose this path, skip to the boss section; if you choose to collect the many tamatebako scattered throughout the stage for a chance at new accessories or weapons, read on.
Press ![]() to jump on the horse,
to jump on the horse, ![]() to attack on the horse, and
to attack on the horse, and ![]() to charge on the horse (at the cost of your Basara). Take the horse to the first squad leader, and defeat him and his squad to build up your Basara if it hasn't been built up already. This squad leader and all subsequent squad leaders drop tamatebako, so you will have to dismount every time you reach one on the map in order to collect some rewards. As for the first tamatebako hidden inside a crate, it can be found in a path to the right following the second squad leader (alternate the path of the third squad leader, who you should also defeat for an extra item), among large soldiers carrying giant hammers. Press
to charge on the horse (at the cost of your Basara). Take the horse to the first squad leader, and defeat him and his squad to build up your Basara if it hasn't been built up already. This squad leader and all subsequent squad leaders drop tamatebako, so you will have to dismount every time you reach one on the map in order to collect some rewards. As for the first tamatebako hidden inside a crate, it can be found in a path to the right following the second squad leader (alternate the path of the third squad leader, who you should also defeat for an extra item), among large soldiers carrying giant hammers. Press ![]() while on horseback to charge through the bridge filled with shielded soldiers and reach the fourth squad leader. Past this one is an open area where the fifth squad leader can be found, as well as a crate holding a hidden tamatebako to the left.
while on horseback to charge through the bridge filled with shielded soldiers and reach the fourth squad leader. Past this one is an open area where the fifth squad leader can be found, as well as a crate holding a hidden tamatebako to the left.
At the next fork, choose the left path to find both a squad leader and a crate to the left containing a hidden tamatebako, which should bring your total up to ten. The following segment contains both archers and bomb soldiers, though you should be able to pass them easily with a horse. At the final fork, choose the left path once more to find the last hidden tamatebako. Once all squad leaders have been defeated and all tamatebako have been collected, approach Masamune to begin the boss battle.
Boss: Masamune Date[edit]

The squad leaders that surround Masamune offer health and Basara once defeated, so feel free to ignore them if you don't need the extra assistance (crates around the arena offer similar aid). Defeating the archer leaders may be necessary if they happen to find their way on camera, as they can easily disrupt your combos and give Masamune an opening to attack you.
The key here is to use the many walls in this area to your advantage, trapping Masamune so that he cannot get close and thus do no damage. His trump card is War Dance, as you should have noticed in the previous battle against him, and this becomes dangerous only if he manages to close in and combo you. You can either interrupt him from a distance when he does this, or attack him up close before he can even manage to trigger it. The Heavy Thunder skill accessible by Ranmaru Mori (pictured) is especially effective against Masamune once he is drawn to a wall, as he will then be unable to dodge away as long as you continue using it. The Passing of the Dragonfly skill of Nouhime (which allows her to shoot in motion) is also handy against a trapped Masamune, as she can follow him with her bullets even if he manages to dodge to the side. Defeat Masamune to clear the stage and access your many rewards.
