Jump to navigation
Jump to search
File:PKMN FR&LG Area MtMoon1Floor.pngMt.Moon Floor 1.
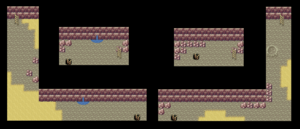
Basement Floor 1 map.
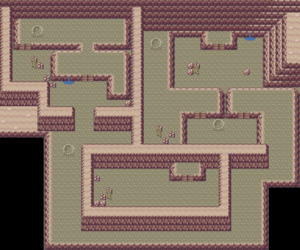
Basement Floor 2 map.
m (cleanup, added maps) |
m (→Battles: image name change, Replaced: Image:Pokébuck.png → File:Pokebuck.png (12),) |
||
| Line 133: | Line 133: | ||
|[[Image:Pokemon 014Kakuna.png|40px]]{{bp|Kakuna}} 11 | |[[Image:Pokemon 014Kakuna.png|40px]]{{bp|Kakuna}} 11 | ||
| | | | ||
|[[ | |[[File:Pokebuck.png]]132 | ||
|- | |- | ||
|2 | |2 | ||
| Line 140: | Line 140: | ||
| | | | ||
| | | | ||
|[[ | |[[File:Pokebuck.png]]224 | ||
|- | |- | ||
|3 | |3 | ||
| Line 147: | Line 147: | ||
|[[Image:Pokemon 100Voltorb.png|40px]]{{bp|Voltorb}} 11 | |[[Image:Pokemon 100Voltorb.png|40px]]{{bp|Voltorb}} 11 | ||
| | | | ||
|[[ | |[[File:Pokebuck.png]]264 | ||
|- | |- | ||
|4 | |4 | ||
| Line 154: | Line 154: | ||
|[[Image:Pokemon 011Metapod.png|40px]]{{bp|Metapod}} 10 | |[[Image:Pokemon 011Metapod.png|40px]]{{bp|Metapod}} 10 | ||
|[[Image:Pokemon 010Caterpie.png|40px]]{{bp|Caterpie}} 10 | |[[Image:Pokemon 010Caterpie.png|40px]]{{bp|Caterpie}} 10 | ||
|[[ | |[[File:Pokebuck.png]]120 | ||
|- | |- | ||
|5 | |5 | ||
| Line 161: | Line 161: | ||
|[[Image:Pokemon 069Bellsprout.png|40px]]{{bp|Bellsprout}} 11 | |[[Image:Pokemon 069Bellsprout.png|40px]]{{bp|Bellsprout}} 11 | ||
| | | | ||
|[[ | |[[File:Pokebuck.png]]176 | ||
|- | |- | ||
|6 | |6 | ||
| Line 168: | Line 168: | ||
|[[Image:Pokemon 019Rattata.png|40px]]{{bp|Rattata}} 10 | |[[Image:Pokemon 019Rattata.png|40px]]{{bp|Rattata}} 10 | ||
|[[Image:Pokemon 041Zubat.png|40px]]{{bp|Zubat}} 10 | |[[Image:Pokemon 041Zubat.png|40px]]{{bp|Zubat}} 10 | ||
|[[ | |[[File:Pokebuck.png]]160 | ||
|- | |- | ||
|7 | |7 | ||
| Line 175: | Line 175: | ||
|[[Image:Pokemon 074Geodude.png|40px]]{{bp|Geodude}} 10 | |[[Image:Pokemon 074Geodude.png|40px]]{{bp|Geodude}} 10 | ||
|[[Image:Pokemon 095Onix.png|40px]]{{bp|Onix}} 10 | |[[Image:Pokemon 095Onix.png|40px]]{{bp|Onix}} 10 | ||
|[[ | |[[File:Pokebuck.png]]360 | ||
|} | |} | ||
{| {{prettytable|notwide=1|text center=1}} | {| {{prettytable|notwide=1|text center=1}} | ||
| Line 192: | Line 192: | ||
|[[Image:Pokemon 019Rattata.png|40px]]{{bp|Rattata}} 11 | |[[Image:Pokemon 019Rattata.png|40px]]{{bp|Rattata}} 11 | ||
|[[Image:Pokemon 041Zubat.png|40px]]{{bp|Zubat}} 11 | |[[Image:Pokemon 041Zubat.png|40px]]{{bp|Zubat}} 11 | ||
|[[ | |[[File:Pokebuck.png]]352 | ||
|- | |- | ||
|TR | |TR | ||
| Line 199: | Line 199: | ||
|[[Image:Pokemon 023Ekans.png|40px]]{{bp|Ekans}} 11 | |[[Image:Pokemon 023Ekans.png|40px]]{{bp|Ekans}} 11 | ||
| | | | ||
|[[ | |[[File:Pokebuck.png]]352 | ||
|- | |- | ||
|TR | |TR | ||
| Line 206: | Line 206: | ||
|[[Image:Pokemon 027Sandshrew.png|40px]]{{bp|Sandshrew}} 13 | |[[Image:Pokemon 027Sandshrew.png|40px]]{{bp|Sandshrew}} 13 | ||
| | | | ||
|[[ | |[[File:Pokebuck.png]]416 | ||
|- | |- | ||
|TR | |TR | ||
| Line 213: | Line 213: | ||
|[[Image:Pokemon 041Zubat.png|40px]]{{bp|Zubat}} 13 | |[[Image:Pokemon 041Zubat.png|40px]]{{bp|Zubat}} 13 | ||
| | | | ||
|[[ | |[[File:Pokebuck.png]]416 | ||
|- | |- | ||
|5 | |5 | ||
| Line 220: | Line 220: | ||
|[[Image:Pokemon 100Voltorb.png|40px]]{{bp|Voltorb}} 12 | |[[Image:Pokemon 100Voltorb.png|40px]]{{bp|Voltorb}} 12 | ||
|[[Image:Pokemon 109Koffing.png|40px]]{{bp|Koffing}} 12 | |[[Image:Pokemon 109Koffing.png|40px]]{{bp|Koffing}} 12 | ||
|[[ | |[[File:Pokebuck.png]]288 | ||
|} | |} | ||
Revision as of 21:50, 20 November 2009
There are three different levels in Mt. Moon, populated by four types of Pokémon and multiple trainers. Also along the way, you'll notice that the criminal gang Team Rocket is carrying out an operation in Mt. Moon, and it's up to you to blow their operation wide open!
Pokémon found
| FireRed | Level | Encounter Rate | LeafGreen | Level | Encounter Rate |
|---|---|---|---|---|---|
| 7-10 | 69% | 7-10 | 69% | ||
| 7-9 | 25% | 7-9 | 25% | ||
| 8 | 5% | 8 | 5% | ||
| 8 | 1% | 8 | 1% |

| FireRed | Level | Encounter Rate | LeafGreen | Level | Encounter Rate |
|---|---|---|---|---|---|
| 7-10 | 100% | 7-10 | 100% |

| FireRed | Level | Encounter Rate | LeafGreen | Level | Encounter Rate |
|---|---|---|---|---|---|
| 8-11 | 49% | 8-11 | 49% | ||
| 9-10 | 30% | 9-10 | 30% | ||
| 10-12 | 15% | 10-12 | 15% | ||
| 10-12 | 6% | 10-12 | 6% |
| #41 Zubat | #74 Geodude |
|---|---|
 |
 |
| #46 Paras | #35 Clefairy |
 |
 |
Battles
| Name | 1st | 2nd | 3rd | Money | |
| 1 | File:Pokemon FRLG BugCatcher.pngKent | ||||
| 2 | |||||
| 3 | File:Pokemon FRLG SuperNerd.pngJovan | ||||
| 4 | File:Pokemon FRLG BugCatcher.pngRobby | ||||
| 5 | |||||
| 6 | |||||
| 7 |  Marcos Marcos
|
| Name | 1st | 2nd | 3rd | Money | |
| TR | |||||
| TR | |||||
| TR | |||||
| TR | |||||
| 5 | File:Pokemon FRLG SuperNerd.pngMiguel |
Items
- TM09 Bullet Seed (F1)
- Paralyzed Heal (F1)
- Star Piece (BF2: 1st ladder)
- Potion (F1)
- Rare Candy (F1)
- Escape Rope (F1)
- Ether (BF2: 2nd ladder - hidden in the lone rock)
- TM46 Thief (BF2)
- Moonstone ×2 (F1),(BF2: hidden in rock before you choose a fossil)
- Revive (BF2: last ladder)
- Helix Fossil (BF2, can choose only 1 fossil)
- Dome Fossil (BF2, can choose only 1 fossil)
- Antidote (BF2)