(created) |
(added images) |
||
| (3 intermediate revisions by 2 users not shown) | |||
| Line 1: | Line 1: | ||
{{Header Nav|game=Mega Man 7}} | {{Header Nav|game=Mega Man 7}} | ||
{{floatingtoc}} | |||
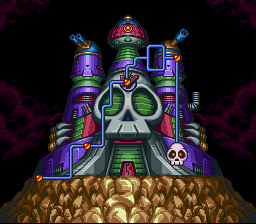
[[File:MM7 SkullFortress.png|frame|center]] | |||
{{-}} | |||
== Stage walkthrough == | |||
=== Stage part 1 === | |||
{{sect-stub}} | |||
=== Halfway boss: Bass & Treble === | === Halfway boss: Bass & Treble === | ||
[[File:MM7 boss03a BassTreble.png|frame]] | |||
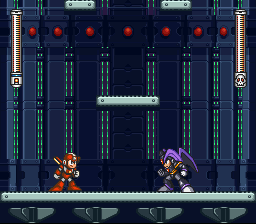
At the start of the fight, Bass will talk and then he will combine with Treble, giving him the ability of flight. | At the start of the fight, Bass will talk and then he will combine with Treble, giving him the ability of flight. | ||
;Weakness Strategy | ;Weakness Strategy | ||
Using the Super Adapter, dodge his shots whenever you can, when he flies at you, jump over in his direction and then let loose when he charges. Dodge his blasts of three by using the jet pack and put distance | Using the Super Adapter, dodge his shots whenever you can, when he flies at you, jump over in his direction and then let loose when he charges. Dodge his blasts of three by using the jet pack and put distance between you and him when he releases his fist. The easiest way is to get away from his jumping/shots and then have him chase you by flying, then jump on the platform above and let him circle around and charge, right then release a powered S Adapter Punch. You might have to try this fight a few times as well as use an E Tank. | ||
;Attacks | ;Attacks | ||
#'''Bass Buster Barrage''' | #'''Bass Buster Barrage:''' Hops around and fires a few shots, sometimes even a charged one. | ||
#*''Solution'' | #*''Solution:'' Get far away, attack at all times, and try to jump over/dodge everything. | ||
#'''Bass Punch''' | #'''Bass Punch:''' He will fly around in an arch, power up somewhere, then chase you down and release his version of the S Adapter Punch. | ||
#*''Solution'' | #*''Solution:'' Take advantage of him charging, he's open to damage. When he chases you, try to get on the side of a platform, then when he shoots, drop down and run away, it only goes so far. | ||
=== Stage part 2 === | |||
{{sect-stub}} | |||
== Boss: Turtlerizer == | |||
[[File:MM7 boss03b Turtlerizer.png|frame]] | |||
;Weakness Strategy | ;Weakness Strategy | ||
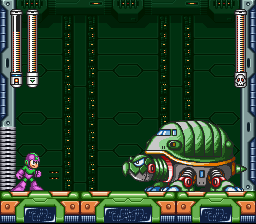
Either use his weakness weapons ( | Either use his weakness weapons (charged Wild Coil or Danger Wrap) or use the Mega Buster (safer). You can only damage his head, so if he's hiding focus on dodging. He has two attacks, and the babies have three. Attack the head with the '''Wild Coil'''. The babies allow you to replenish some of your weapon energy, if need be, but it's not worth it. To take out the baby-turtles easily, use '''Danger Wrap'''. If you have the opportunity, push a wrapped turtle into Kamerizer for extra damage. | ||
;Attacks | ;Attacks | ||
#'''Fire Breath''' | #'''Fire Breath:''' Releases a short burst of flame that slowly curves upwards, evaporates when it hits the wall. Often creates 2 of these with a pause in between before charging. | ||
#*''Solution'' | #*''Solution:'' Simply jump over. | ||
#'''Charge''' | #'''Charge:''' Hides in it's shell, and flies straight into the wall. It then backs up and either attacks again or comes back to the ground. | ||
#*''Solution'' | #*''Solution:'' Stand out from the wall, about half way between where the turtle lands and the wall. When it flies at you, slide underneath and when it returns, promptly slide back. You might have to do this a few times before it rests. | ||
#'''Baby Turtles''' | #'''Baby Turtles:''' Drops a little bunker which holds 3 turtles and a value on the top. The value tells you what the little buggers are going to do. 1) means they walk into the wall and back, in between they hop, the easiest of all the attacks to defend against. 2)They spin at you, flying around the room. 3)The turtles leave the barracks, dig under ground, pop up randomly, and then spin around. | ||
#*''Solution'' | #*''Solution:'' Blast 'em with Thunder Bolt just as they leave the barracks, give them a little room because they are invincible while inside and they move slow enough to give you a breather. | ||
{{Footer Nav|game=Mega Man 7|prevpage=Wily Stage 1|nextpage=Wily Stage 3}} | {{Footer Nav|game=Mega Man 7|prevpage=Wily Stage 1|nextpage=Wily Stage 3}} | ||
Latest revision as of 08:24, 22 June 2016

Stage walkthrough[edit]
Stage part 1[edit]
Halfway boss: Bass & Treble[edit]

At the start of the fight, Bass will talk and then he will combine with Treble, giving him the ability of flight.
- Weakness Strategy
Using the Super Adapter, dodge his shots whenever you can, when he flies at you, jump over in his direction and then let loose when he charges. Dodge his blasts of three by using the jet pack and put distance between you and him when he releases his fist. The easiest way is to get away from his jumping/shots and then have him chase you by flying, then jump on the platform above and let him circle around and charge, right then release a powered S Adapter Punch. You might have to try this fight a few times as well as use an E Tank.
- Attacks
- Bass Buster Barrage: Hops around and fires a few shots, sometimes even a charged one.
- Solution: Get far away, attack at all times, and try to jump over/dodge everything.
- Bass Punch: He will fly around in an arch, power up somewhere, then chase you down and release his version of the S Adapter Punch.
- Solution: Take advantage of him charging, he's open to damage. When he chases you, try to get on the side of a platform, then when he shoots, drop down and run away, it only goes so far.
Stage part 2[edit]
Boss: Turtlerizer[edit]

- Weakness Strategy
Either use his weakness weapons (charged Wild Coil or Danger Wrap) or use the Mega Buster (safer). You can only damage his head, so if he's hiding focus on dodging. He has two attacks, and the babies have three. Attack the head with the Wild Coil. The babies allow you to replenish some of your weapon energy, if need be, but it's not worth it. To take out the baby-turtles easily, use Danger Wrap. If you have the opportunity, push a wrapped turtle into Kamerizer for extra damage.
- Attacks
- Fire Breath: Releases a short burst of flame that slowly curves upwards, evaporates when it hits the wall. Often creates 2 of these with a pause in between before charging.
- Solution: Simply jump over.
- Charge: Hides in it's shell, and flies straight into the wall. It then backs up and either attacks again or comes back to the ground.
- Solution: Stand out from the wall, about half way between where the turtle lands and the wall. When it flies at you, slide underneath and when it returns, promptly slide back. You might have to do this a few times before it rests.
- Baby Turtles: Drops a little bunker which holds 3 turtles and a value on the top. The value tells you what the little buggers are going to do. 1) means they walk into the wall and back, in between they hop, the easiest of all the attacks to defend against. 2)They spin at you, flying around the room. 3)The turtles leave the barracks, dig under ground, pop up randomly, and then spin around.
- Solution: Blast 'em with Thunder Bolt just as they leave the barracks, give them a little room because they are invincible while inside and they move slow enough to give you a breather.