Jump to navigation
Jump to search
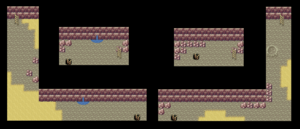
File:PKMN FR&LG Area MtMoon1Floor.pngMt.Moon Floor 1.
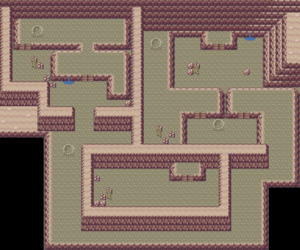
Basement Floor 1 map.
Basement Floor 2 map.
Notmyhandle (talk | contribs) (→Items: revised) |
|||
| Line 25: | Line 25: | ||
[[File:PKMN FR&LG Area MtMoon1Floor.png|thumb|right|Mt.Moon Floor 1.]] | [[File:PKMN FR&LG Area MtMoon1Floor.png|thumb|right|Mt.Moon Floor 1.]] | ||
{| {{prettytable | ===Pokemon Found=== | ||
{| {{prettytable|notwide=1|text center=1}} | |||
! style="background:red;color:white" | FireRed | ! style="background:red;color:white" | FireRed | ||
! style="background:red;color:white" | Level | ! style="background:red;color:white" | Level | ||
| Line 33: | Line 33: | ||
! style="background:green;color:white" | Level | ! style="background:green;color:white" | Level | ||
! style="background:green;color:white" | Encounter Rate | ! style="background:green;color:white" | Encounter Rate | ||
|- | |- | ||
| | | style="vertical-align:middle" | {{PokePic|Zubat}}{{bp|Zubat}} | ||
|7-9 | | style="vertical-align:middle" |7-10 | ||
|25% | | style="vertical-align:middle" |69% | ||
| | | style="vertical-align:middle" | {{PokePic|Zubat}}{{bp|Zubat}} | ||
|7-9 | | style="vertical-align:middle" |7-10 | ||
|25% | | style="vertical-align:middle" |69% | ||
|- | |||
| style="vertical-align:middle" | {{PokePic|Geodude}}{{bp|Geodude}} | |||
| style="vertical-align:middle" |7-9 | |||
| style="vertical-align:middle" |25% | |||
| style="vertical-align:middle" | {{PokePic|Geodude}}{{bp|Geodude}} | |||
| style="vertical-align:middle" |7-9 | |||
| style="vertical-align:middle" |25% | |||
|- | |- | ||
| | | style="vertical-align:middle" | {{PokePic|Paras}}{{bp|Paras}} | ||
|8 | | style="vertical-align:middle" |8 | ||
|5% | | style="vertical-align:middle" |5% | ||
| | | style="vertical-align:middle" | {{PokePic|Paras}}{{bp|Paras}} | ||
|8 | | style="vertical-align:middle" |8 | ||
|5% | | style="vertical-align:middle" |5% | ||
|- | |- | ||
| | | style="vertical-align:middle" | {{PokePic|Clefairy}}{{bp|Clefairy}} | ||
|8 | | style="vertical-align:middle" |8 | ||
|1% | | style="vertical-align:middle" |1% | ||
| | | style="vertical-align:middle" | {{PokePic|Clefairy}}{{bp|Clefairy}} | ||
|8 | | style="vertical-align:middle" |8 | ||
|1% | | style="vertical-align:middle" |1% | ||
|} | |} | ||
===Trainers=== | |||
{| {{prettytable|notwide=1|text center=1}} | {| {{prettytable|notwide=1|text center=1}} | ||
! Name | |||
! 1st | |||
! | ! 2nd | ||
! | ! 3rd | ||
! | ! Money | ||
! | |- | ||
! | | style="vertical-align:middle" | [[File:Pokemon FRLG BugCatcher.png]] Kent | ||
|- | | style="background-color:#{{Pokemon color|Bug}};vertical-align:middle" |{{PokePic|Weedle}}{{bp|Weedle}} 11 | ||
| style="background-color:#{{Pokemon color|Bug}};vertical-align:middle" |{{PokePic|Kakuna}}{{bp|Kakuna}} 11 | |||
|[[File:Pokemon FRLG BugCatcher.png]]Kent | |||
| style="background-color:#{{Pokemon color|Bug}}; | |||
| style="background-color:#{{Pokemon color|Bug}}; | |||
| | | | ||
|[[File:Pokebuck.png]]132 | | style="vertical-align:middle" | [[File:Pokebuck.png]]132 | ||
|- | |- | ||
| | | style="vertical-align:middle" | [[File:Pokemon FRLG Lass.png]] Iris | ||
|[[File:Pokemon FRLG Lass.png]]Iris | | style="background-color:#{{Pokemon color|Normal}};vertical-align:middle" |{{PokePic|Clefairy}}{{bp|Clefairy}} 14 | ||
| style="background-color:#{{Pokemon color|Normal}}; | |||
| | | | ||
| | | | ||
|[[File:Pokebuck.png]]224 | | style="vertical-align:middle" | [[File:Pokebuck.png]]224 | ||
|- | |- | ||
| | | style="vertical-align:middle" | [[File:Pokemon FRLG SuperNerd.png]] Jovan | ||
|[[File:Pokemon FRLG SuperNerd.png]]Jovan | | style="background-color:#{{Pokemon color|Electric}};vertical-align:middle" |{{PokePic|Magnemite}}{{bp|Magnemite}} 11 | ||
| style="background-color:#{{Pokemon color|Electric}}; | | style="background-color:#{{Pokemon color|Electric}};vertical-align:middle" |{{PokePic|Voltorb}}{{bp|Voltorb}} 11 | ||
| style="background-color:#{{Pokemon color|Electric}}; | |||
| | | | ||
|[[File:Pokebuck.png]]264 | | style="vertical-align:middle" | [[File:Pokebuck.png]]264 | ||
|- | |- | ||
| | | style="vertical-align:middle" | [[File:Pokemon FRLG BugCatcher.png]] Robby | ||
|[[File:Pokemon FRLG BugCatcher.png]]Robby | | style="background-color:#{{Pokemon color|Bug}};vertical-align:middle" |{{PokePic|Caterpie}}{{bp|Caterpie}} 10 | ||
| style="background-color:#{{Pokemon color|Bug}}; | | style="background-color:#{{Pokemon color|Bug}};vertical-align:middle" |{{PokePic|Metapod}}{{bp|Metapod}} 10 | ||
| style="background-color:#{{Pokemon color|Bug}}; | | style="background-color:#{{Pokemon color|Bug}};vertical-align:middle" |{{PokePic|Caterpie}}{{bp|Caterpie}} 10 | ||
| style="background-color:#{{Pokemon color|Bug}}; | | style="vertical-align:middle" | [[File:Pokebuck.png]]120 | ||
|[[File:Pokebuck.png]]120 | |||
|- | |- | ||
| | | style="vertical-align:middle" | [[File:Pokemon FRLG Lass.png]] Miriam | ||
|[[File:Pokemon FRLG Lass.png]]Miriam | | style="background-color:#{{Pokemon color|Grass}};vertical-align:middle" |{{PokePic|Oddish}}{{bp|Oddish}} 11 | ||
| style="background-color:#{{Pokemon color|Grass}}; | | style="background-color:#{{Pokemon color|Grass}};vertical-align:middle" |{{PokePic|Bellsprout}}{{bp|Bellsprout}} 11 | ||
| style="background-color:#{{Pokemon color|Grass}}; | |||
| | | | ||
|[[File:Pokebuck.png]]176 | | style="vertical-align:middle" | [[File:Pokebuck.png]]176 | ||
|- | |- | ||
| | | style="vertical-align:middle" | [[File:Pokemon FRLG Youngster.png]] Josh | ||
|[[File:Pokemon FRLG Youngster.png]]Josh | | style="background-color:#{{Pokemon color|Normal}};vertical-align:middle" |{{PokePic|Rattata}}{{bp|Rattata}} 10 | ||
| style="background-color:#{{Pokemon color|Normal}}; | | style="background-color:#{{Pokemon color|Normal}};vertical-align:middle" |{{PokePic|Rattata}}{{bp|Rattata}} 10 | ||
| style="background-color:#{{Pokemon color|Normal}}; | | style="background-color:#{{Pokemon color|Poison}};vertical-align:middle" |{{PokePic|Zubat}}{{bp|Zubat}} 10 | ||
| style="background-color:#{{Pokemon color|Poison}}; | | style="vertical-align:middle" | [[File:Pokebuck.png]]160 | ||
|[[File:Pokebuck.png]]160 | |||
|- | |- | ||
| | | style="vertical-align:middle" | [[File:Pokemon FRLG Hiker.png]]Marcos | ||
|[[File:Pokemon FRLG Hiker.png]]Marcos | | style="background-color:#{{Pokemon color|Rock}};vertical-align:middle" |{{PokePic|Geodude}}{{bp|Geodude}} 10 | ||
| style="background-color:#{{Pokemon color|Rock}}; | | style="background-color:#{{Pokemon color|Rock}};vertical-align:middle" |{{PokePic|Geodude}}{{bp|Geodude}} 10 | ||
| style="background-color:#{{Pokemon color|Rock}}; | | style="background-color:#{{Pokemon color|Rock}};vertical-align:middle" |{{PokePic|Onix}}{{bp|Onix}} 10 | ||
| style="background-color:#{{Pokemon color|Rock}}; | | style="vertical-align:middle" | [[File:Pokebuck.png]]360 | ||
|[[File:Pokebuck.png]]360 | |||
|} | |} | ||
==Basement Floor 1== | ==Basement Floor 1== | ||
Revision as of 20:25, 22 October 2014
There are three different levels in Mt. Moon, populated by four types of Pokémon and multiple trainers. Also along the way, you'll notice that the criminal gang Team Rocket is carrying out an operation in Mt. Moon, and it's up to you to blow their operation wide open!
There's a rare candy within Mt. Moon, but save them for now. Your Pokemon level up too fast right now to justify using a rare candy.
Items
- TM09 Bullet Seed (F1)
- Parlyz Heal (F1)
- Star Piece (BF2: 1st ladder)
- Potion (F1)
- Rare Candy (F1)
- Escape Rope (F1)
- Ether (BF2: 2nd ladder - hidden in the lone rock)
- TM46 Thief (BF2)
- Moonstone ×2 (F1),(BF2: hidden in rock before you choose a fossil)
- Revive (BF2: last ladder)
- Helix Fossil (BF2, can choose only 1 fossil), can be resurrected into Omanyte.
- Dome Fossil (BF2, can choose only 1 fossil), can be resurrected into Kabuto
- Antidote (BF2)
- Tinymushroom ×3 (two are found in rocks in BF1 and the other is next to the very last ladder before exiting Mt. Moon)
- Big Mushroom ×3(each are found in rocks in BF1)
Floor 1
Pokemon Found
| FireRed | Level | Encounter Rate | LeafGreen | Level | Encounter Rate |
|---|---|---|---|---|---|
| 7-10 | 69% | 7-10 | 69% | ||
| 7-9 | 25% | 7-9 | 25% | ||
| 8 | 5% | 8 | 5% | ||
| 8 | 1% | 8 | 1% |
Trainers
| Name | 1st | 2nd | 3rd | Money |
|---|---|---|---|---|
| File:Pokemon FRLG BugCatcher.png Kent | ||||
| File:Pokemon FRLG SuperNerd.png Jovan | ||||
| File:Pokemon FRLG BugCatcher.png Robby | ||||
 Marcos Marcos
|
Basement Floor 1

| FireRed | Level | Encounter Rate | LeafGreen | Level | Encounter Rate |
|---|---|---|---|---|---|
| 5-10 | 100% | 5-10 | 100% |
Basement Floor 2

| FireRed | Level | Encounter Rate | LeafGreen | Level | Encounter Rate |
|---|---|---|---|---|---|
| 8-11 | 49% | 8-11 | 49% | ||
| 9-10 | 30% | 9-10 | 30% | ||
| 10-12 | 15% | 10-12 | 15% | ||
| 10-12 | 6% | 10-12 | 6% |
| Name | 1st | 2nd | 3rd | Money | |
|---|---|---|---|---|---|
| 8 | |||||
| 9 | |||||
| 10 | |||||
| 11 | |||||
| 12 | File:Pokemon FRLG SuperNerd.pngMiguel |
| #41 Zubat | #74 Geodude |
|---|---|
 |
 |
| #46 Paras | #35 Clefairy |
 |
 |