Jump to navigation
Jump to search
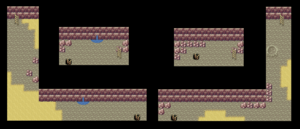
File:PKMN FR&LG Area MtMoon1Floor.pngMt.Moon Floor 1.
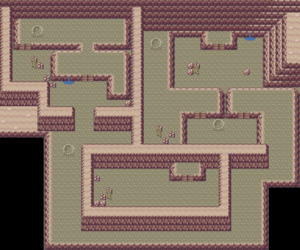
Basement Floor 1 map.
Basement Floor 2 map.
Pokelover11 (talk | contribs) (Rare candy tibit) |
Notmyhandle (talk | contribs) (Image->File, rearranged, cleanup) |
||
| Line 1: | Line 1: | ||
{{Header Nav|game=Pokémon FireRed and LeafGreen}} | {{Header Nav|game=Pokémon FireRed and LeafGreen}} | ||
{{floatingtoc}} | |||
There are three different levels in '''Mt. Moon''', populated by four types of Pokémon and multiple trainers. Also along the way, you'll notice that the criminal gang Team Rocket is carrying out an operation in Mt. Moon, and it's up to you to blow their operation wide open! | There are three different levels in '''Mt. Moon''', populated by four types of Pokémon and multiple trainers. Also along the way, you'll notice that the criminal gang Team Rocket is carrying out an operation in Mt. Moon, and it's up to you to blow their operation wide open! | ||
There's a rare candy within Mt. Moon, but save them for now. Your Pokemon level up too fast right now to justify using a rare candy. | There's a rare candy within Mt. Moon, but save them for now. Your Pokemon level up too fast right now to justify using a rare candy. | ||
{{-}} | |||
== | ==Items== | ||
{| {{prettytable|notwide=1|text center=1}} | * TM09 {{bpm|Bullet Seed}} (F1) | ||
* Parlyz Heal (F1) | |||
* Star Piece (BF2: 1st ladder) | |||
* Potion (F1) | |||
* Rare Candy (F1) | |||
* Escape Rope (F1) | |||
* Ether (BF2: 2nd ladder - hidden in the lone rock) | |||
* TM46 {{bpm|Thief}} (BF2) | |||
* Moonstone ×2 (F1),(BF2: hidden in rock before you choose a fossil) | |||
* Revive (BF2: last ladder) | |||
* Helix Fossil (BF2, can choose only 1 fossil), can be resurrected into {{bp|Omanyte}}. | |||
* Dome Fossil (BF2, can choose only 1 fossil), can be resurrected into {{bp|Kabuto}} | |||
* Antidote (BF2) | |||
* Tinymushroom ×3 (Hidden on BF1) | |||
==Floor 1== | |||
[[File:PKMN FR&LG Area MtMoon1Floor.png|thumb|right|Mt.Moon Floor 1.]] | |||
{| {{prettytable|float=left|notwide=1|text center=1}} | |||
|+ Floor 1 | |+ Floor 1 | ||
! style="background:red;color:white" | FireRed | ! style="background:red;color:white" | FireRed | ||
! style="background:red;color:white" | Level | ! style="background:red;color:white" | Level | ||
| Line 16: | Line 33: | ||
! style="background:green;color:white" | Encounter Rate | ! style="background:green;color:white" | Encounter Rate | ||
|- valign="center" | |- valign="center" | ||
|[[ | |[[File:Pokemon 041Zubat.png|40px]]{{bp|Zubat}} | ||
|7-10 | |7-10 | ||
|69% | |69% | ||
|[[ | |[[File:Pokemon 041Zubat.png|40px]]{{bp|Zubat}} | ||
|7-10 | |7-10 | ||
|69% | |69% | ||
|- | |- | ||
|[[ | |[[File:Pokemon 074Geodude.png|40px]]{{bp|Geodude}} | ||
|7-9 | |7-9 | ||
|25% | |25% | ||
|[[ | |[[File:Pokemon 074Geodude.png|40px]]{{bp|Geodude}} | ||
|7-9 | |7-9 | ||
|25% | |25% | ||
|- | |- | ||
|[[ | |[[File:Pokemon 046Paras.png|40px]]{{bp|Paras}} | ||
|8 | |8 | ||
|5% | |5% | ||
|[[ | |[[File:Pokemon 046Paras.png|40px]]{{bp|Paras}} | ||
|8 | |8 | ||
|5% | |5% | ||
|- | |- | ||
|[[ | |[[File:Pokemon 035Clefairy.png|40px]]{{bp|Clefairy}} | ||
|8 | |8 | ||
|1% | |1% | ||
|[[ | |[[File:Pokemon 035Clefairy.png|40px]]{{bp|Clefairy}} | ||
|8 | |8 | ||
|1% | |1% | ||
|} | |||
{| {{prettytable|notwide=1|text center=1}} | |||
|+ Floor 1 battles | |||
! style="background-color:#{{Pokemon color|Bug light}};color:#ffffff;" | | |||
! style="background-color:#{{Pokemon color|Bug light}};color:#ffffff;" | Name | |||
! style="background-color:#{{Pokemon color|Bug light}};color:#ffffff;" | 1st | |||
! style="background-color:#{{Pokemon color|Bug light}};color:#ffffff;" | 2nd | |||
! style="background-color:#{{Pokemon color|Bug light}};color:#ffffff;" | 3rd | |||
! style="background-color:#{{Pokemon color|Bug light}};color:#ffffff;" | Money | |||
|- align="center" | |||
|1 | |||
|[[File:Pokemon FRLG BugCatcher.png]]Kent | |||
| style="background-color:#{{Pokemon color|Bug}};color:#ffffff;" |[[File:Pokemon 013Weedle.png|40px]]{{bp|Weedle}} 11 | |||
| style="background-color:#{{Pokemon color|Bug}};color:#ffffff;" |[[File:Pokemon 014Kakuna.png|40px]]{{bp|Kakuna}} 11 | |||
| | |||
|[[File:Pokebuck.png]]132 | |||
|- | |- | ||
|2 | |||
|[[File:Pokemon FRLG Lass.png]]Iris | |||
| style="background-color:#{{Pokemon color|Normal}};color:#ffffff;" |[[File:Pokemon 035Clefairy.png|40px]]{{bp|Clefairy}} 14 | |||
| | |||
| | |||
|[[File:Pokebuck.png]]224 | |||
|- | |||
|3 | |||
|[[File:Pokemon FRLG SuperNerd.png]]Jovan | |||
| style="background-color:#{{Pokemon color|Electric}};color:#ffffff;" |[[File:Pokemon 081Magnemite.png|40px]]{{bp|Magnemite}} 11 | |||
| style="background-color:#{{Pokemon color|Electric}};color:#ffffff;" |[[File:Pokemon 100Voltorb.png|40px]]{{bp|Voltorb}} 11 | |||
| | |||
|[[File:Pokebuck.png]]264 | |||
|- | |||
|4 | |||
|[[File:Pokemon FRLG BugCatcher.png]]Robby | |||
| style="background-color:#{{Pokemon color|Bug}};color:#ffffff;" |[[File:Pokemon 010Caterpie.png|40px]]{{bp|Caterpie}} 10 | |||
| style="background-color:#{{Pokemon color|Bug}};color:#ffffff;" |[[File:Pokemon 011Metapod.png|40px]]{{bp|Metapod}} 10 | |||
| style="background-color:#{{Pokemon color|Bug}};color:#ffffff;" |[[File:Pokemon 010Caterpie.png|40px]]{{bp|Caterpie}} 10 | |||
|[[File:Pokebuck.png]]120 | |||
|- | |||
|5 | |||
|[[File:Pokemon FRLG Lass.png]]Miriam | |||
| style="background-color:#{{Pokemon color|Grass}};color:#ffffff;" |[[File:Pokemon 043Oddish.png|40px]]{{bp|Oddish}} 11 | |||
| style="background-color:#{{Pokemon color|Grass}};color:#ffffff;" |[[File:Pokemon 069Bellsprout.png|40px]]{{bp|Bellsprout}} 11 | |||
| | |||
|[[File:Pokebuck.png]]176 | |||
|- | |||
|6 | |||
|[[File:Pokemon FRLG Youngster.png]]Josh | |||
| style="background-color:#{{Pokemon color|Normal}};color:#ffffff;" |[[File:Pokemon 019Rattata.png|40px]]{{bp|Rattata}} 10 | |||
| style="background-color:#{{Pokemon color|Normal}};color:#ffffff;" |[[File:Pokemon 019Rattata.png|40px]]{{bp|Rattata}} 10 | |||
| style="background-color:#{{Pokemon color|Poison}};color:#ffffff;" |[[File:Pokemon 041Zubat.png|40px]]{{bp|Zubat}} 10 | |||
|[[File:Pokebuck.png]]160 | |||
|- | |||
|7 | |||
|[[File:Pokemon FRLG Hiker.png]]Marcos | |||
| style="background-color:#{{Pokemon color|Rock}};color:#ffffff;" |[[File:Pokemon 074Geodude.png|40px]]{{bp|Geodude}} 10 | |||
| style="background-color:#{{Pokemon color|Rock}};color:#ffffff;" |[[File:Pokemon 074Geodude.png|40px]]{{bp|Geodude}} 10 | |||
| style="background-color:#{{Pokemon color|Rock}};color:#ffffff;" |[[File:Pokemon 095Onix.png|40px]]{{bp|Onix}} 10 | |||
|[[File:Pokebuck.png]]360 | |||
|} | |} | ||
[[ | |||
{{-}} | |||
==Basement Floor 1== | |||
[[File:Pokemon FRLG Mt Moon B1F.png|thumb|Basement Floor 1 map.]] | |||
{| {{prettytable|notwide=1|text center=1}} | {| {{prettytable|notwide=1|text center=1}} | ||
|+ Basement Floor 1 | |+ Basement Floor 1 | ||
| Line 56: | Line 135: | ||
! style="background:green;color:white" | Encounter Rate | ! style="background:green;color:white" | Encounter Rate | ||
|- valign="center" | |- valign="center" | ||
|[[ | |[[File:Pokemon 046Paras.png|40px]]{{bp|Paras}} | ||
|5-10 | |5-10 | ||
|100% | |100% | ||
|[[ | |[[File:Pokemon 046Paras.png|40px]]{{bp|Paras}} | ||
|5-10 | |5-10 | ||
|100% | |100% | ||
|} | |} | ||
{{-}} | {{-}} | ||
[[ | |||
==Basement Floor 2== | |||
[[File:Pokemon FRLG Mt Moon B2F.png|thumb|Basement Floor 2 map.]] | |||
{| {{prettytable|notwide=1|text center=1}} | {| {{prettytable|notwide=1|text center=1}} | ||
|+ Basement Floor 2 | |+ Basement Floor 2 | ||
| Line 75: | Line 156: | ||
! style="background:green;color:white" | Encounter Rate | ! style="background:green;color:white" | Encounter Rate | ||
|- valign="center" | |- valign="center" | ||
|[[ | |[[File:Pokemon 041Zubat.png|40px]]{{bp|Zubat}} | ||
|8-11 | |8-11 | ||
|49% | |49% | ||
|[[ | |[[File:Pokemon 041Zubat.png|40px]]{{bp|Zubat}} | ||
|8-11 | |8-11 | ||
|49% | |49% | ||
|- | |- | ||
|[[ | |[[File:Pokemon 074Geodude.png|40px]]{{bp|Geodude}} | ||
|9-10 | |9-10 | ||
|30% | |30% | ||
|[[ | |[[File:Pokemon 074Geodude.png|40px]]{{bp|Geodude}} | ||
|9-10 | |9-10 | ||
|30% | |30% | ||
|- | |- | ||
|[[ | |[[File:Pokemon 046Paras.png|40px]]{{bp|Paras}} | ||
|10-12 | |10-12 | ||
|15% | |15% | ||
|[[ | |[[File:Pokemon 046Paras.png|40px]]{{bp|Paras}} | ||
|10-12 | |10-12 | ||
|15% | |15% | ||
|- | |- | ||
|[[ | |[[File:Pokemon 035Clefairy.png|40px]]{{bp|Clefairy}} | ||
|10-12 | |10-12 | ||
|6% | |6% | ||
|[[ | |[[File:Pokemon 035Clefairy.png|40px]]{{bp|Clefairy}} | ||
|10-12 | |10-12 | ||
|6% | |6% | ||
|} | |} | ||
{| {{prettytable|notwide=1|text center=1}} | {| {{prettytable|notwide=1|text center=1}} | ||
|+ Basement Floor 2 | |+ Basement Floor 2 battles | ||
! style="background-color:#{{Pokemon color|Poison light}};color:#ffffff;" | | ! style="background-color:#{{Pokemon color|Poison light}};color:#ffffff;" | | ||
! style="background-color:#{{Pokemon color|Poison light}};color:#ffffff;" | Name | ! style="background-color:#{{Pokemon color|Poison light}};color:#ffffff;" | Name | ||
| Line 188: | Line 195: | ||
|- align="center" | |- align="center" | ||
|8 | |8 | ||
|[[ | |[[File:Pokemon FRLG TRGrunt.png]]Grunt | ||
| style="background-color:#{{Pokemon color|Ground}};color:#ffffff;" |[[ | | style="background-color:#{{Pokemon color|Ground}};color:#ffffff;" |[[File:Pokemon 027Sandshrew.png|40px]]{{bp|Sandshrew}} 11 | ||
| style="background-color:#{{Pokemon color|Normal}};color:#ffffff;" |[[ | | style="background-color:#{{Pokemon color|Normal}};color:#ffffff;" |[[File:Pokemon 019Rattata.png|40px]]{{bp|Rattata}} 11 | ||
| style="background-color:#{{Pokemon color|Poison}};color:#ffffff;" |[[ | | style="background-color:#{{Pokemon color|Poison}};color:#ffffff;" |[[File:Pokemon 041Zubat.png|40px]]{{bp|Zubat}} 11 | ||
|[[File:Pokebuck.png]]352 | |[[File:Pokebuck.png]]352 | ||
|- | |- | ||
|9 | |9 | ||
|[[ | |[[File:Pokemon FRLG TRGrunt.png]]Grunt | ||
| style="background-color:#{{Pokemon color|Poison}};color:#ffffff;" |[[ | | style="background-color:#{{Pokemon color|Poison}};color:#ffffff;" |[[File:Pokemon 041Zubat.png|40px]]{{bp|Zubat}} 11 | ||
| style="background-color:#{{Pokemon color|Poison}};color:#ffffff;" |[[ | | style="background-color:#{{Pokemon color|Poison}};color:#ffffff;" |[[File:Pokemon 023Ekans.png|40px]]{{bp|Ekans}} 11 | ||
| | | | ||
|[[File:Pokebuck.png]]352 | |[[File:Pokebuck.png]]352 | ||
|- | |- | ||
|10 | |10 | ||
|[[ | |[[File:Pokemon FRLG TRGrunt.png]]Grunt | ||
| style="background-color:#{{Pokemon color|Normal}};color:#ffffff;" |[[ | | style="background-color:#{{Pokemon color|Normal}};color:#ffffff;" |[[File:Pokemon 019Rattata.png|40px]]{{bp|Rattata}} 13 | ||
| style="background-color:#{{Pokemon color|Ground}};color:#ffffff;" |[[ | | style="background-color:#{{Pokemon color|Ground}};color:#ffffff;" |[[File:Pokemon 027Sandshrew.png|40px]]{{bp|Sandshrew}} 13 | ||
| | | | ||
|[[File:Pokebuck.png]]416 | |[[File:Pokebuck.png]]416 | ||
|- | |- | ||
|11 | |11 | ||
|[[ | |[[File:Pokemon FRLG TRGrunt.png]]Grunt | ||
| style="background-color:#{{Pokemon color|Normal}};color:#ffffff;" |[[ | | style="background-color:#{{Pokemon color|Normal}};color:#ffffff;" |[[File:Pokemon 019Rattata.png|40px]]{{bp|Rattata}} 13 | ||
| style="background-color:#{{Pokemon color|Poison}};color:#ffffff;" |[[ | | style="background-color:#{{Pokemon color|Poison}};color:#ffffff;" |[[File:Pokemon 041Zubat.png|40px]]{{bp|Zubat}} 13 | ||
| | | | ||
|[[File:Pokebuck.png]]416 | |[[File:Pokebuck.png]]416 | ||
|- | |- | ||
|12 | |12 | ||
|[[ | |[[File:Pokemon FRLG SuperNerd.png]]Miguel | ||
| style="background-color:#{{Pokemon color|Poison}};color:#ffffff;" |[[ | | style="background-color:#{{Pokemon color|Poison}};color:#ffffff;" |[[File:Pokemon 088Grimer.png|40px]]{{bp|Grimer}} 12 | ||
| style="background-color:#{{Pokemon color|Electric}};color:#ffffff;" |[[ | | style="background-color:#{{Pokemon color|Electric}};color:#ffffff;" |[[File:Pokemon 100Voltorb.png|40px]]{{bp|Voltorb}} 12 | ||
| style="background-color:#{{Pokemon color|Poison}};color:#ffffff;" |[[ | | style="background-color:#{{Pokemon color|Poison}};color:#ffffff;" |[[File:Pokemon 109Koffing.png|40px]]{{bp|Koffing}} 12 | ||
|[[File:Pokebuck.png]]288 | |[[File:Pokebuck.png]]288 | ||
|} | |} | ||
{{-}} | |||
{| {{prettytable}} | |||
|+New Pokémon | |||
! style="background-color:#c080ff;color:#ffffff;" width="50%" | #41 Zubat | |||
! style="background-color:#c080ff;color:#ffffff;" width="50%" | #74 Geodude | |||
|- | |||
| [[File:Pokemon 041Zubat.png|Zubat|right]] The most common Pokémon among caves in all the Pokémon Core games. At this part of the game you can only evolve it into {{bp|Golbat}}. In order to evolve it further into {{bp|Crobat}}, you will need to beat the Elite Four and to raise Golbat's happiness to the maximum. Crobat however, is an excellent Pokémon which has decent Attack and magnificent Speed. You can catch Zubat later because Golbat doesn't do very well on Elite Four. | |||
| [[File:Pokemon 074Geodude.png|Geodude|left]] The first Rock-type Pokémon in this game. It has powerful attacks early on and is easy to train. However, it can't stand Water- nor Grass-type attacks so be cautious when using it. It evolves into {{bp|Graveler}} by leveling up and then into {{bp|Golem}} by trading. Golem, however, is inferior to {{bp|Rhydon}} (which is also a Rock/Ground-type Pokémon) by base stats and Rhydon can be obtained easier, so choosing Rhydon is recommended. | |||
|- | |||
! style="background-color:#c080ff;color:#ffffff;" width="50%" | #46 Paras | |||
! style="background-color:#c080ff;color:#ffffff;" width="50%" | #35 Clefairy | |||
|- | |||
| [[File:Pokemon 046Paras.png|Paras|right]] A weak Bug/Grass-type Pokémon which can be easily found in Basement Floor 1. It evolves into {{bp|Parasect}}. It has numerous weaknesses and its stats are quite poor (especially Speed), so using it isn't recommendable. | |||
| [[File:Pokemon 035Clefairy.png|Clefairy|left]] Clefairy the Moon Pokémon. It has some decent attacks and some very useful egg moves, though its Attack isn't that high. It is a bit difficult to find, but it can be bought at Celadon City. It evolves into {{bp|Clefable}} by using the Moon Stone. | |||
|} | |||
{{Footer Nav|game=Pokémon FireRed and LeafGreen|prevpage=Route 3|nextpage=Route 4}} | {{Footer Nav|game=Pokémon FireRed and LeafGreen|prevpage=Route 3|nextpage=Route 4}} | ||
Revision as of 16:25, 27 July 2012
There are three different levels in Mt. Moon, populated by four types of Pokémon and multiple trainers. Also along the way, you'll notice that the criminal gang Team Rocket is carrying out an operation in Mt. Moon, and it's up to you to blow their operation wide open!
There's a rare candy within Mt. Moon, but save them for now. Your Pokemon level up too fast right now to justify using a rare candy.
Items
- TM09 Bullet Seed (F1)
- Parlyz Heal (F1)
- Star Piece (BF2: 1st ladder)
- Potion (F1)
- Rare Candy (F1)
- Escape Rope (F1)
- Ether (BF2: 2nd ladder - hidden in the lone rock)
- TM46 Thief (BF2)
- Moonstone ×2 (F1),(BF2: hidden in rock before you choose a fossil)
- Revive (BF2: last ladder)
- Helix Fossil (BF2, can choose only 1 fossil), can be resurrected into Omanyte.
- Dome Fossil (BF2, can choose only 1 fossil), can be resurrected into Kabuto
- Antidote (BF2)
- Tinymushroom ×3 (Hidden on BF1)
Floor 1
| FireRed | Level | Encounter Rate | LeafGreen | Level | Encounter Rate |
|---|---|---|---|---|---|
| 7-10 | 69% | 7-10 | 69% | ||
| 7-9 | 25% | 7-9 | 25% | ||
| 8 | 5% | 8 | 5% | ||
| 8 | 1% | 8 | 1% |
| Name | 1st | 2nd | 3rd | Money | |
|---|---|---|---|---|---|
| 1 | File:Pokemon FRLG BugCatcher.pngKent | ||||
| 2 | |||||
| 3 | File:Pokemon FRLG SuperNerd.pngJovan | ||||
| 4 | File:Pokemon FRLG BugCatcher.pngRobby | ||||
| 5 | |||||
| 6 | |||||
| 7 |  Marcos Marcos
|
Basement Floor 1

| FireRed | Level | Encounter Rate | LeafGreen | Level | Encounter Rate |
|---|---|---|---|---|---|
| 5-10 | 100% | 5-10 | 100% |
Basement Floor 2

| FireRed | Level | Encounter Rate | LeafGreen | Level | Encounter Rate |
|---|---|---|---|---|---|
| 8-11 | 49% | 8-11 | 49% | ||
| 9-10 | 30% | 9-10 | 30% | ||
| 10-12 | 15% | 10-12 | 15% | ||
| 10-12 | 6% | 10-12 | 6% |
| Name | 1st | 2nd | 3rd | Money | |
|---|---|---|---|---|---|
| 8 | |||||
| 9 | |||||
| 10 | |||||
| 11 | |||||
| 12 | File:Pokemon FRLG SuperNerd.pngMiguel |
| #41 Zubat | #74 Geodude |
|---|---|
 |
 |
| #46 Paras | #35 Clefairy |
 |
 |