(Wikify?) |
(removed redundancy) |
||
| (28 intermediate revisions by 17 users not shown) | |||
| Line 1: | Line 1: | ||
{{Header Nav|game=Zelda II: The Adventure of Link}} | {{Header Nav|game=Zelda II: The Adventure of Link}} | ||
== Horsehead == | == Horsehead == | ||
[[Image:Adventure of Link Horsehead.png|left]] | [[Image:Adventure of Link Horsehead.png|left]] | ||
{| {{prettytable|float=right|text center=1|style=width:300px}} | |||
!width="36%"| Power Level | |||
|width="8%"| 1 ||width="8%"| 2 ||width="8%"| 3 ||width="8%"| 4 ||width="8%"| 5 ||width="8%"| 6 ||width="8%"| 7 ||width="8%"| 8 | |||
|- | |||
! Hits Required | |||
| 16 || 11 || 8 || 6 || 4 || 3 || 2 || 2 | |||
|} | |||
{| | |||
| | |||
*'''Hit Points''': 32 | |||
*'''Offense''': 24 | |||
*'''Experience Points''': 50 | |||
|} | |||
The ''Shield'' and ''Jump'' spells will aid you against Horsehead. ''Shield'' will substantially reduce the damage inflicted by his mace attack, while ''Jump'' will make it easier to target Horsehead's weakpoint. Simply jump and thrust at the boss' face to land a hit. Try moving away quickly, as he will usually counterattack if you come close to him. | |||
{{-}} | {{-}} | ||
== Helmethead == | == Helmethead == | ||
[[Image:Adventure of Link Helmethead.png|left]] | [[Image:Adventure of Link Helmethead.png|left]] | ||
{| {{prettytable|float=right|text center=1|style=width:300px}} | |||
!width="36%"| Power Level | |||
|width="8%"| 1 ||width="8%"| 2 ||width="8%"| 3 ||width="8%"| 4 ||width="8%"| 5 ||width="8%"| 6 ||width="8%"| 7 ||width="8%"| 8 | |||
|- | |||
! Hits Required | |||
| 24 || 16 || 12 || 8 || 6 || 4 || 3 || 2 | |||
|} | |||
{| | |||
| | |||
*'''Hit Points''': 48 | |||
*'''Offense''': 16 | |||
*'''Experience Points''': 200 | |||
|} | |||
Like the Horsehead strategy mentioned above, you will need to jump and strike at the boss' head. However, the first two blows you land will cause a helmet to fall off and float around the room, firing projectiles at you. After the second hit, his head will be exposed and you can inflict damage on him. Since Helmethead repeats this pattern, it's recommended that you get close and attempt to land as many hits as quickly as possible. | |||
{{-}} | {{-}} | ||
== Horseback Ironknuckle== | == Horseback Ironknuckle== | ||
[[Image:Adventure of Link Ironknuckle Horseback.png|left]] | [[Image:Adventure of Link Ironknuckle Horseback.png|left]] | ||
{| {{prettytable|float=right|text center=1|style=width:300px}} | |||
!width="36%"| Power Level | |||
|width="8%"| 1 ||width="8%"| 2 ||width="8%"| 3 ||width="8%"| 4 ||width="8%"| 5 ||width="8%"| 6 ||width="8%"| 7 ||width="8%"| 8 | |||
|- | |||
! Hits to dismount | |||
| 17 || 13 || 10 || 7 || 5 || 4 || 3 || 2 | |||
|- | |||
! Hits to defeat | |||
| 23 || 16 || 12 || 8 || 6 || 4 || 3 || 2 | |||
|} | |||
{| | |||
| | |||
*'''Hit Points''': | |||
*'''Offense''': 48 | |||
*'''Experience Points''': 300 is reported but 301 points are awarded | |||
|} | |||
This battle has two stages: horseback, and on foot. In the first phase, the horse will charge past you at high speed. It's best to engage the ''Jump'' spell to better avoid these charges. If you learned the Downward Thrust technique from the soldier in Mido Town, then defeating the horseback form will simply require a few downward blows to the horse's head. Otherwise, try using a few well-placed jumping thrusts to the horse's face while the boss is stationary. Once the horse is defeated and the Blue Ironknuckle begins to pursue you on foot, try a few jumping thrusts to the his head to land attacks easily. Beware that the Ironknuckle will attack with a flurry of sword beams immediately after he dismounts; it may be best to wait for this flurry to end before approaching. Note that although Ironknuckles usually guard against melee attacks, jumping and then landing blows to the head will usually slip past their defense. | |||
NOTE: The actual health of each part of this boss is not consistent as the chart shows. This is because the Ironknuckle will dismount when the horse is sufficiently weakened, not when it is completely out of health. Furthermore, depending on the damage inflicted prior, the Ironknuckle itself may not begin the second phase with full health. | |||
{{-}} | {{-}} | ||
== Carock == | == Carock == | ||
[[Image:Adventure of Link Carock.png|left]] | [[Image:Adventure of Link Carock.png|left]] | ||
{| {{prettytable|float=right|text center=1|style=width:300px}} | |||
!width="36%"| Power Level | |||
|width="8%"| 1 ||width="8%"| 2 ||width="8%"| 3 ||width="8%"| 4 ||width="8%"| 5 ||width="8%"| 6 ||width="8%"| 7 ||width="8%"| 8 | |||
|- | |||
! Magic Reflects | |||
| 8 || 8 || 8 || 8 || 8 || 8 || 8 || 8 | |||
|} | |||
{| | |||
| | |||
*'''Hit Points''': 8 | |||
*'''Offense''': 48 | |||
*'''Experience Points''': 300 is reported but 301 points are awarded | |||
|} | |||
If you did not obtain the ''Reflect'' spell from Darunia Town, you will not be able to defeat Carock. (Rescue the lost child from the Maze Island to complete this sub-quest and procure the spell) To damage Carock, you must first cast ''Reflect'' to enhance your shield with reflective abilities. Then, squat and face Carock when he launches a magic spell at you—your shield will reflect it back, damaging him in the process. To remain safe during this battle, you can usually stand in either corner of the room, duck down and remain stationary while the boss defeats itself. The boss usually will not appear too close to the edges of the room. | |||
{{-}} | {{-}} | ||
== Boss Gooma== | == Boss Gooma== | ||
[[Image:Adventure of Link Boss Gooma.png|left]] | [[Image:Adventure of Link Boss Gooma.png|left]] | ||
{| {{prettytable|float=right|text center=1|style=width:300px}} | |||
!width="36%"| Power Level | |||
|width="8%"| 1 ||width="8%"| 2 ||width="8%"| 3 ||width="8%"| 4 ||width="8%"| 5 ||width="8%"| 6 ||width="8%"| 7 ||width="8%"| 8 | |||
|- | |||
! Hits Required | |||
| 72 || 48 || 36 || 24 || 16 || 12 || 8 || 6 | |||
|} | |||
{| | |||
| | |||
*'''Hit Points''': 144 | |||
*'''Offense''': 112 | |||
*'''Experience Points''': 500 | |||
|} | |||
Unlike the Horsehead and Helmethead bosses, you cannot effectively use the downward thrust on this boss (If you wait until right before you take damage from his head and use your downward thrust, you will damage him. If you're too early, you will just bounce off of him and do no damage. If you're too late, you will be damaged and thrown back). You must stab his body in order to damage him; however, his flail has quite a long range, and moving out of reach can be difficult. An effective strategy is to cast the ''Jump'' spell, jump over his flail and stab his body when you land. He is exclusively in the English localized release. | |||
{{-}} | {{-}} | ||
== Barba == | == Barba == | ||
[[Image:Adventure of Link Barba.png|left]] | [[Image:Adventure of Link Barba.png|left]] | ||
{| {{prettytable|float=right|text center=1|style=width:300px}} | |||
!width="36%"| Power Level | |||
|width="8%"| 1 ||width="8%"| 2 ||width="8%"| 3 ||width="8%"| 4 ||width="8%"| 5 ||width="8%"| 6 ||width="8%"| 7 ||width="8%"| 8 | |||
|- | |||
! Hits Required | |||
| 96 || 64 || 48 || 32 || 22 || 16 || 11 || 8 | |||
|} | |||
{| | |||
| | |||
*'''Hit Points''': 192 | |||
*'''Offense''': 112 | |||
*'''Experience Points''': 700 | |||
|} | |||
Barba will generally appear from any of the three lava pits in its room and breathe fire in your direction before bobbing back down into the lava. You may only damage the boss by striking its head. This can be done by either thrusting at it as it rises from the lava or sinks back, using the jump spell to reach the boss after it has risen from the lava. Be careful not to be knocked into one of the lava pits, as a single hit from Barba's breathe attack can easily push you backwards just enough to fall off the narrow platform. | |||
{{-}} | {{-}} | ||
== Thunderbird == | == Thunderbird == | ||
[[Image:Adventure of Link Thunderbird.png|left]] | [[Image:Adventure of Link Thunderbird.png|left]] | ||
{| {{prettytable|float=right|text center=1|style=width:300px}} | |||
!width="36%"| Power Level | |||
|width="8%"| 1 ||width="8%"| 2 ||width="8%"| 3 ||width="8%"| 4 ||width="8%"| 5 ||width="8%"| 6 ||width="8%"| 7 ||width="8%"| 8 | |||
|- | |||
! Hits Required | |||
| 96 || 64 || 48 || 32 || 22 || 16 || 11 || 8 | |||
|} | |||
{| | |||
| | |||
*'''Hit Points''': 192 | |||
*'''Offense''': 112<ref>The Thunderbird's strength is unique in that is he capable of doing greater than normal damage for any enemy with 112 strength. See [[Zelda II: The Adventure of Link/Link|Link's page]] for more information.</ref> | |||
*'''Experience Points''': 1,000 | |||
|} | |||
If you did not obtain the ''Thunder'' spell from Old Kasuto, you will be unable to defeat this boss (collect every Magic Container and speak to the old man in Old Kasuto to procure this spell). Start the battle by casting the ''Thunder'' spell, which will reveal the Thunderbird's face, the only vulnerable point on its body. Be sure to have sufficient magic before entering into this battle. Cast ''Jump'' and attempt to target the boss' headdress while avoiding the fireballs it launches. If you have additional magic remaining, the ''Shield'' spell can also help here, as the boss' fire attack inflicts a lot of damage. If your magic is at level 8, you should also have enough magic to cast ''Reflect'' magic, which can help block some of the fireballs. | |||
{{reflist}} | |||
{{-}} | {{-}} | ||
== Shadow Link == | == Shadow Link == | ||
[[Image:Adventure of Link Shadow Link.png|left]] | [[Image:Adventure of Link Shadow Link.png|left]] | ||
{ | {| | ||
Link's shadow | | | ||
*'''Hit Points''': 8 | |||
*'''Offense''': | |||
*'''Experience Points''': 0 | |||
|} | |||
Link's shadow has every ability that Link does. He will block all of Link's attack high and low, and he will thrust his sword continuously. You will have to attack quickly to have any chance to damage him. The body of the shadow cannot harm Link, only the sword can. Therefore, you can jump into him and attempt to strike quickly before the shadow has an attempt to reposition himself. The Shadow Link is the very last foe that you will fight in the entire game. | |||
{{Footer Nav|game=Zelda II: The Adventure of Link|prevpage=Palace Enemies|nextpage=Walkthrough}} | {{Footer Nav|game=Zelda II: The Adventure of Link|prevpage=Palace Enemies|nextpage=Walkthrough}} | ||
Latest revision as of 01:20, 24 November 2019
Horsehead[edit]
| Power Level | 1 | 2 | 3 | 4 | 5 | 6 | 7 | 8 |
|---|---|---|---|---|---|---|---|---|
| Hits Required | 16 | 11 | 8 | 6 | 4 | 3 | 2 | 2 |
|
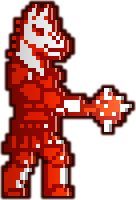
The Shield and Jump spells will aid you against Horsehead. Shield will substantially reduce the damage inflicted by his mace attack, while Jump will make it easier to target Horsehead's weakpoint. Simply jump and thrust at the boss' face to land a hit. Try moving away quickly, as he will usually counterattack if you come close to him.
Helmethead[edit]

| Power Level | 1 | 2 | 3 | 4 | 5 | 6 | 7 | 8 |
|---|---|---|---|---|---|---|---|---|
| Hits Required | 24 | 16 | 12 | 8 | 6 | 4 | 3 | 2 |
|
Like the Horsehead strategy mentioned above, you will need to jump and strike at the boss' head. However, the first two blows you land will cause a helmet to fall off and float around the room, firing projectiles at you. After the second hit, his head will be exposed and you can inflict damage on him. Since Helmethead repeats this pattern, it's recommended that you get close and attempt to land as many hits as quickly as possible.
Horseback Ironknuckle[edit]
| Power Level | 1 | 2 | 3 | 4 | 5 | 6 | 7 | 8 |
|---|---|---|---|---|---|---|---|---|
| Hits to dismount | 17 | 13 | 10 | 7 | 5 | 4 | 3 | 2 |
| Hits to defeat | 23 | 16 | 12 | 8 | 6 | 4 | 3 | 2 |
|
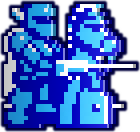
This battle has two stages: horseback, and on foot. In the first phase, the horse will charge past you at high speed. It's best to engage the Jump spell to better avoid these charges. If you learned the Downward Thrust technique from the soldier in Mido Town, then defeating the horseback form will simply require a few downward blows to the horse's head. Otherwise, try using a few well-placed jumping thrusts to the horse's face while the boss is stationary. Once the horse is defeated and the Blue Ironknuckle begins to pursue you on foot, try a few jumping thrusts to the his head to land attacks easily. Beware that the Ironknuckle will attack with a flurry of sword beams immediately after he dismounts; it may be best to wait for this flurry to end before approaching. Note that although Ironknuckles usually guard against melee attacks, jumping and then landing blows to the head will usually slip past their defense.
NOTE: The actual health of each part of this boss is not consistent as the chart shows. This is because the Ironknuckle will dismount when the horse is sufficiently weakened, not when it is completely out of health. Furthermore, depending on the damage inflicted prior, the Ironknuckle itself may not begin the second phase with full health.
Carock[edit]
| Power Level | 1 | 2 | 3 | 4 | 5 | 6 | 7 | 8 |
|---|---|---|---|---|---|---|---|---|
| Magic Reflects | 8 | 8 | 8 | 8 | 8 | 8 | 8 | 8 |
|
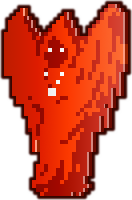
If you did not obtain the Reflect spell from Darunia Town, you will not be able to defeat Carock. (Rescue the lost child from the Maze Island to complete this sub-quest and procure the spell) To damage Carock, you must first cast Reflect to enhance your shield with reflective abilities. Then, squat and face Carock when he launches a magic spell at you—your shield will reflect it back, damaging him in the process. To remain safe during this battle, you can usually stand in either corner of the room, duck down and remain stationary while the boss defeats itself. The boss usually will not appear too close to the edges of the room.
Boss Gooma[edit]
| Power Level | 1 | 2 | 3 | 4 | 5 | 6 | 7 | 8 |
|---|---|---|---|---|---|---|---|---|
| Hits Required | 72 | 48 | 36 | 24 | 16 | 12 | 8 | 6 |
|
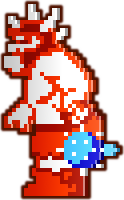
Unlike the Horsehead and Helmethead bosses, you cannot effectively use the downward thrust on this boss (If you wait until right before you take damage from his head and use your downward thrust, you will damage him. If you're too early, you will just bounce off of him and do no damage. If you're too late, you will be damaged and thrown back). You must stab his body in order to damage him; however, his flail has quite a long range, and moving out of reach can be difficult. An effective strategy is to cast the Jump spell, jump over his flail and stab his body when you land. He is exclusively in the English localized release.
Barba[edit]
| Power Level | 1 | 2 | 3 | 4 | 5 | 6 | 7 | 8 |
|---|---|---|---|---|---|---|---|---|
| Hits Required | 96 | 64 | 48 | 32 | 22 | 16 | 11 | 8 |
|
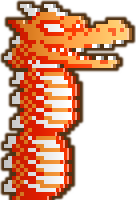
Barba will generally appear from any of the three lava pits in its room and breathe fire in your direction before bobbing back down into the lava. You may only damage the boss by striking its head. This can be done by either thrusting at it as it rises from the lava or sinks back, using the jump spell to reach the boss after it has risen from the lava. Be careful not to be knocked into one of the lava pits, as a single hit from Barba's breathe attack can easily push you backwards just enough to fall off the narrow platform.
Thunderbird[edit]
| Power Level | 1 | 2 | 3 | 4 | 5 | 6 | 7 | 8 |
|---|---|---|---|---|---|---|---|---|
| Hits Required | 96 | 64 | 48 | 32 | 22 | 16 | 11 | 8 |
|
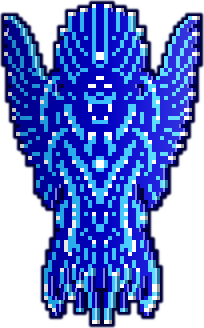
If you did not obtain the Thunder spell from Old Kasuto, you will be unable to defeat this boss (collect every Magic Container and speak to the old man in Old Kasuto to procure this spell). Start the battle by casting the Thunder spell, which will reveal the Thunderbird's face, the only vulnerable point on its body. Be sure to have sufficient magic before entering into this battle. Cast Jump and attempt to target the boss' headdress while avoiding the fireballs it launches. If you have additional magic remaining, the Shield spell can also help here, as the boss' fire attack inflicts a lot of damage. If your magic is at level 8, you should also have enough magic to cast Reflect magic, which can help block some of the fireballs.
- ↑ The Thunderbird's strength is unique in that is he capable of doing greater than normal damage for any enemy with 112 strength. See Link's page for more information.
Shadow Link[edit]

|
Link's shadow has every ability that Link does. He will block all of Link's attack high and low, and he will thrust his sword continuously. You will have to attack quickly to have any chance to damage him. The body of the shadow cannot harm Link, only the sword can. Therefore, you can jump into him and attempt to strike quickly before the shadow has an attempt to reposition himself. The Shadow Link is the very last foe that you will fight in the entire game.
